How to Setup and Install Google Analytics 4 with Google Tag Manager
If you want to measure the performance of your website, you must use some web analytics tool. Google Analytics 4 is one of them. It allows you to see things like the number of sessions, visitors, most popular traffic sources, etc.
To get started, first, you need to install GA4 on a website. And in this blog post, I will show you how to do that.
Here’s the process of how to install Google Analytics 4 with Google Tag Manager:
- Create a new GA4 property
- Create a data stream (in this blog post, I focused on the Web stream)
- Copy the Measurement ID
- Create a Google Analytics 4 Configuration tag
- Paste the Measurement ID and set the tag to fire on All Pages
- Preview/test the new tag
- Publish the changes in Google Tag Manager
If you are currently using the older version of Google Analytics
What if you already use the older version of Google Analytics on your website? Should you ditch it completely and replace it with Google Analytics 4? Should you use them both?
In a nutshell, Google Analytics 3 (Universal Analytics) stops collecting data on July 1st, 2023. That’s why you have to switch to another tool (e.g. GA4) as soon as possible.
This article is your first step of the migration process.
Create a Google Analytics 4 Property & Data Stream
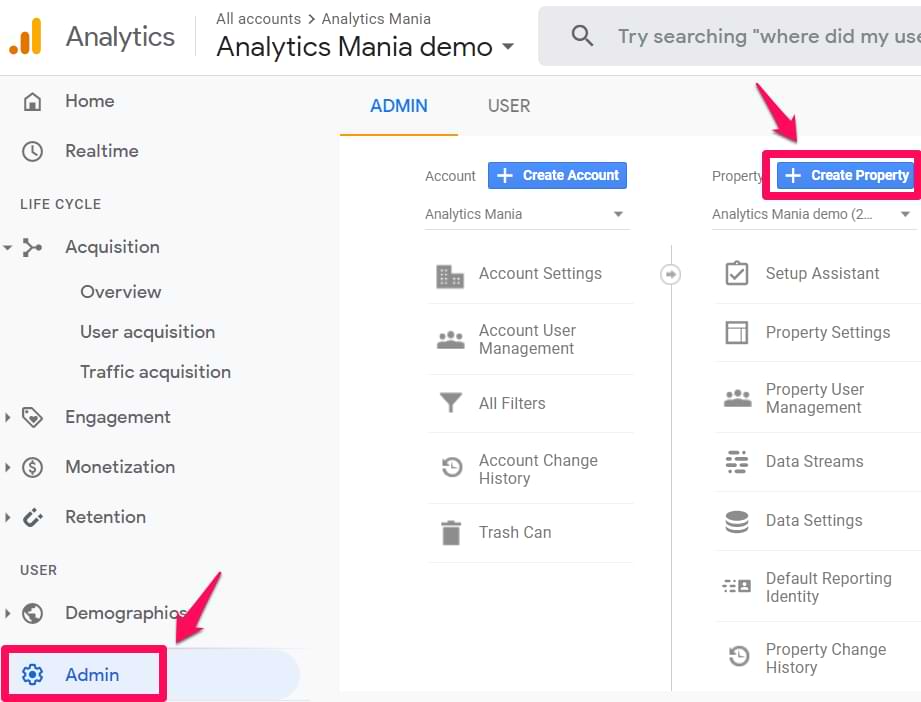
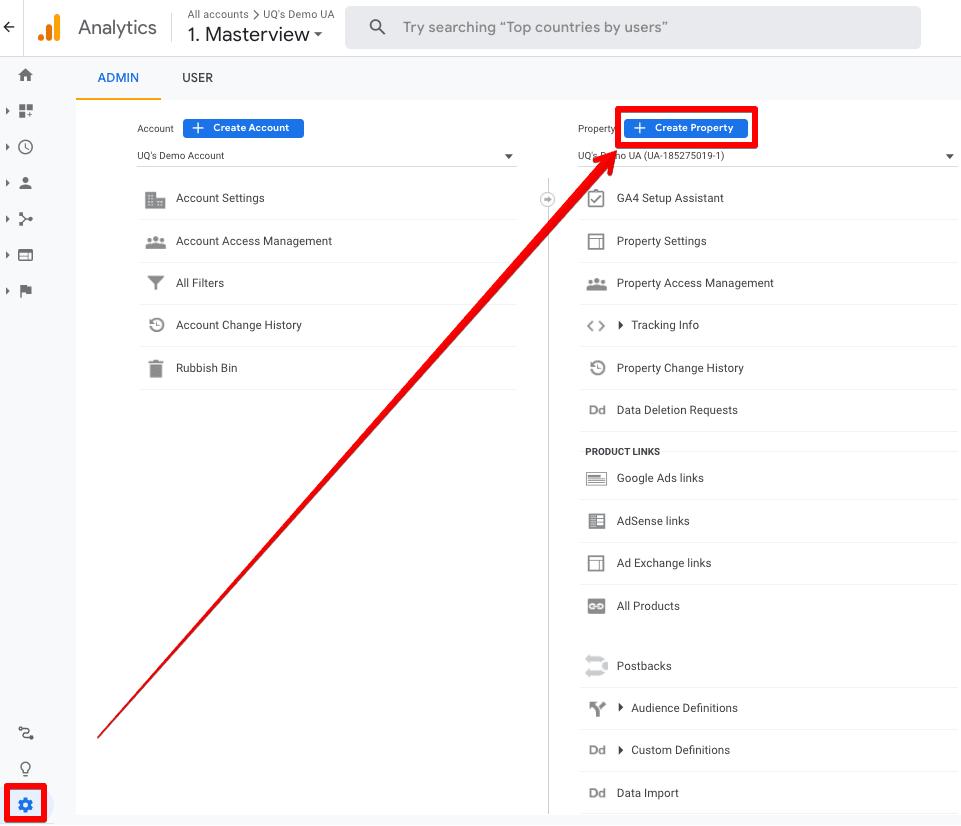
If you want to create a new Google Analytics 4 property (and you are not using the Upgrade to GA4 option), then go to the Admin section of your Google Analytics interface (by clicking the Admin at the bottom-left corner) and then (in the Property section) click Create Property.
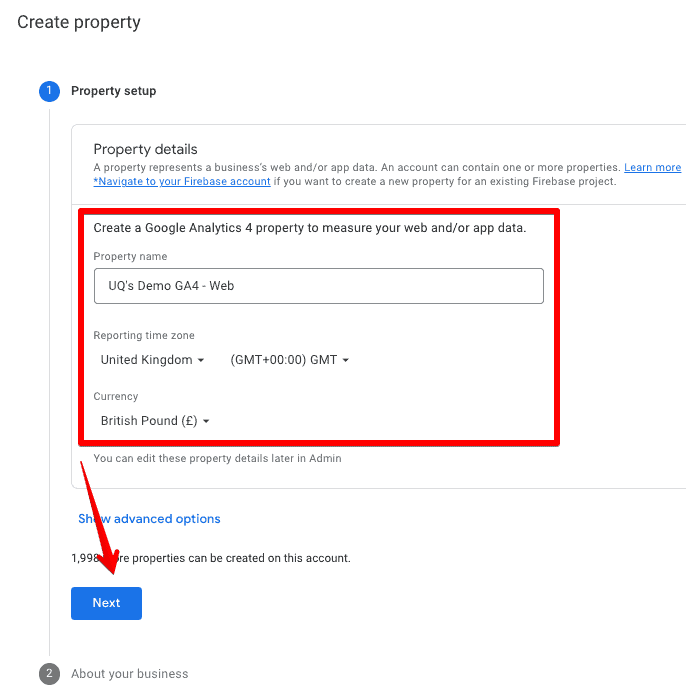
Then enter the name of your property. It might be the name of your website, of your company, a brand, etc. Choose your company’s country, reporting time zone, and the main currency that your business operates in.

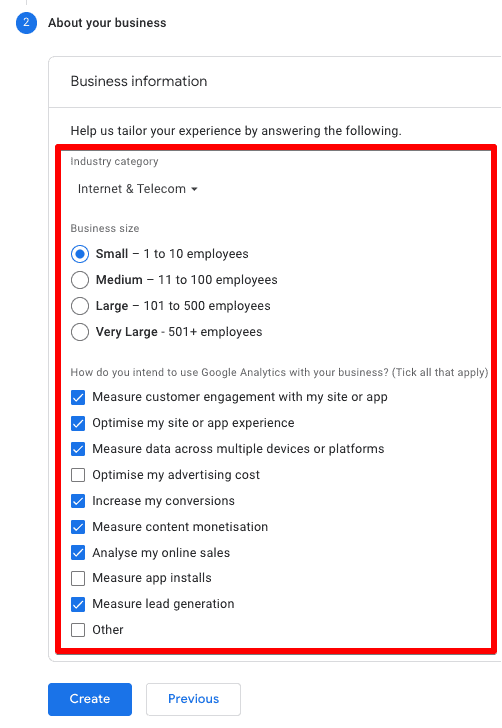
Then press Next, and answer several questions. Then you will need to select your business objectives. Based on these choices, the reports that you will have in the interface will change too. To make things simpler right now, select Get baseline reports.

Click Create.
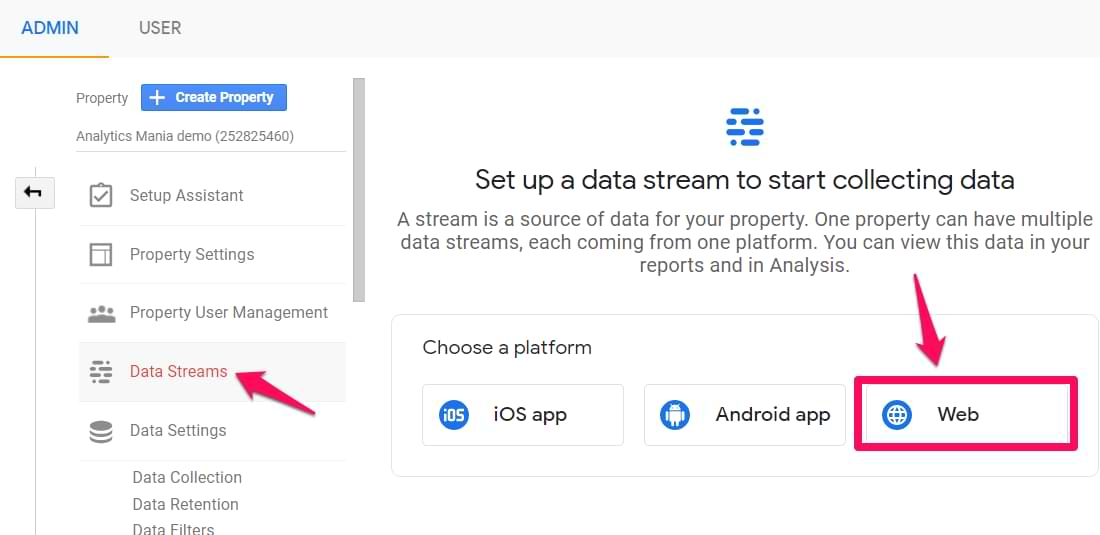
The next step to complete is to configure your first data stream. It is a data source from which events will be sent to your Google Analytics 4 property. You can have multiple data sources in a single property. For example, three web properties, 1 for Android app, and 1 for an iOS app.
In this blog post, I will focus on a Web stream. Select it.
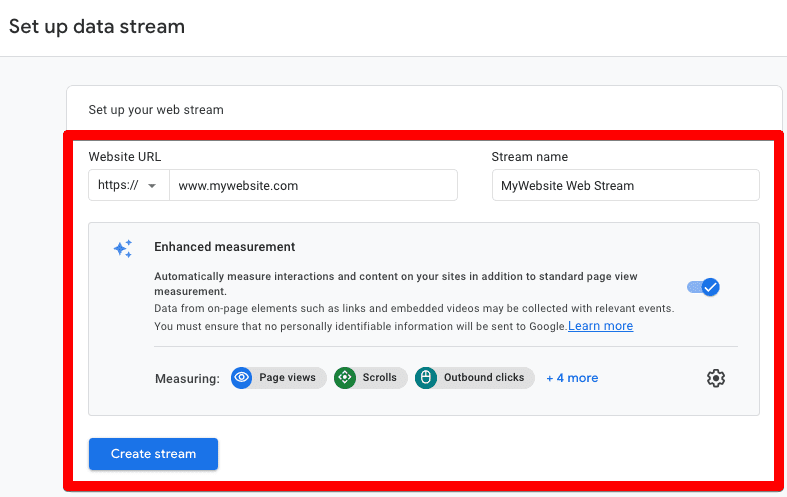
Then enter the URL of your website (for example, https://www.mywebsite.com). Note that the protocol (https) is already selected. After that, enter the name of your website.
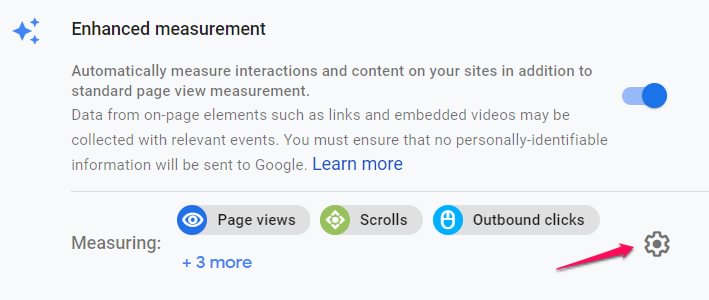
When you create a web data stream in Google Analytics 4, you have the option to enable/disable Enhanced Measurement. It is designed to help marketers get as many events in the reports as possible without the need to cooperate with developers or configure them in Google Tag Manager.

By default, this feature is enabled and will automatically track the following events:
- Page view (event name: page_view)
- Scroll (event name: scroll)
- Outbound link click (event name: click with the parameter outbound: true)
- Site search (event name: view_search_results)
- Video Engagement (events: video_start, video_progress, video_complete)
- File Download (event name: file_download)
- Form events (form_start, form_submit)
If you want, you can disable/enable events individually. You can do that by clicking the gear icon in the Enhanced Measurement section and then clicking the toggle buttons.
When you’re ready, press the Create stream button.
Install Google Analytics 4 with Google Tag Manager
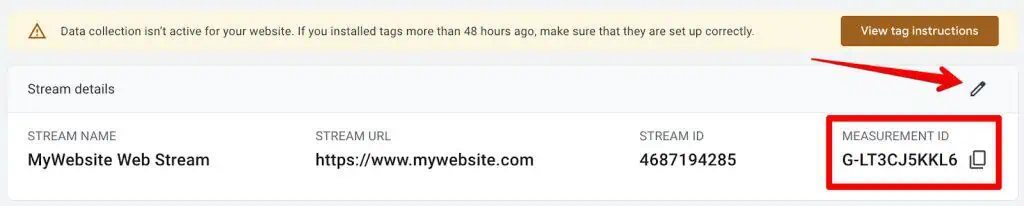
When you create a data stream (web), you will see a Measurement ID.

At the top-right corner, you will see the tracking ID of your new property. Copy it. We’ll need to use it in Google Tag Manager.
By the way, if you ever get lost in the GA4 interface, and you need to revisit this page, go to Admin > Data Streams > choose your most recently created stream, and then you will return to the same window that I have displayed in the screenshot above.
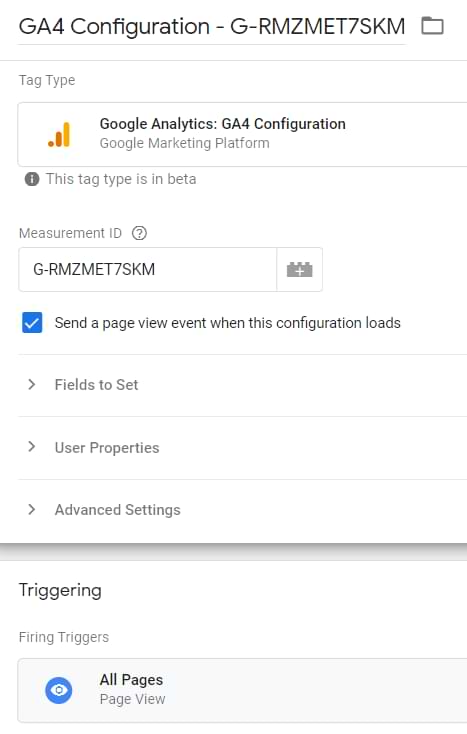
Then go to your Google Tag Manager container (if you haven’t worked with it, here’s a tutorial on how to get started) > Tags > New and choose GA4 configuration.
In the Measurement ID field, enter the ID that you copied in the GA4 interface. Keep the Send a page view event when this configuration loads if you want to automatically track pageviews.
Usually, that’s ok keep it enabled. Still, in some situations, e.g. on single-page applications, it is more recommended to disable the pageview checkbox and create just a standalone configuration tag. You can read more about that here.
In the Triggering section, select All Pages and then name the tag, e.g. GA4 – Pageview.
Check the DebugView in Google Analytics 4
Enable the preview mode to test your changes.
Once you enable the preview mode, you should see the new GA4 tag among the tags that fired.

Once you configure your events, it’s time to test them. The primary feature built for debugging GA 4 data is the DebugView section.
Head over to your Google Analytics 4 account > Admin > Debugview.

Most likely, you will not see any data there (yet). That’s because that data in the DebugView is visible ONLY when the debug mode in GA4 is enabled. Do not mix this with the GTM Preview and Debug mode. They are two different beasts.
To enable the debug mode in GA4, you have several options (any of them will work):
- Enable the GA debugger Chrome extension
- Send a debug_mode parameter together with an event
- Have enabled Google Tag Manager’s Preview mode on a page that you’re debugging
In the case of the first option, install the extension here, and then click its icon (so you can see the ON ribbon). From this moment, you will start seeing your events coming into DebugView.
The other option is to send a debug_mode parameter with every event that you wish to see in the DebugView.
In Google Tag Manager, you can do that by opening the GA4 Configuration tag and adding the following parameter:
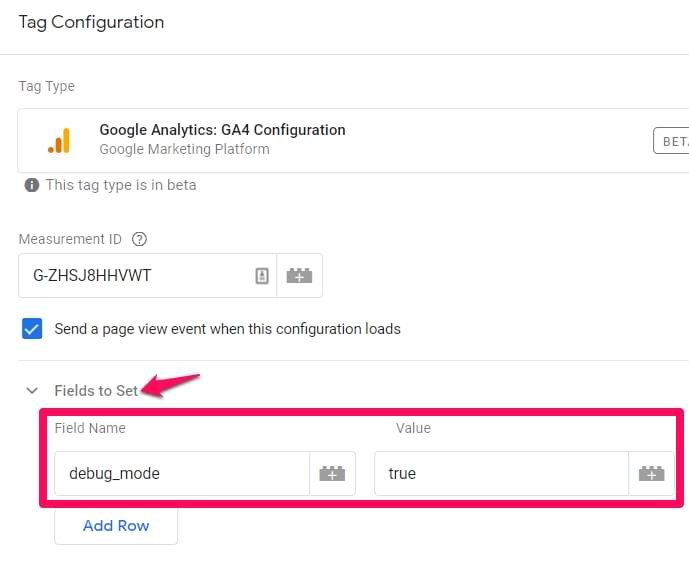
If the debug_mode parameter contains any value, the event will be seen in DebugView. If you are using a hardcoded gtag.js, here are the instructions for including the debug_mode parameter.
But since we are working with Google Tag Manager, having the GTM Preview mode enabled automatically sets the debug_mode to true. Thus the data will start appearing in the GA4 DebugView.
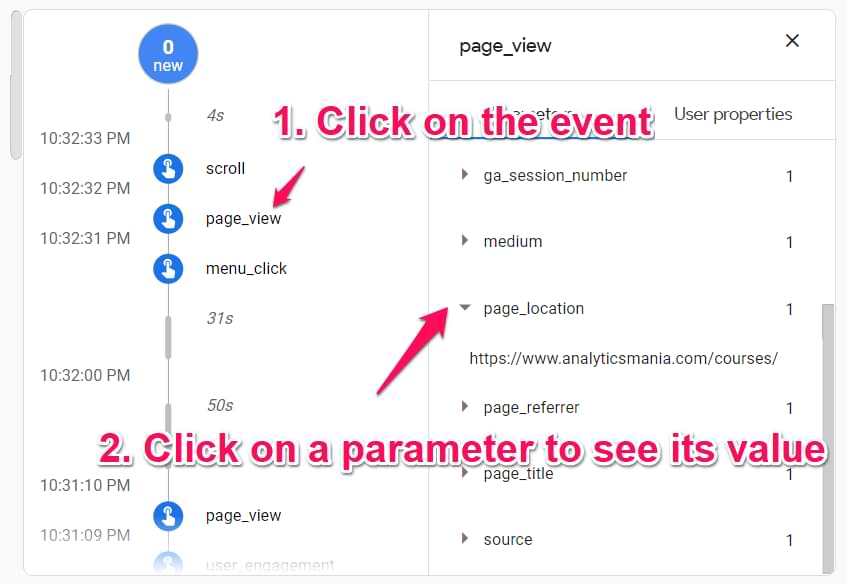
When you start seeing data in the DebugView, you can click on every individual event, and then a list of parameters will be displayed.
Click on that parameter to see the value that was received by GA4. Now that is some granular debugging!
However, I have noticed some delays between the event actually happening on a website and then appearing in DebugView. Sometimes, I have to wait for several minutes until the data come in. That’s a bit unfortunate, and hopefully, the team behind Google Analytics 4 will improve this in the future.
Sometimes, refreshing DebugView’s page helps too.
Also, ensure you have selected the correct Debug device in the top left corner.
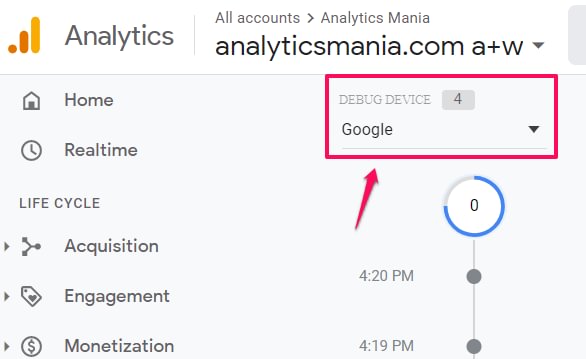
If multiple visitors have enabled the debug view (e.g. they all have enabled the Chrome extension), you will see multiple devices there and it might require some time to find yourself. This especially applies to my blog, when many of my readers have enabled the GA Debugger Extension, and I have to guess which device (out of the other 15) is mine
Anyway, once you start seeing data in DebugView, things will look like this.

Publish your changes in Google Tag Manager
Once you made sure that the data is coming in and it is displayed properly, you should submit your GA4 changes in the GTM container and publish it.
You can do that by clicking the SUBMIT button in the top right corner and then completing all the other steps that the user interface asks you to do.

After that, you should soon start seeing the new data coming in your real-time reports as well.
Google Analytics 4 real-time reports
On the left sidebar of the Google Analytics 4 interface, go to Realtime. This is where you will see the data coming into your reports. Unlike in the previous version (Universal Analytics), the new report offers you capabilities to see the data on a much more granular level.
First, you will see a map and a bunch of cards with traffic sources, the most popular events, and the number of users in the last 30 minutes.
You can also take a look at the snapshot of an individual user. You can do that by clicking the View user snapshot button in the top right corner.
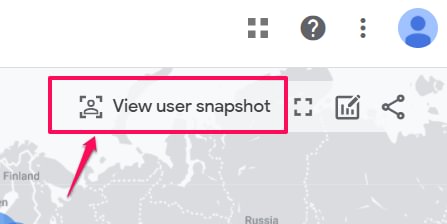
Then, you will see a stream of all events of that particular user, you can click on them (just like in the DebugView) to see things on a more granular level. If you wish to look at another user/visitor, you can click the button here:
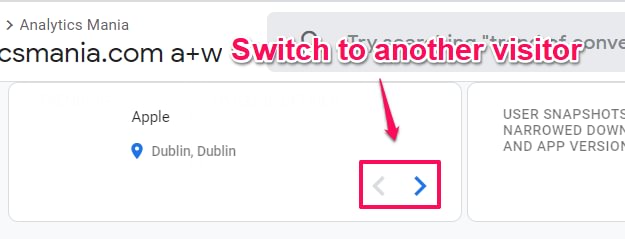
To exit the snapshot, press the Exit snapshot button in the top right corner.
What’s next? More events!
I will not go into too much details here, but here are several things for you to configure next:
- Exclude your internal traffic
- Increase data retention to 14 months (because the default for most of the data is two months)
- Configure cross-domain tracking
Frequently Asked Questions
Here are some additional questions that you might have that I wanted to address.
What if I already have Universal Analytics installed on my site? Please refer to my blog post on how to upgrade to Google Analytics 4. But a short version is that you can use both GA versions simultaneously (as long as the old version still works).
What if I already have Google Analytics 4 tracking code hardcoded in the website’s source code? I would highly recommend implementing GA4 (or any other JavaScript-based marketing/analytics tool) via Google Tag Manager because of its flexibility. Click here to learn more about GTM benefits. But a short version goes like this: your developers should remove the hardcoded tracking code from your website, and you should implement Google Analytics 4 via Google Tag Manager. My Google Tag Manager Course for Beginners covers the process and tips on how to migrate hardcoded tools to Google Tag Manager.
If I already have Universal Analytics (GA3) implemented in Google Tag Manager, should I create a new GTM container for Google Analytics 4? No, you don’t need to create a new GTM container just for Google Analytics 4. Use your existing Google Tag Manager container for the new GA version as well. Google Analytics 4 requires completely different GA tags, but they can co-exist with Universal Analytics tags in the same container.
Final words on how to install Google Analytics 4
And that’s how you install Google Analytics 4 with Google Tag Manager on your website. The reason why this blog post was longer (than it should have been) is DebugView and real-time reports of GA4. I wanted to introduce them properly, and you must understand how they work.
Speaking of the process, here’s a summary:
- Create a new GA4 property
- Create a data stream (in this blog post, I focused on the Web stream)
- Copy the Measurement ID
- Create a Google Analytics 4 Configuration tag
- Paste the Measurement ID and set the tag to fire on All Pages
- Preview/test the new tag
- Publish your changes in Google Tag Manager
Got more questions? Feel free to ask in the comments below.
Whether you’ve been using web analytics tools for a long time with Universal Analytics (UA) or are just recently starting in the online world, you need some analytics tool to analyze your website’s performance.
Google’s tools are one of the most frequently used because of the wide availability of their free versions. Google Analytics 4 is Google’s latest addition to its analytical tools.
If you haven’t installed GA4 on your website, then now is the time to do so because July is only a few months away when UA will go away for good (for free users).
Sign up to the FREE GTM for Beginners Course...
GET THE FREE COURSE
The sooner you do it, the more data you will have available in your GA4 account to analyze later on because GA4 is inevitable unless you’re planning to move to other analytical tools.
There are several methods of installing GA4 on your website but using Google Tag Manager (GTM) makes things easier. You can install Google Analytics 4 with Google Tag Manager even if you’re entirely new to GTM by following the steps in this post.
Here’s the overview of what you’ll learn below:
- Why Should I Use GTM to Install GA4
- Creating a Google Analytics 4 Property
- Creating a Google Tag Manager Account
- Steps to Install Google Analytics 4 with Google Tag Manager
- Verifying GA4 Tracking
Let’s install Google Analytics 4 with Google Tag Manager and start getting all that data to analyze.
Why Should I Use GTM to Install GA4
Before we get to the how part, let’s go back to the blackboard and discuss why it’s a good idea to install Google Analytics 4 with Google Tag Manager.
Using a tag management system (TMS) like GTM helps to simplify the implementation of other tools like GA4.
All you have to do is to install the GTM container code on your website and then use TMS to install the GA4 tracking code and send events with different parameters.
It also gives you more flexibility because you can easily add or remove tags without changing your website’s code every time. This takes away the dependency on a developer at least for the simple tags.
With GTM, you can send custom events with any custom parameters more easily and you can, later on, add them as custom definitions in GA4 to view in reports.
This is one of the major reasons which can be easily overlooked – centralized tag management. GTM will allow you to manage all your tags in one place, nice and organized.
This might not seem like a lot when you just have a couple of tags, but with time, when you add more tracking to your website, you’d be so happy to see and manage them all in one place.
Lastly, one of my favorite features in GA4 is the DebugView and it lights up when you use GTM’s Preview Mode to check what data you’re sending to GA4 in real-time.
This helps us to catch any mistakes before we go ahead and implement our tracking, which saves us from polluting the data and gives us more confidence in what we see in GA4.
So there it is! Several good reasons why we should install Google Analytics 4 with Google Tag Manager.
Creating a Google Analytics 4 Property
You can’t install Google Analytics 4 with Google Tag Manager unless you create a GA4 property first.
Assuming you already have a Google Analytics account, click on the Admin cog in the bottom left → Click on the blue Create Property button under the second column.
This will open a GA4 property setup interface where you have to name your property, select the reporting time zone, and choose the currency of your business. These settings can be changed later on.
The next step is where you provide more information about your business, i.e., industry, business size, and how you intend to use GA4.
All of this info isn’t mandatory, but it helps Google to tailor your experience by providing relevant benchmarking insights to compare against.
After clicking on the Create button, you will be greeted with a screen where you’re prompted to choose your data source, aka data stream, i.e., Web, Android App, or iOS App.

After you select Web as your data stream, you have to provide some information about the website which is mainly the URL and Stream name, as well as configure Enhanced measurement settings, and click on the Create stream button.
Once you create the data stream, you can see the Measurement ID that we can use to set up tracking on the website. You can also edit the Stream Name and URL that we entered in the above step, by clicking on the pencil icon on the top right.
If you scroll down further on the same page under Events, you can find settings for Enhanced measurement, Modifying Events, and creating Custom Events.
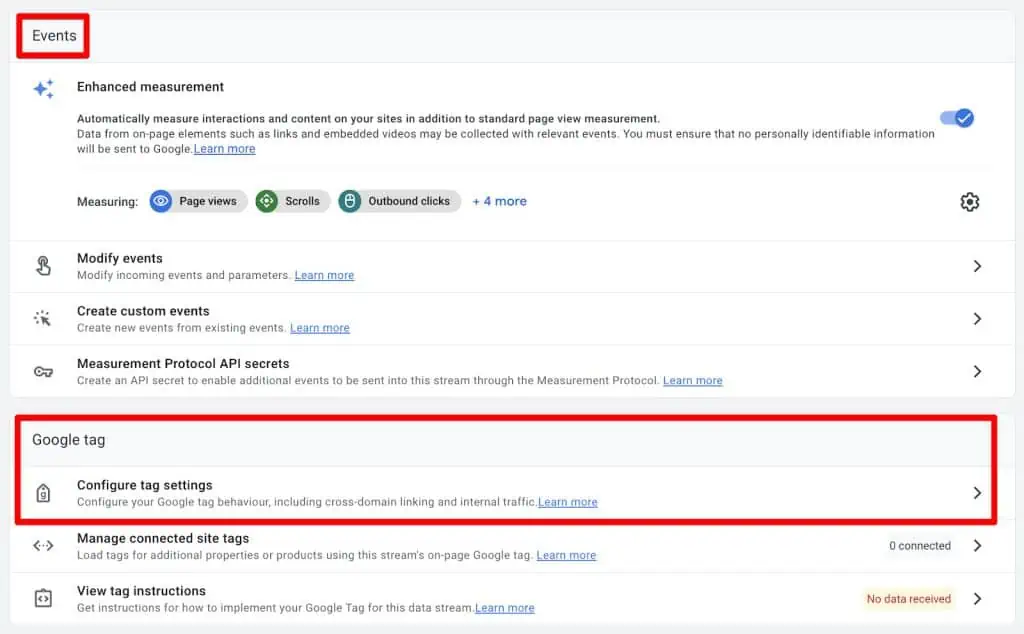
Under the Google tag section, you can configure cross-domain linking, internal traffic, and unwanted referrals, along with other settings, and find helpful instructions on how to implement the tag directly without GTM (not something we’ll cover in this blog).

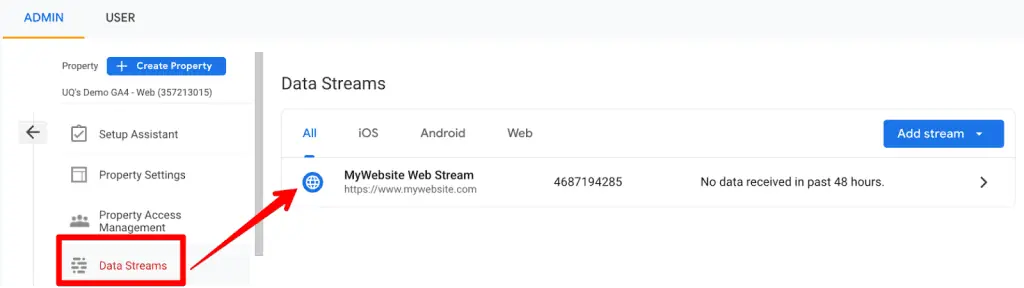
Finally, you can now see the newly created GA4 property with the web stream when you click on Data Streams under the property column of the admin panel. You can always come back and change stream details and/or the settings.
So now that one part of this puzzle is solved, we can head to GTM to complete the process there.
Creating a Google Tag Manager Account
You can skip this section if you already have a GTM account or container you want to use to install GA4 and move to the next section – Steps to Install Google Analytics 4 with Google Tag Manager.
Let’s log in to Google Tag Manager and click on the Create Account button on the right side.

This will open the account setup interface that will have two parts:
- Account setup with Account name and country.

- Container setup with Container name and Target platform (Web, iOS, Android, AMP, and Server).
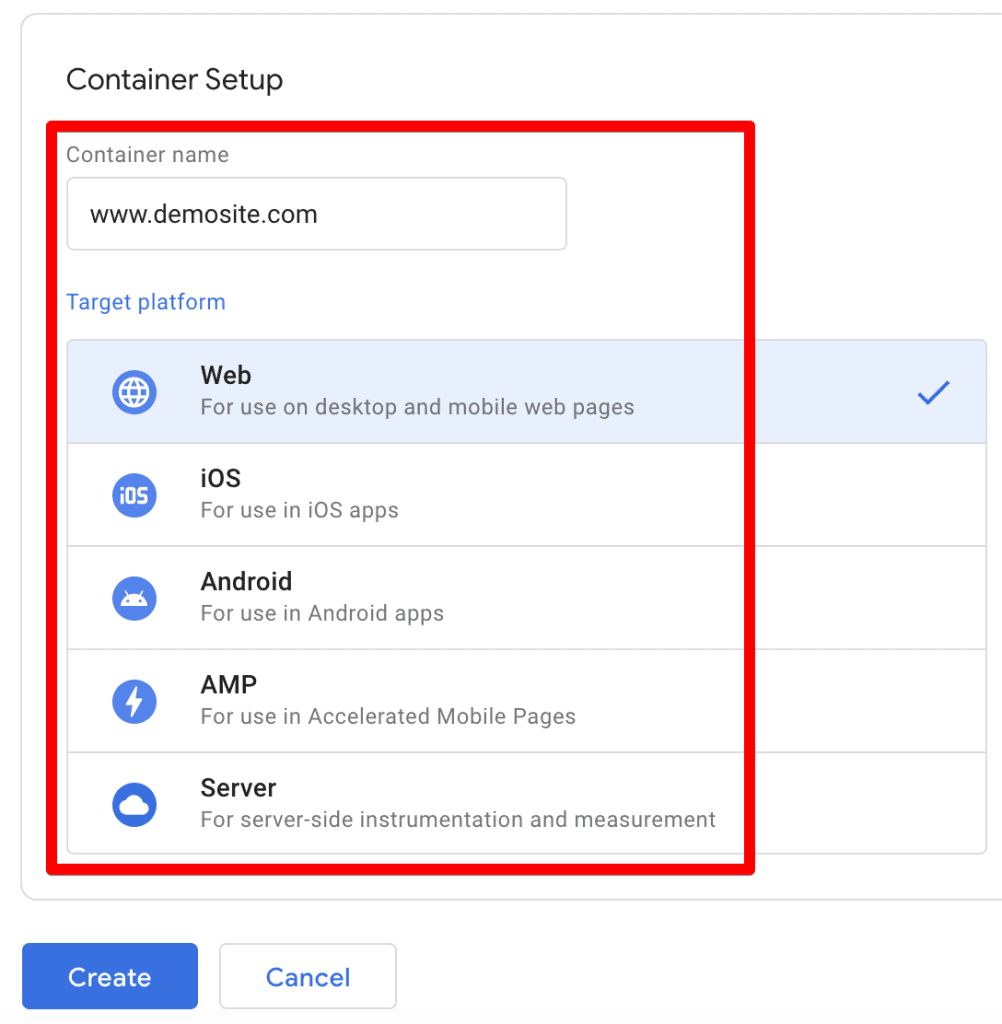
Once you click on the Create button and accept the terms of service agreement, your account will be created and you will be given the GTM code snippet that needs to be installed on your website like below:
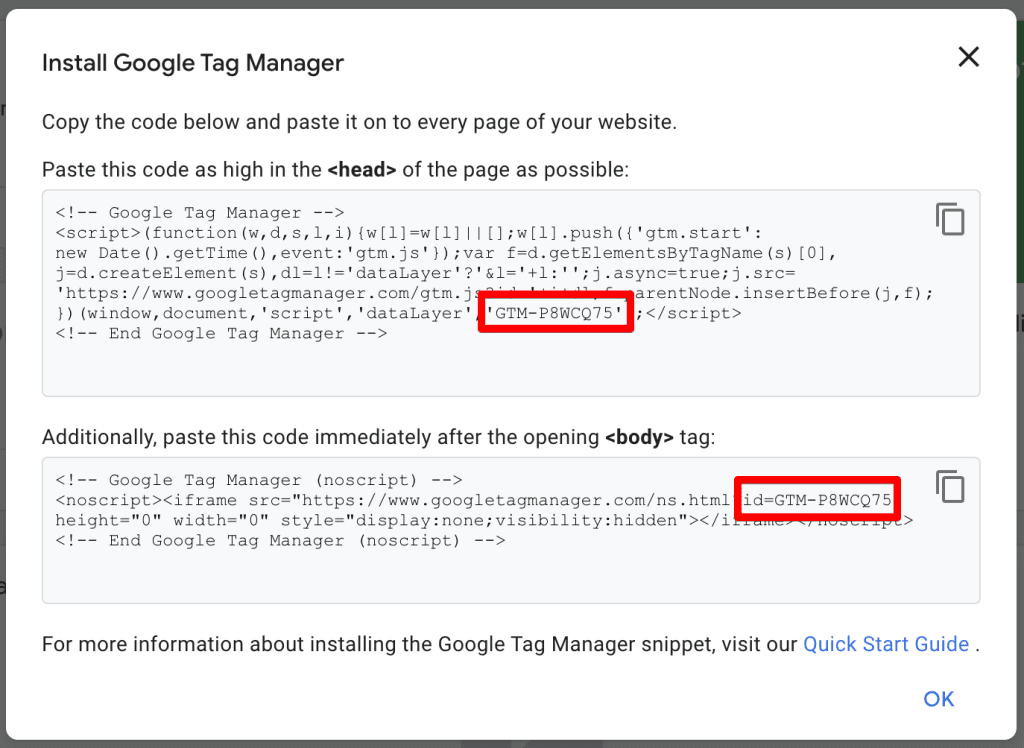
You can also see the GTM container ID similar to GA4’s measurement ID as highlighted in two places in the above screenshot. You can find this ID in several other places in your GTM account.
This is the only time you will be installing a code directly on the website because from here onwards, you can use GTM to manage different tracking tools on your website.
If you already have a GTM account, then you can go with creating a container route by clicking on the 3-dot menu on the right and selecting the Create Container option.

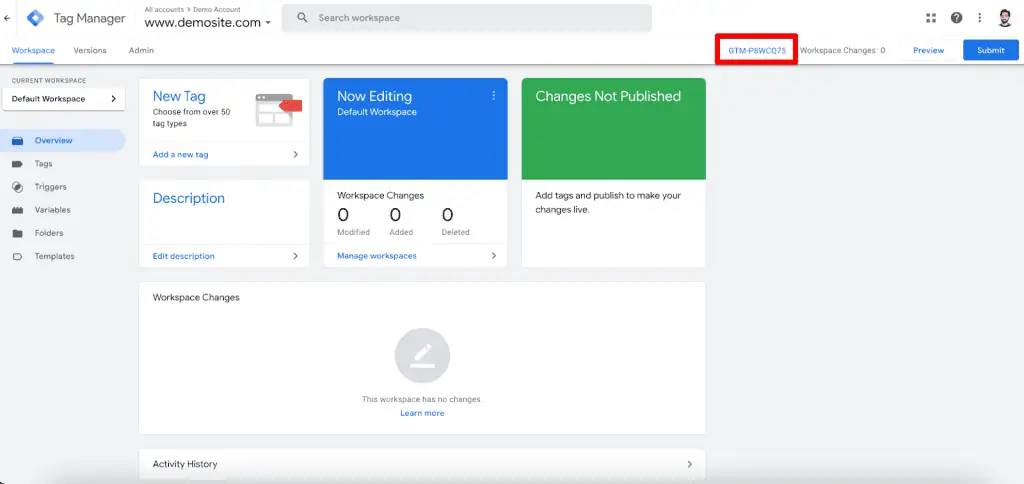
Notice how the same Container ID is also mentioned under the account details.
Once inside your GTM container, here’s how your newly created account/container will look, again, with the container ID at the top.
Steps to Install Google Analytics 4 with Google Tag Manager
Now that our GA4 property and GTM account are set up, let’s install Google Analytics 4 with Google Tag Manager. Here are the setup steps:
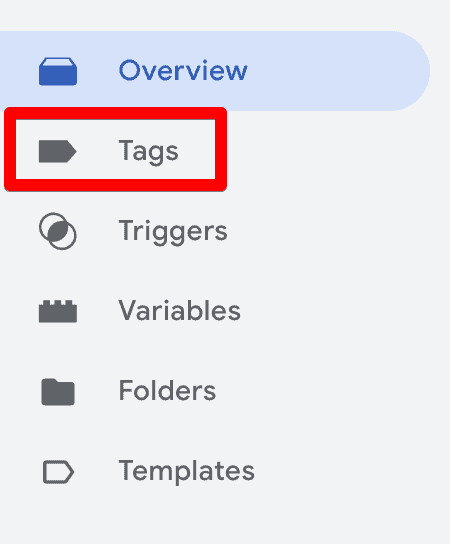
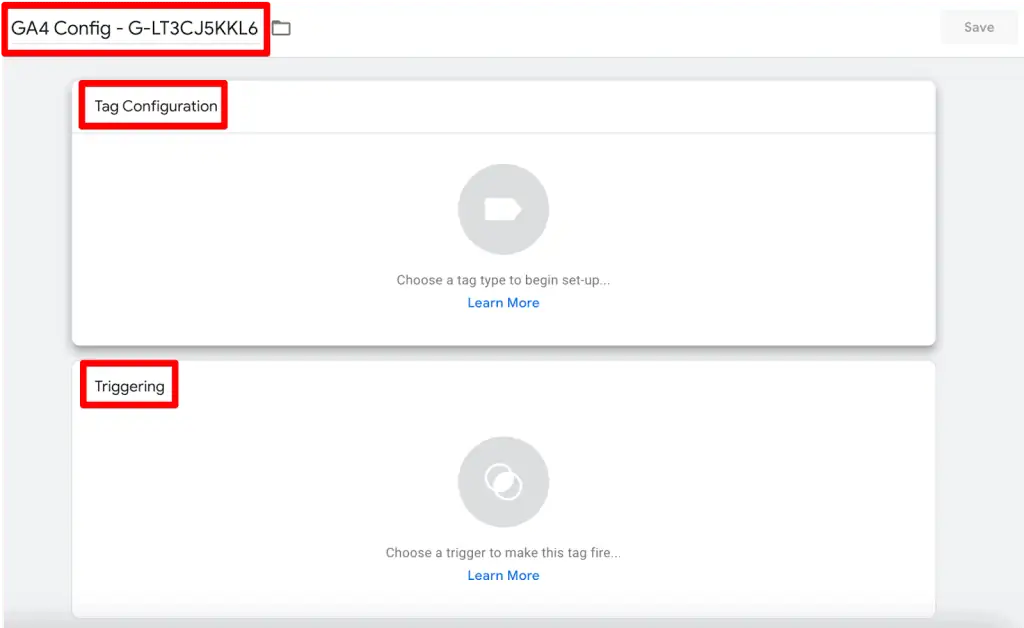
- Click on the Tags on the left side.
- Click on the New button on the right side.

- You will now see a Tag configuration interface where you can name the tag, choose the tag type, and select the trigger, i.e., when this tag fires.
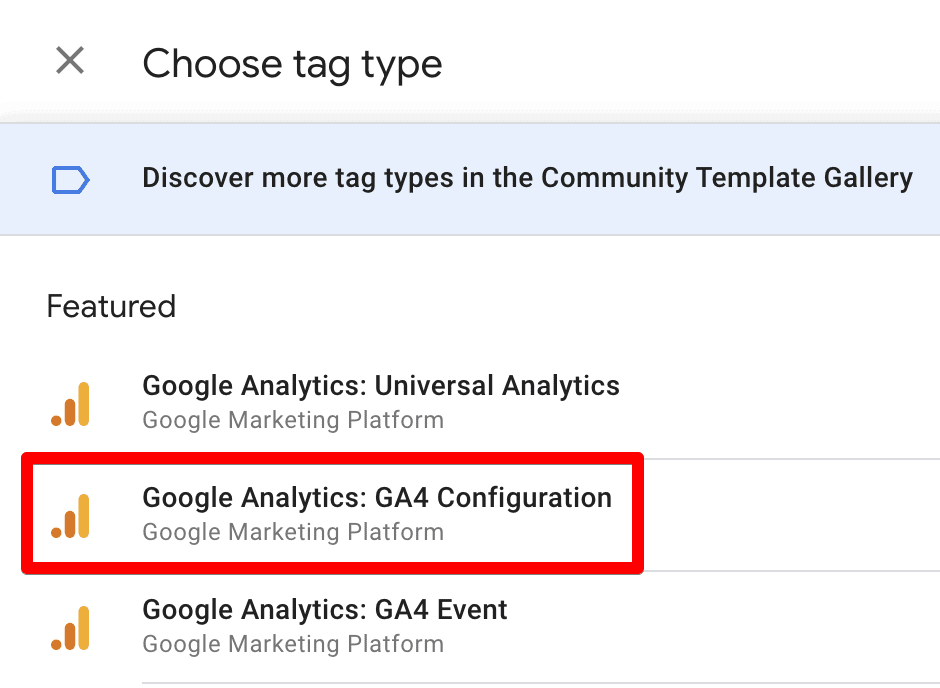
- Click on the tag configuration section and choose the Google Analytics: GA4 Configuration tag type from the list.
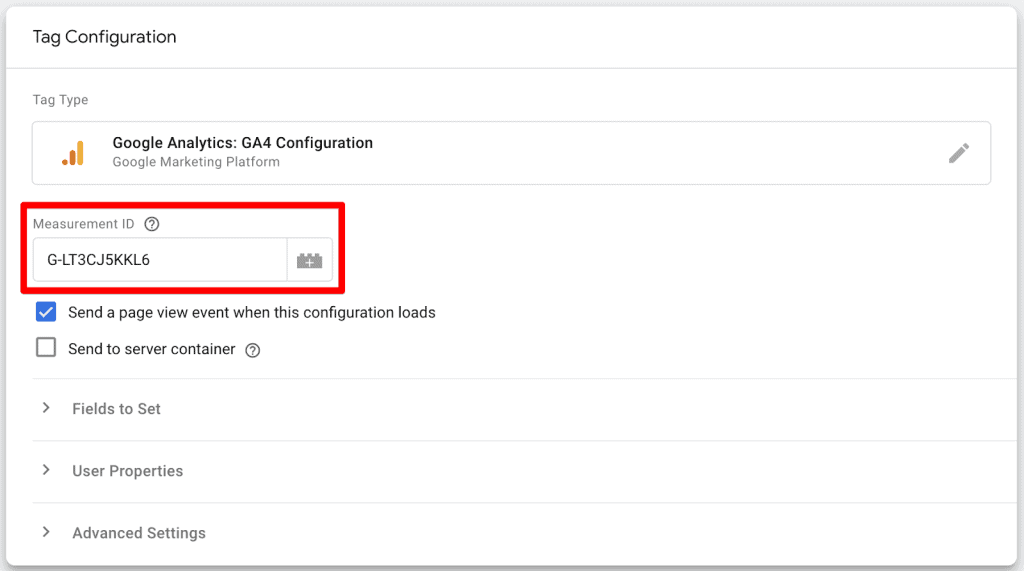
- Enter the GA4 Measurement ID. For this example, we’ll use G-LT3CJ5KKL6, which is for the GA4 property we created above.
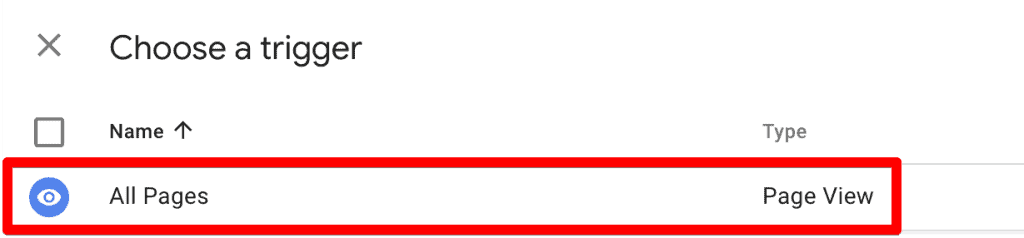
- Now, let’s set up the trigger, i.e., when we want to send the page view events to GA4. For the configuration tag, it will be every time someone visits our website, so hit All pages and Save the tag.
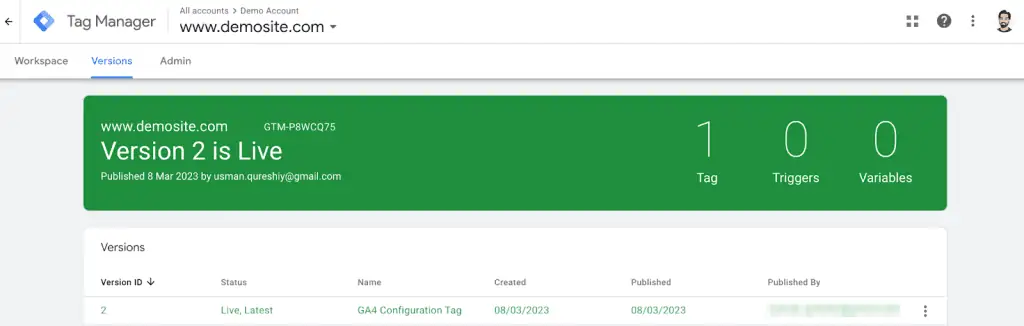
- Click on the Submit → Publish button. It’s a good idea to give a Name or add any description here, so anyone can look back and understand what changes were made. Then, click on Continue.

That’s it! You’ve set up the GA4 tag. You will now see a confirmation screen and once you close it, you will again find the summary of tags you published along with details.
But how do you know if your GA4 tracking is set up properly?
Verifying GA4 Tracking
There are several ways to verify your GA4 tracking, but we’ll look at three of them.
GA4 Account
The quickest way is to simply log into your GA4 account to see the data, though, it can take up to 24 hrs for the data to show up in your account.
If you go to the Home report, then you will see the confirmation that tracking is active.

GTM Preview Mode
This option lets you utilize GA4’s powerful DebugView feature and is more useful for verifying any specific events, their parameters, and values versus only GA4’s tracking code. It’s good to know there’s still that option. Here’s how to use it:
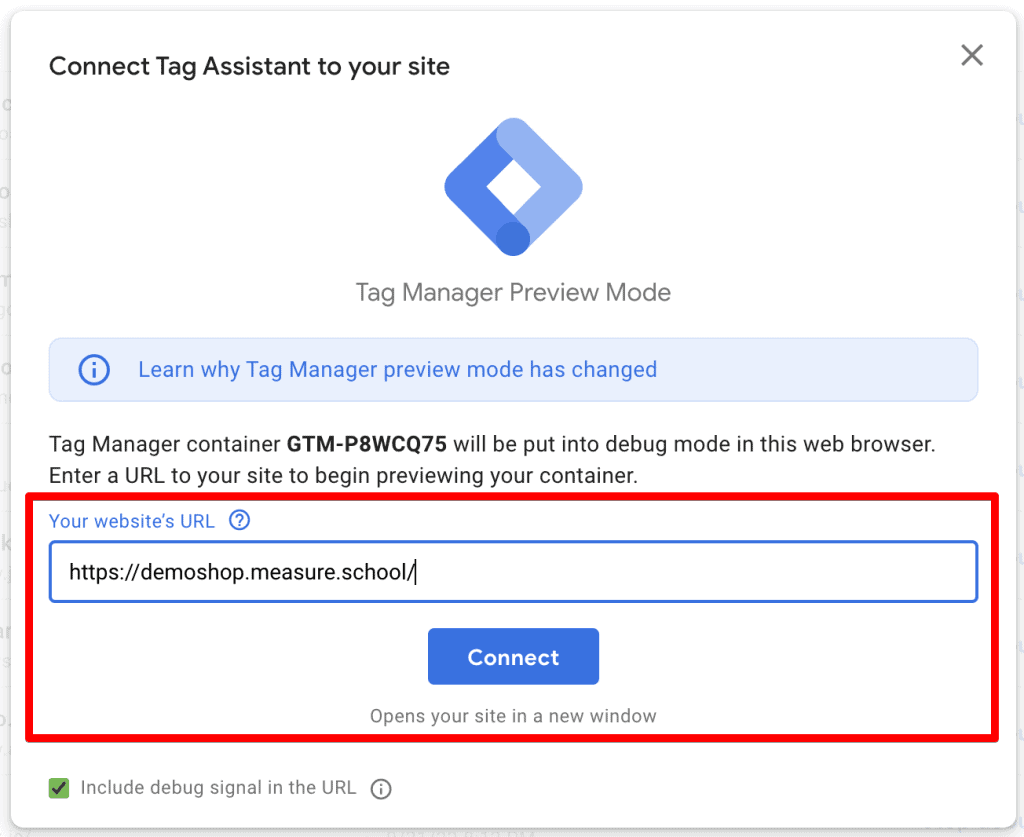
- Click on the Preview button at the top right.

- Enter your website’s URL in the new tab that opened and click on Connect. This will open another tab on your website.
- You can now see that the GA4 Config tag we installed is firing, as well as mentioning how many times. You can also click on the tag to see more details.
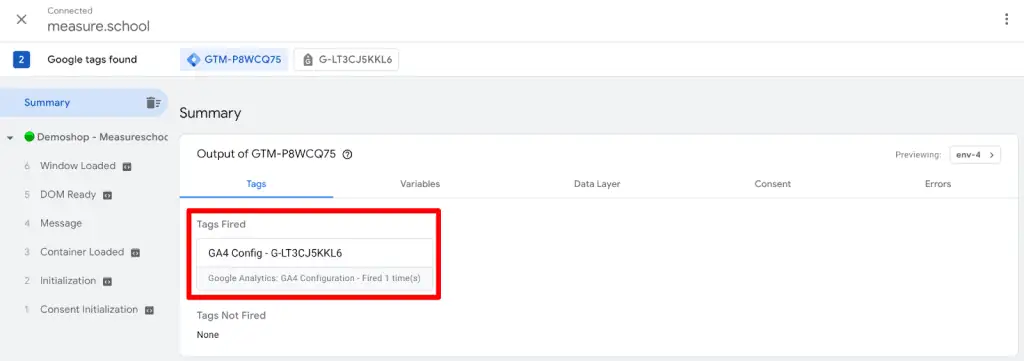
- In GA4, go to Admin → DebugView and you will see events lighting up there, as well.

Clicking on these individual events like page_view will give you more info about them, but that isn’t important to verify GA4’s tracking code.
Google Tag Assistant Extension
You can install Google’s tag assistant extension and quickly see if your installed GA4 tag shows up or not. The good thing is, this extension also shows any other Google products that are installed on your website through GTM.
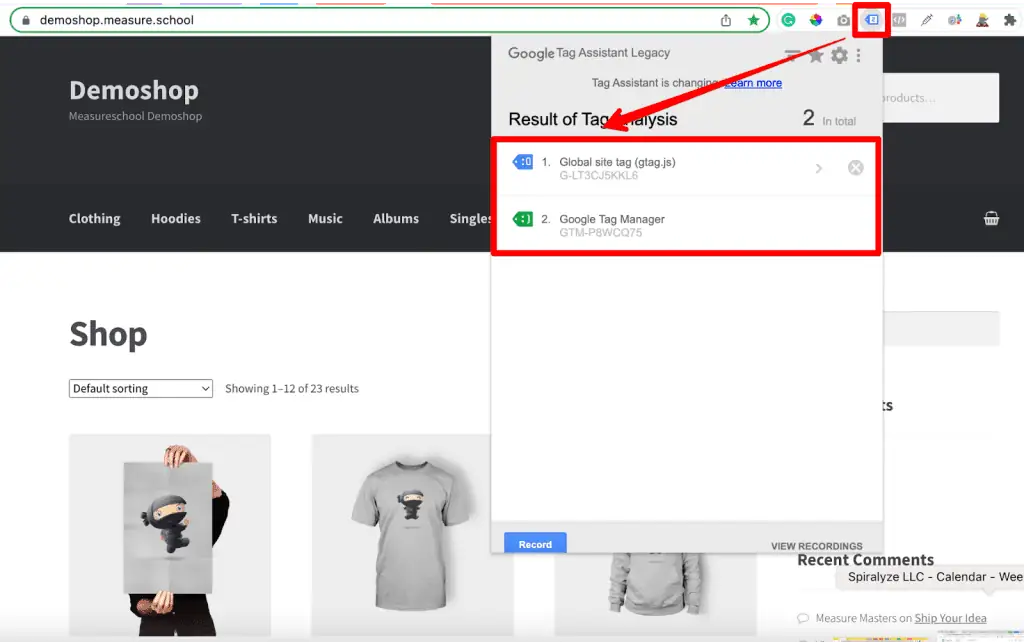
You can find the GA4 tracking code under the Global site tag (gtag.js) which matches what we added in the GTM tag. You can also see the GTM container ID through which we installed the GA4 tag.
Don’t mind the blue icon color icon in front of the GA4 tag, as it is a known issue with the extension. There are also other extensions that you can use to verify if the GA4 code exists on your website.