Odoo Expenses streamlines the management of expenses. After an employee submits their expenses in Odoo, the expenses are reviewed by management and accounting teams. Once approved, payments can then be processed and disbursed back to the employee for reimbursement(s).
An employee is a crucial component of a business. In other instances, the employee uses his personal funds to pay for business expenses. When a person travels for work-related assignments, such as field trips, it will cost money. In some instances, the business pays these costs. Since they are business expenses, the organization will pay the employee back for them.
The Odoo Expense module aids in effective expense management. This module aids with accurate expense tracking and employee expense approval. This additionally offered an effortless connection with other modules, such as payroll, accounting, etc.
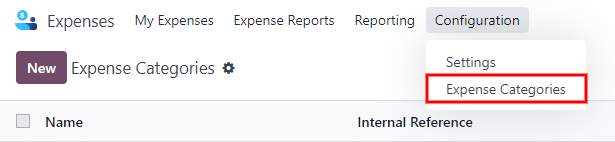
Set expense categories
The first step to track expenses is to configure the different types of expenses for the company (managed as expense categories in Odoo). Each category can be as specific or generalized as needed. Go to Expenses app ‣ Configuration ‣ Expense Categories to view the current expensable categories in a default list view.
To create a new expense category, click New. A product form will appear, with the description field labeled Product Name.
Only two fields are required, the Product Name and the Unit of Measure. Enter the Product Name in the field, and select the Unit of Measure from the drop-down menu (most products will be set to Units).
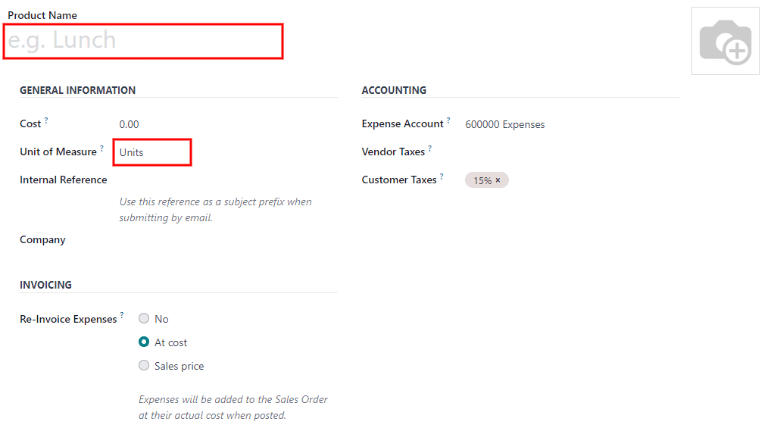
The Cost field on the product form is populated with a value of 0.00 by default. When a specific expense should always be reimbursed for a particular price, enter that amount in the Cost field. Otherwise, leave the Cost set to 0.00, and employees will report the actual cost when submitting an expense report.
Note
The Cost field is always visible on the expense category form, but the Sales Price field is only visible if the Sales Price is selected under the Re-Invoice Expenses section. Otherwise, the Sales Price field is hidden.
Example
Here are some examples for when to set a specific Cost on a product vs. leaving the Cost at 0.00:
- Meals: Set the Cost to 0.00. When an employee logs an expense for a meal, they enter the actual amount of the bill and will be reimbursed for that amount. An expense for a meal costing $95.23 would equal a reimbursement for $95.23.
- Mileage: Set the Cost to 0.30. When an employee logs an expense for “mileage”, they enter the number of miles driven in the Quantity field, and are reimbursed 0.30 per mile they entered. An expense for 100 miles would equal a reimbursement for $30.00.
- Monthly Parking: Set the Cost to 75.00. When an employee logs an expense for “monthly parking”, the reimbursement would be for $75.00.
- Expenses: Set the Cost to 0.00. When an employee logs an expense that is not a meal, mileage, or monthly parking, they use the generic Expenses product. An expense for a laptop costing $350.00 would be logged as an Expenses product, and the reimbursement would be for $350.00.
Select an Expense Account if using the Odoo Accounting app. It is recommended to check with the accounting department to determine the correct account to reference in this field as it will affect reports.
Record expenses
Manually create a new expense
To record a new expense, begin in the main Expenses app dashboard, which presents the default My Expenses view. This view can also be accessed from Expenses app ‣ My Expenses ‣ My Expenses.
First, click New, and then fill out the various fields on the form.
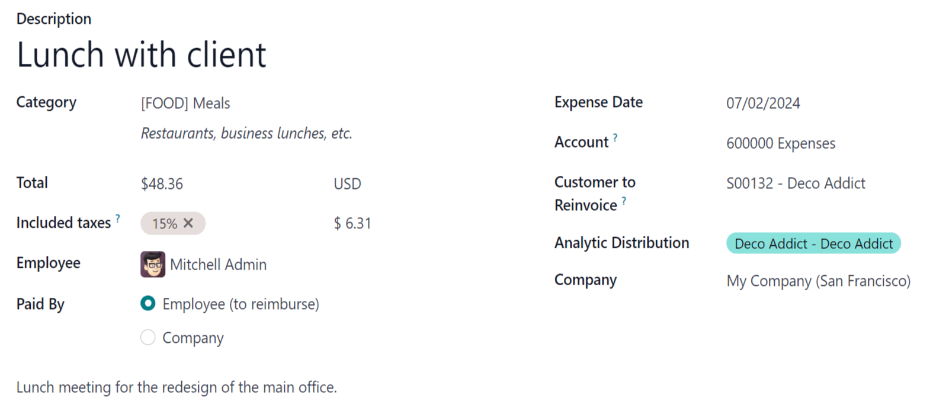
- Description: Enter a short description for the expense in the Description field. This should be short and informative, such as lunch with client or hotel for conference.
- Category: Select the expense category from the drop-down menu that most closely corresponds to the expense. For example, an airplane ticket would be appropriate for an expense Category named Air Travel.
- Total: Enter the total amount paid for the expense in one of two ways:
- If the expense is for one single item/expense, and the category selected was for a single item, enter the cost in the Total field (the Quantity field is hidden).
- If the expense is for multiples of the same item/expense with a fixed price, the Unit Price is displayed. Enter the quantity in the Quantity field, and the total cost is automatically updated with the correct total (the Unit Price x the Quantity = the total). Be advised, the word “total” does not appear, the total cost simply appears below the Quantity. ExampleFor example, in the case of mileage driven, the Unit Price is populated as the cost per mile. Set the Quantity to the number of miles driven, and the total is calculated.
- Included Taxes: If taxes were configured on the expense category, the tax percentage and amount appear automatically after entering either the Total or the Quantity. NoteWhen a tax is configured on an expense category, the Included Taxes value will update in real time as the Total or Quantity is updated.
- Employee: Using the drop-down menu, select the employee this expense is for.
- Paid By: Click the radio button to indicate who paid for the expense and should be reimbursed. If the employee paid for the expense (and should be reimbursed) select Employee (to reimburse). If the company paid directly instead (e.g. if the company credit card was used to pay for the expense) select Company. Depending on the expense category selected, this field may not appear.
- Bill Reference: If there is any reference text that should be included for the expense, enter it in this field.
- Expense Date: Using the calendar module, enter the date the expense was incurred. Use the < (left) and > (right) arrows to navigate to the correct month, then click on the specific day to enter the selection.
- Account: Select the expense account that this expense should be logged on from the drop-down menu.
- Customer to Reinvoice: If the expense is something that should be paid for by a customer, select the SO and customer that will be invoiced for this expense from the drop-down menu. All sales orders in the drop-down menu list both the SO as well as the company the sales order is written for, but after the expense is saved, the customer name disappears and only the SO is visible on the expense. ExampleA customer wishes to have an on-site meeting for a custom garden (design and installation) and agrees to pay for the expenses associated with it (such as travel, hotel, meals, etc.). All expenses tied to that meeting would indicate the sales order for the custom garden (which also references the customer) as the Customer to Reinvoice.
- Analytic Distribution: Select the account(s) the expense should be written against from the drop-down menu for either Projects, Departments, or both. Multiple accounts can be listed for each category if needed. Adjust the percentage for each analytic account by typing in the percentage value next to the account.
- Company: If multiple companies are set up, select the company this expense should be filed for from the drop-down menu. The current company will automatically populate this field.
- Notes…: If any notes are needed in order to clarify the expense, enter them in the notes field.
Attach a receipt
After the expense is created, the next step is to attach a receipt. Click the Attach Receipt button, and a file explorer appears. Navigate to the receipt to be attached, and click Open. The new receipt is recorded in the chatter, and the number of receipts will appear next to the 📎 (paperclip) icon beneath the expense form. More than one receipt can be attached to an individual expense, as needed. The number of receipts attached to the expense will be noted on the paperclip icon.
![]()
Create an expense report
When expenses are ready to submit (such as at the end of a business trip, or once a month), an expense report needs to be created. Go to the main Expenses app dashboard, which displays a default My Expenses view, or go to Expenses app ‣ My Expenses ‣ My Expenses.
Expenses are color coded by status. Any expense with a status of To Report (expenses that still need to be added to an expense report) the text appears in blue. All other statuses (To Submit, Submitted, and Approved) the text appears in black.
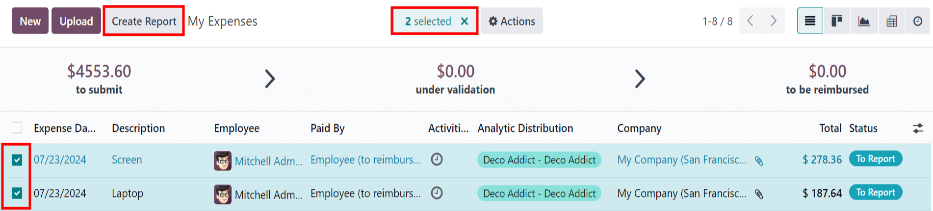
First, select each individual expense for the report by clicking the check box next to each entry, or quickly select all the expenses in the list by clicking the check box next to Expense Date.
Another way to quickly add all expenses that are not on an expense report is to click Create Report without selecting any expenses, and Odoo will select all expenses with a status of To Submit that are not already on a report.
Note
Any expense can be selected from the My Expenses list, regardless of status. The Create Report button is visible as long as there is a minimum of 1 expense with a status of To Report selected. When the Create Report button is clicked, only expenses with a status of To Submit that are not currently on another expense report will appear in the newly created expense report.
Once the expenses have been selected, click the Create Report button. The new report appears with all the expenses listed in the Expense tab. If there is a receipt attached to an individual expense, a 📎 (paperclip) icon appears next to the Customer to Reinvoice and Analytic Distribution columns.
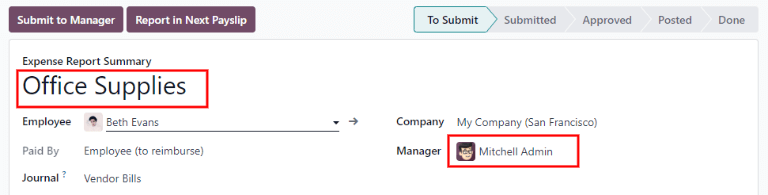
When the report is created, the date range for the expenses appears in the Expense Report Summary field by default. It is recommended to edit this field with a short summary for each report to help keep expenses organized. Enter a short description for the expense report (such as Client Trip NYC, or Repairs for Company Car) in the Expense Report Summary field. Next, select a Manager from the drop-down menu to assign a manager to review the report. If needed, the Journal can be changed. Use the drop-down menu to select a different Journal.
If some expenses are not on the report that should be, they can still be added. Click Add a line at the bottom of the Expense tab. A pop up appears with all the available expenses that can be added to the report (with a status of To Submit). Click the check box next to each expense to add, then click Select. The items now appear on the report that was just created. If a new expense needs to be added that does not appear on the list, click New to create a new expense and add it to the report.

Note
Expense reports can be created in one of three places:
- Go to the main Expenses app dashboard (also accessed by going to Expenses app ‣ My Expenses ‣ My Expenses)
- Go to Expenses app ‣ My Expenses ‣ My Reports
- Go to Expenses app ‣ Expense Reports
In any of these views, click New to create a new expense report.
Approve expenses
In Odoo, not just anyone can approve expense reports— only users with the necessary rights (or permissions) can. This means that a user must have at least Team Approver rights for the Expenses app. Employees with the necessary rights can review expense reports, approve or reject them, and provide feedback thanks to the integrated communication tool.
To see who has rights to approve, go to the main Settings app and click on Manage Users.
Note
If the Settings app is not available, then certain rights are not set on the account. Check the Access Rights tab of a user’s card in the Settings app. the Administration section (bottom right of the Access Rights tab) is set to one of three options:
- None (blank): The user cannot access the Settings app at all.
- Access Rights: The user can only view the User’s & Companies section of the Settings app.
- Settings: The user has access to the entire Settings app with no restrictions.
Click on an individual to view their card, which displays the Access Rights tab in the default view. Scroll down to the Human Resources section. Under Expenses, there are four options:
- None (blank): A blank field means the user has no rights to view or approve expense reports, and can only view their own.
- Team Approver: The user can only view and approve expense reports for their own specific team.
- All Approver: The user can view and approve any expense report.
- Administrator: The user can view and approve any expense report, as well as access the reporting and configuration menus in the Expenses app.
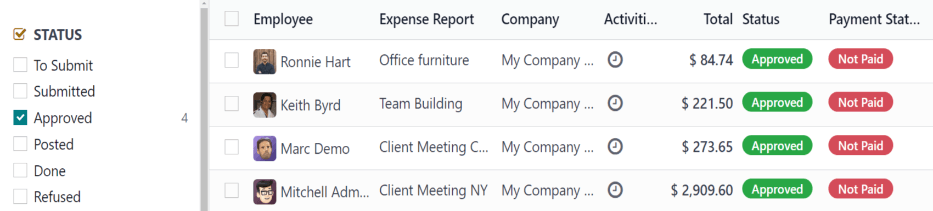
Users who are able to approve expense reports (typically managers) can easily view all expense reports they have access rights to. Go to Expenses app ‣ Expense Reports, and a list appears with all expense reports that have a status of either To Submit, Submitted, Approved, Posted, or Done. Expense reports with a status of Refused are hidden in the default view.
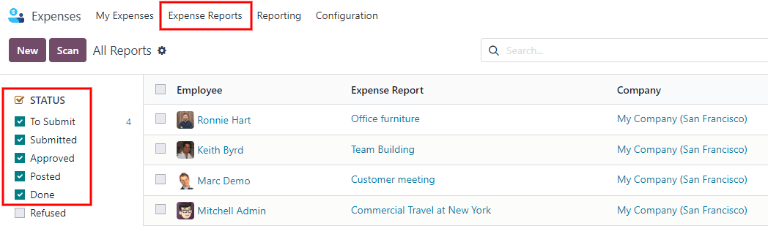
When viewing expense reports, there is a panel of filters that can be enabled or disabled on the left side. The three categories that filters can be applied on are Status, Employee, and Company. To view only expense reports with a particular status, enable the specific status filter to display the expense reports with only that status. Disable the specific status filter to hide the reports with that status. To view expense reports for a particular employee and/or company, enable the specific employee name filter and/or company filter in the Employee and Company sections.
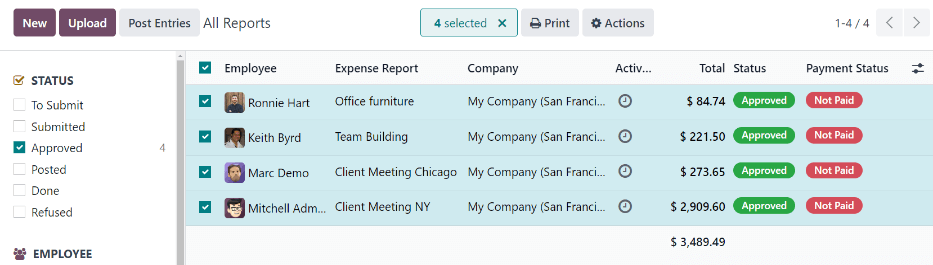
Reports can be approved in two ways (individually or several at once) and refused only one way. To approve multiple expense reports at once, remain in the list view. First, select the reports to approve by clicking the check box next to each report, or click the box next to Employee to select all the reports in the list.
Important
Only reports with a status of Submitted can be approved. It is recommended to only display the submitted reports by adjusting the status filter on the left side by only having the Submitted filter enabled.
If a report is selected that is unable to be approved, the Approve Report button will not appear, indicating there is a problem with the selected report(s).
Next, click the Approve Report button.

To approve an individual report, click on a report to go to a detailed view of that report. In this view, several options are presented: Approve, Report in Next Payslip, Refuse, or Reset to draft. Click Approve to approve the report.
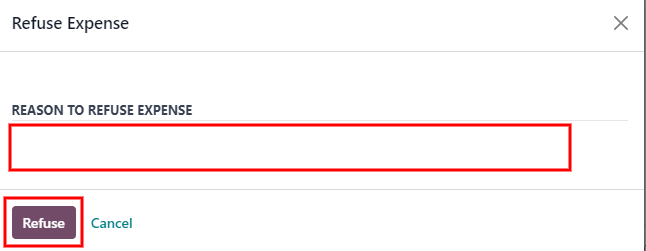
If Refuse is clicked, a pop-up window appears. Enter a brief explanation for the refusal in the Reason to Refuse Expense field, and then click Refuse.
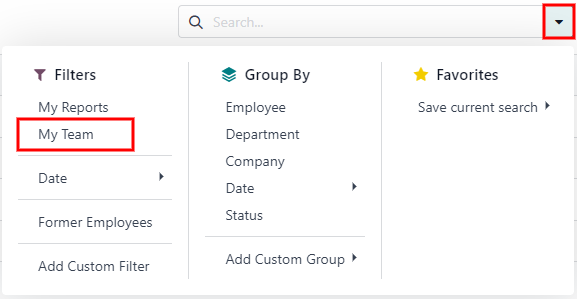
Team managers can easily view all the expense reports for their team members. While in the Expense Reports view, click the drop-down arrow in the right-side of the search box, and click on My Team in the Filters section. This presents all the reports for the manager’s team.
Post expenses in accounting
Once an expense report is approved, the next step is to post the report to the accounting journal. To view all expense reports, go to Expenses app ‣ Expense Reports. To view only the expense reports that have been approved and need to be posted, adjust the filters on the left side so that only the Approved status is enabled.
Just like approvals, expense reports can be posted in two ways (individually or several at once). To post multiple expense reports at once, remain in the list view. First, select the reports to post by clicking the check box next to each report, or click the box next to Employee to select all the reports in the list. Next, click Post Entries.
To post an individual report, click on a report to go to the detailed view of that report. In this view, several options are presented: Post Journal Entries, Report In Next Payslip, Refuse, or Reset to Draft. Click Post Journal Entries to post the report.
If Refuse is clicked, a pop-up window appears. Enter a brief explanation for the refusal in the Reason to Refuse Expense field, and then click Refuse. Refused reports can be viewed by going to Expenses app ‣ Expense Reports, then adjusting the filters on the left so that only Refused is selected. This will only show the refused expense reports.
Important
To post expense reports to an accounting journal, the user must have following access rights:
- Accounting: Accountant or Adviser
- Expenses: Manager