Benefits of Using a Social Media Content Calendar & Content Planner
We're all busy, and inevitably, tasks slip through the cracks. Social media content is no exception.
A successful social media strategy requires regular publishing and engaging with followers to see positive results — whether you're looking for sales, brand recognition, lead generation, or all three.
So, if you're not already using a social media content planner, here are a few advantages to pique your interest:
Easily pivot when plans change.
With a social media content calendar, marketers can plan out posts for entire weeks or months in advance. This frees up working hours to strategize for the future.
The best part is that you can always leave space for breaking news or current events in your industry. Otherwise, you'll spend valuable time searching the internet daily for content to share, a known productivity killer.
Curate content just for your audience.
Social media marketers should take the time to craft custom messages for each network because the audience expects to see something different on each one.
For example, your Instagram followers want to see Reels and Videos, while your Twitter followers like quick sound bites and shareable quotes. Planning this content using a social media content planner will save you time throughout the week. It will also make it easier to draft thoughtful and intentional content for each site.
A social media content planner can help you post more consistently on each social channel. This consistency creates a routine for your followers and helps you build trust.
Improved collaboration.
A shared calendar can improve collaboration — both with internal teams and external stakeholders. This is because it gives everyone access to what's on the calendar and gives you a reason to reconnect.
Skip waiting or sending last-minute emails for links, project status, or partnerships. Your social content planner gives you a simple way to let everyone know what you'll need well before you need it.
Simplified performance tracking.
Without a calendar, social media marketers are publishing content into the void. They cannot track big-picture and past performance.
With a calendar, marketers can look back and analyze which content performed best so they can adjust their strategy accordingly. If a particular type of post received a significant amount of views, you can recreate it for a different topic and potentially see the same success.
Content planning with a calendar can also help you track impact and ROI for social media efforts.
Reach new audiences.
With the help of a content planner, you can plan for holidays, events, and observance days, such as National Cat Day or Eat More Fruits and Vegetables Day. This makes it easy for you to tailor your content and engage with a broader audience.
Social Media Calendar Examples
1. Jotform Social Media Calendar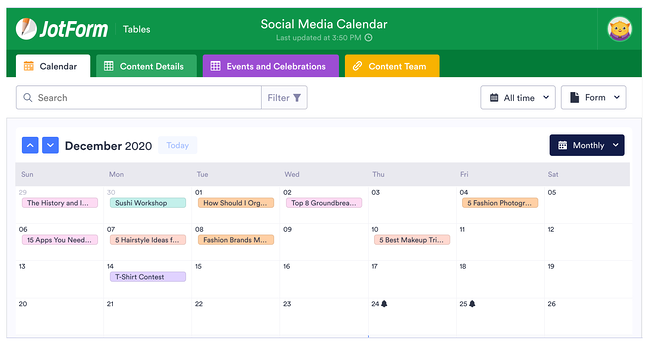
Jotform's social media calendar isn't just visually appealing and functional. The tabs at the top reveal your social plan for every channel you execute your strategy on, including in-person or virtual events.
If you're modeling your social calendar after this one, remember to include a tab for content details and who on your team will be responsible for creating the content. You might also have a separate tab for each month to keep things organized.
2. Firefly Marketing Social Media Content Calendar

Going a more traditional route with your social media calendar? Try a Google Sheets template like the one created by Firefly Marketing. Each tab is dedicated to a different month, while the worksheet includes every channel you might need across the top.
The rows are separated by a week, so you can quickly identify the date and time a post is scheduled for publishing. Our favorite part of this template is the pre-populated social media holiday column with fun dates that your audience will love.
شاهد وأحصل على أعمالنا من منصة خمسات
أنا بارع في خدماتي مرحبا ! أنا دكتور عبد الغني فؤاد. لقد حصلت على درجة الدكتوراة في تطوير النظم الأدارية و التسويقية. لقد كنت أعمل في العديد من المشاريع ، مثل التعلم الآلي ، والتعلم العميق ، وعلوم البيانات ، وتحليل البيانات ، واستخراج البيانات ، يمكنني أيضًا القيام بأي مهمة متعلقة بالعمل. لدي أكثر من 15 سنة من الخبرة. أنا هنا لأقدم لك كل تلك الخدمات الممتازة
How To Create a Social Media Posting Schedule for Your Business
Scheduling your business's social posts can keep you organized and help you consistently deliver content to your followers without worrying about looming deadlines. Content posting strategies can differ depending on the social media platform, and you should consider not only what you're posting but also when and how often.
By creating a social posting schedule and adjusting the schedule to fit each platform, you can increase the chances that your posts will reach your audience.
Facebook's Meta Business Suite makes scheduling posts and stories for your business easy.
Scheduling a Facebook Post on Desktop
Step 1: To schedule a post using the Meta Business Suite on your desktop, start by selecting your business's Facebook Page from the dropdown menu in the top left of your sidebar.
Step 2: Next, click Posts & Stories or Calendar, then click Create Post.
Step 3: Click Facebook News Feed to schedule the post to your news feed.
Step 4: Enter the details of your post, including text, media, and a link or location. If you add a photo to your post, you won’t be able to add a link preview. Click Call to Action or Feeling/Activity to add an optional call to action or feeling/activity to your post. You can’t add both a call to action and a feeling/activity.
Step 5: A preview will appear on the right as you build your post. You can change the preview to see how your post will look on both desktop and mobile by using the dropdown menu at the top of the window.
Step 6: After building your post, click the arrow next to Publish and click Schedule Post. Select the date and time you want your post to be published, and click Schedule to schedule your post.
Scheduling a Facebook Post on Mobile
Step 1: You can also schedule Facebook posts on mobile with the Meta Business Suite mobile app. Start by tapping Post to create a new post.
Step 2: Enter the details of your post, including text, media, links, a background color, and a feeling/activity. Then choose your business's Facebook page to publish to Facebook.
Step 3: Tap Schedule for later and select the date and time you want your post to be published. Then tap Schedule to schedule your post.
Like Facebook, Instagram also uses the Meta Business Suite to schedule posts.
Scheduling an Instagram Post on Desktop
Step 1: To schedule a post to Instagram using the Meta Business Suite on your desktop, start by connecting your Instagram account to the Meta Business Suite.
Step 2: Once your Instagram account is connected, click the dropdown menu in the top left of your sidebar and select your Instagram account.
Step 3: Click Posts & Stories or Calendar, then click Create Post. Click Instagram Feed to schedule the post to your Instagram feed.
Step 4: Enter the details of your post, including text, media, and an optional link or location. If you choose to add a link to your Instagram post, it will not show a photo preview.
Step 5: A preview will appear on the right as you build your post. You can change the preview to see how your post will look on both desktop and mobile by using the dropdown menu at the top of the window.
Step 6: After building your post, click the arrow next to Publish and click Schedule Post. Select the date and time you want your post to be published, and click Schedule to schedule your post.
Scheduling an Instagram Post on Mobile
Step 1: Like Facebook, you can schedule Instagram posts on mobile using the Meta Business Suite mobile app. Start by tapping Post to create a new post.
Step 2: Enter the details of your post, including text, media, and links. Then choose your business's Instagram page to publish to Instagram.
Step 3: Tap Schedule for later and select the date and time you want your post to be published. Then tap Schedule to schedule your post.
Only a super or content admin can schedule posts on LinkedIn. Still, by using third-party software such as Hubspot's social media management tools that are included with HubSpot's Marketing Hub Professional accounts, you can easily create and schedule LinkedIn posts.
Step 1: To schedule LinkedIn posts using HubSpot's social media management tools, start by logging into your Marketing Hub Professional account.
Step 2: Next, navigate to Marketing > Social and click Create Social Post.
Step 3: In the right panel, click LinkedIn. Create your post in the text box, including emojis, hashtags, mentions, tags, and a content link. When using HubSpot's social media management tools, you can only mention or tag LinkedIn company pages, not LinkedIn users.
A post preview will appear if you add a content link to your post. You can add up to four images to your post by clicking the image icon or add a video to your post by clicking the video icon.
Step 4: Click Review, then Preview to see how your post will appear on LinkedIn.
Step 5: Then click Schedule post to schedule or publish your post.
Step 1: You can schedule Tweets for your business by logging into your Twitter Ads account and navigating to the Creatives > Tweets tab. To access the Creatives tab in your Twitter Ads account, your account must have a credit card on file.
Step 2: Click on New Tweet in the top right corner and create your Tweet. If you would like your Tweet to only be seen by users you have targeted in a Promoted Ads campaign, click the Promoted Only checkbox. Leave this unchecked if you would like the tweet to be seen organically by your followers.
Step 3: Once you've written your tweet, click the down arrow next to Tweet, click Schedule, and select the date and time you would like the tweet to be posted.
Scheduling a Pinterest Post on Desktop
Pinterest allows you to schedule up to 100 Pins. You can schedule one Pin at a time, up to two weeks in advance on desktop.
Step 1: To schedule Pins for your business, log into your Pinterest Business account. Next, click Create at the left corner of your screen, then click Create Pin.
Step 2: Choose an image or video, and add a title, description, and link.
Step 3: Click Publish later and choose the day and time you’d like to publish your Pin.
Step 4: Choose a board from the drop-down menu, or create a new board by clicking Create board.
Step 5: Click Publish.
Scheduling a Pinterest Post on iOS
You can also schedule Pins using the Pinterest app on iOS.
Step 1: To start, log in to your Pinterest Business account.
Step 2: Tap the plus icon, then tap Pin.
Step 3: Take a photo for your Pin, select an image or video from your device, and tap Next.
Step 4: Add a title, description, and the destination website to your Pin.
Step 5: Below Schedule Date, tap the edit icon and select the date and time you would like to publish your Pin.
Step 6: Tap Done.
Step 7: Tap Next.
Step 8: Choose an existing board to save your Pin to or tap Create board to create a new board.
يمكنك أن تصبح مسوقًا رقميًا: اكتساب المهارات الأساسية والشخصية لمهنة تسويقية تعتمد على التكنولوجيا
ستتعلم المهارات الصعبة الضرورية لمهنة التسويق