
How to Write a Restaurant Business Plan in 2025
A restaurant business plan is a framework that guides you to plan and forecast every element of restaurant management and operations.
This includes anything from your restaurant's menu design, location, financials, employee training, and a lot more.
Creating a solid business plan is important, as it helps:
- Transform your restaurant ideas into reality.
- Boosts entrepreneurial success by 16% (Harvard Business Study).
- It equips you to navigate challenges before they arise.
- Attracts potential investors.
Planning is key to restaurant success. Without a plan, you're more likely to join the 60% of restaurants that fail within a year.
Create a business plan to set yourself up for success. Here's how to get started.
What is a restaurant business plan?
Before writing a business plan, it is important to understand its fundamentals. It serves as a roadmap for starting and running your restaurant, making it easy for outside parties, such as investors, to understand your objectives, vision, and plan of action for your restaurant.
Business plans vary in length and level of detail, ranging from brief synopses to large papers. Investors can benefit from clear insights and additional information provided by beginning with a concise plan and working their way up to a detailed one.
In short, your business plan should include a thorough description of the resources allocated to your restaurant's success.
Why is a restaurant business plan important?
It's unlikely that you would be able to secure an investor to help fund your restaurant dream without a proper plan. And even if you do, the lack of proper planning, regulations, and forecasts will set your restaurant up for failure.
Your restaurant business plan is what is going to map out how you plan on turning a profit from your business as well as where your restaurant fits into the saturated market and how you plan on standing out. A little time and pain early on are worth the reward of a successful restaurant in the long run.
What Every Restaurant Business Plan Should Include
Whether this is your first business plan or your 10th, using a template specifically designed for the restaurant industry can be incredibly helpful. Our restaurant business plan template includes all the necessary sections you need.
Conducting a thorough market analysis to understand customer demographics and competition is crucial for the success of your restaurant. Keep reading to learn about the key elements that make a restaurant business plan successful.
Steps to include in your business plan
Your restaurant business plan should clearly represent your brand and goals, and you don’t have to build it from the ground up.
Whichever approach you take, your business plan should cover 12 key components. Here's a breakdown of the essentials for a successful restaurant plan:
- Executive Summary
- Company Description
- Market Analysis
- Menu
- Employees
- Restaurant Design
- Location
- Market Overview
- Marketing
- External Help
- Financial Analysis
- Legal Compliances
1. Executive summary
A restaurant business plan should always begin with an executive summary. Why?
- 80% of venture capitalists say they read the executive summary first.
- 62% of investors say they would not continue reading a business plan if the executive summary did not capture their interest.
- A strong executive summary can increase the likelihood of securing funding by up to 40%.
An executive summary is your restaurant business plan’s introduction and quick pitch. It’s created to grab attention, especially from investors, and guide them into the full plan. Beyond summarizing your concept, it helps define your restaurant’s identity, shaping customer experience and setting you apart from competitors.
To stand out, focus on key elements that make a strong executive summary:
- A mission statement
- Proposed concept development
- Cuisine selection
- The overall execution
- The potential costs
- Expected return on investments (ROI)
- Business succession plan
Let's take a more in-depth look at the concept development, cuisine selection, and mission statement.
1.1 Concept Development
Selecting the type of restaurant, service style, and atmosphere is the first step towards creating a unique dining experience. Whether you envision a sample menu for a:
- Cozy, intimate bistro
- Bustling quick-service deli
- Fast-casual restaurant
- Fine dining establishment
1.2 Cuisine Selection
The cuisine you select for your restaurant can significantly influence its success. Choosing the appropriate cuisine is vital for distinguishing your establishment from competitors and attracting your target customers.
To make an informed decision, consider factors such as:
- Market demand
- Expertise and passion
- Ingredient availability
- Competition
- Profitability
- Cultural fit
- Seasonality
- Dietary restrictions and trends
In the highly competitive restaurant industry, keeping track of current and emerging cuisine trends can be a significant advantage.
1.3 Creating a mission statement
A mission statement is your restaurant’s compass - it highlights your purpose, values, and goals while resonating with both investors and customers. It also inspires your team, guiding their efforts toward your vision.
To create a mission statement that truly stands out, follow these steps:
- Identify the purpose of the restaurant.
- Contemplate the brand’s image.
- Account for the target audience.
- Incorporate company values.
- Ensure brevity and comprehensiveness.
Automate Restaurant Management Operations with AI Odoo 17
How to Optimize the Restaurant Supply Chain Management Solutions-Automation and Digitization with Best Practices.
2. Business description
This is where you carefully introduce the company in the restaurant business plan (and overall business model). Include the name of the restaurant you are launching in this field along with its address, phone number, and other important information.
Then, include the owner's information and a synopsis or explanation of their background. The second section of the company description should outline the restaurant's legal position and its short—and long-term objectives.
Here's an example of the layout:
Company Description
Restaurant Name: [Restaurant Name]
Location: [Restaurant Address]
Contact: [Restaurant Phone Number] | [Restaurant Email Address]
Owner: [Owner Name]
Experience: [Owner Name] has over [Number] years of experience in the restaurant industry. They have worked in various roles, including [List of Roles]. They are passionate about food and creating a memorable dining experience for their guests.
Legal Standing: [Restaurant Name] is a [Type of Legal Entity] registered in [State/Province].
3. Market analysis
The market analysis portion of the restaurant business plan is usually divided into three parts.
3.1 Industry analysis
This section aims to explain your target market to investors and why you believe guests will choose your restaurant over others.
An example of analyzing your target market
Comprehending your target market is key to customizing your restaurant offerings to their preferences and needs.
By diving into demographics, preferences, dining habits, and trends, you can fine-tune your concept and marketing strategy to reach and appeal to your target audience effectively.
Demographics and preferences
Identifying your primary target market involves considering factors such as:
- Age
- Interests
- Income
- Location
Neighborhood demographics heavily influence restaurant preferences. Family areas favor diverse, family-friendly menus, while young, affluent urban populations prefer upscale, innovative cuisine. Cultural backgrounds also shape dining habits. Understanding your target market helps create a concept that connects and succeeds.
Dining habits and trends
Keeping up with dining trends helps you adapt and attract customers. Online ordering and delivery have boosted demand for convenience, while more diners now seek healthier options.
3.2 Competition analysis
It's easy to assume that everyone will visit your new restaurant first, so it's important to research your competition to make this a reality.
What restaurants have already established a customer base in the area? Take note of everything from their prices, hours, and service style to menu design to the restaurant interior.
Then explain to your investors how your restaurant will be different.
3.3 Advertising analysis
Your investors are going to want to know how you plan to market your restaurant. How will your marketing campaigns differ from what is already being done by others in the restaurant industry?
How do you plan on securing your target market? What kind of offers will you provide your guests? Make sure to list everything.
4. Menu
The menu is the most important part of a restaurant's debut. Your restaurant wouldn't be able to operate without it.
You most likely don't have a final draft at this time, but you should aim to create a mock-up menu for your restaurant business plan. You can choose a design that you can envision yourself using and add your logo to the mock-up.
There are several resources available online if you need assistance with menu design or don't want to hire a designer.
But the price should be the most important component of your sample menu. The cost research you've completed for investors ought to be reflected in your prices. They will have a clearer idea of your restaurant's intended price range as a result.
5. Employees
The company description section of the restaurant business plan briefly introduces the owners of the restaurant with some information about each. This section should fully flesh out the management team.
The investors don’t expect you to have your entire team selected at this point, but you should at least have a couple of people on board. Use the talent you have chosen thus far to highlight the combined work experience everyone is bringing to the table.

Automate Restaurant Management Operations with AI Odoo 17
Studying food and beverage management will equip you with a comprehensive understanding of the food and beverage industry and the skills and knowledge needed to succeed in this dynamic and exciting field.
Strategic Planning and Goal Setting
A restaurant’s ability to keep its food costs under control ultimately depends on effective planning and thoughtful goal-setting. This involves forecasting future demand, setting clear objectives, and adopting strategies to realize those goals.
- Forecast sales to manage costs effectively: While nobody can predict the future with 100% accuracy, demand forecasting allows restaurant owners to draw on data about past and present customer demand to better predict what its customers will want in the future and to foresee the associated food cost they can expect to deliver on those expectations. With these insights, restaurateurs can make cost-efficient decisions when it comes to sourcing ingredients, managing inventory, and setting optimal portion sizes for new menu items.
- Set measurable goals for cost-saving progress: By setting clear, measurable objectives for their organization and their staff, restaurants can more accurately assess progress in reducing food costs. For instance, kitchen staff will have a clearer focus if they’re told that their goal is to reduce food waste by 5% for the month than if they are simply told to be more careful when handling expensive ingredients in the kitchen. Strategic KPIs and financial metrics linked to supplier management, inventory management, portion size controls, and food waste are all worth measuring in devising cost-reduction strategies.
Control Your Restaurant Food Costs With odoo
To control food costs, today’s restaurants and restaurant groups need more than an effective cost control strategy. They need a scalable platform that seamlessly connects procurement, inventory management, financials, and accounting data across the organization. odoo for Restaurants and Hospitality ticks all these boxes. The unified platform provides restaurant operators with the visibility needed to manage their suppliers and food purchasing processes to keep food costs to a minimum, all while ensuring that they always have correct inventory on hand.
odoo Financial Management provides restaurant operators with comprehensive reporting tools that deliver crucial insights into their organization’s financial performance. Restaurants also stand to benefit from odoo Cloud Accounting Software, which offers multilocation financial consolidation to make reporting more accurate and allows them to close their books faster. These capabilities have given organizations the flexibility and forecasting ability to drive aggressive growth while meeting industry benchmarks for food and labor costs.
Controlling food costs is a top priority for restaurant operators, and with good reason. Restaurants that consistently find new ways to minimize their expenses maintain healthier profit margins that can drive growth and expansion or make it possible to buy new equipment, attract the most qualified staff, or provide the necessary liquidity to weather peaks and troughs in customer demand. The key to success for restaurants is to adopt proven cost-control strategies. These strategies should improve supplier and inventory management, food handling, portion sizing, operational efficiency and goal-setting. Additionally, tracking performance against measurable benchmarks allows restaurants to verify that their food cost control strategies are paying off.
Point Of Sale
For recording regular sales transactions and related business activities of stores and restaurants, the Odoo17 Point of Sale module is the ideal solution. This specialized module provides a wealth of cutting-edge capabilities and user-friendly management tools to assist you in effectively managing virtual storefronts. This module may be easily used on desktop computers, iPads, and tablets.
You can meet the needs of your business with the help of this module's versatility and customization options. Based on their distinct needs, different companies use this module in different ways today. Companies can utilize the Point of Sales module differently depending on their needs, thanks to the customization feature provided by custom coding. The operation of this module can be effortlessly integrated with the accounting, inventory, sales, and other business departments.
Dashboard
All of the point-of-sale sessions in Odoo 17 will be visible on the Dashboard of the PoS module. With the correct tools, managing the sessions is simple from the dashboard itself. The PoS dashboard's Kanban view is depicted in the screenshot. You can either use the Continue Selling button to carry on with the current session or the New Session option to begin a new session for the relevant PoS. Customers can use their kiosk to place orders by clicking the "Open Kiosk" button.
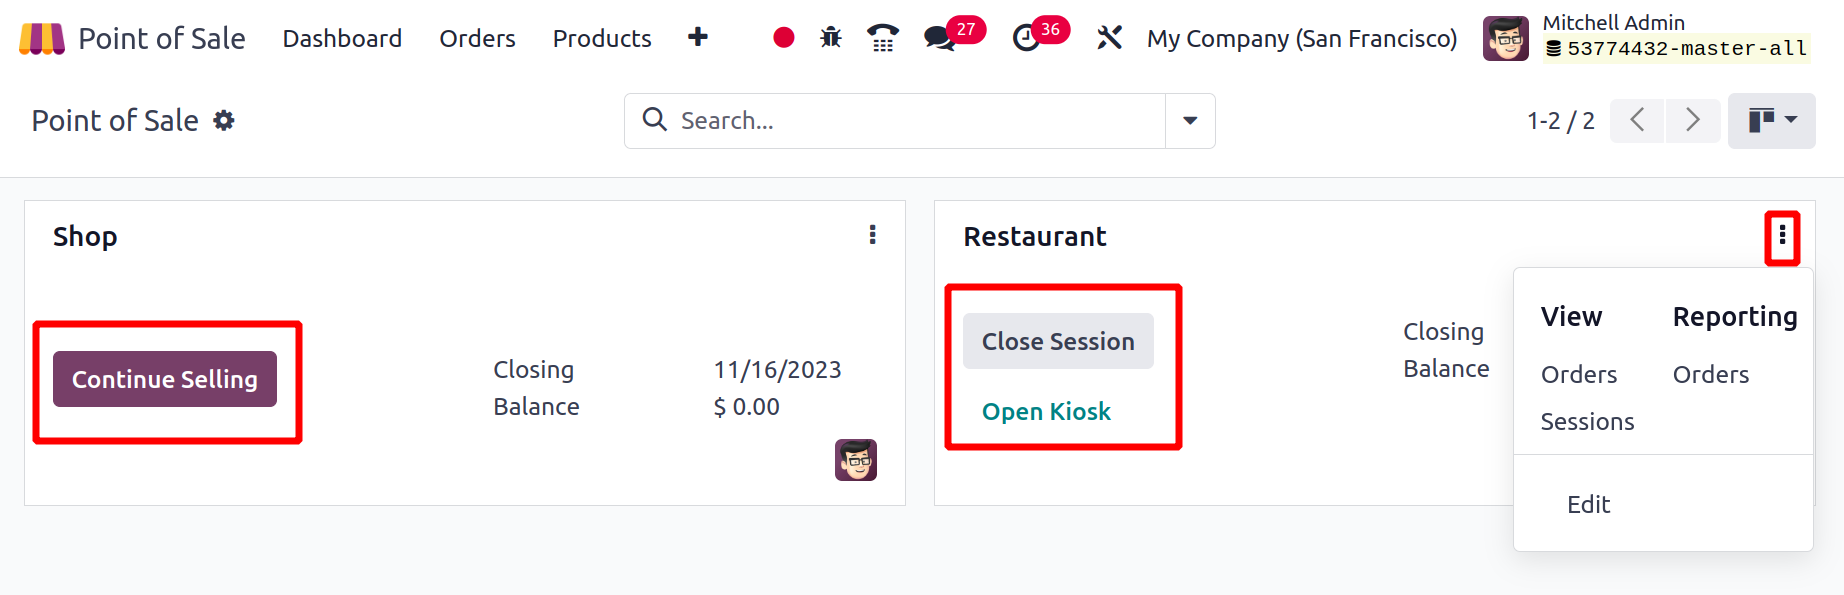
The menu that displays after clicking the three vertical dots on each session, as shown in the figure above, has more operation tools. You can view the Orders and Sessions of the chosen PoS using this menu and create reports about the Orders.
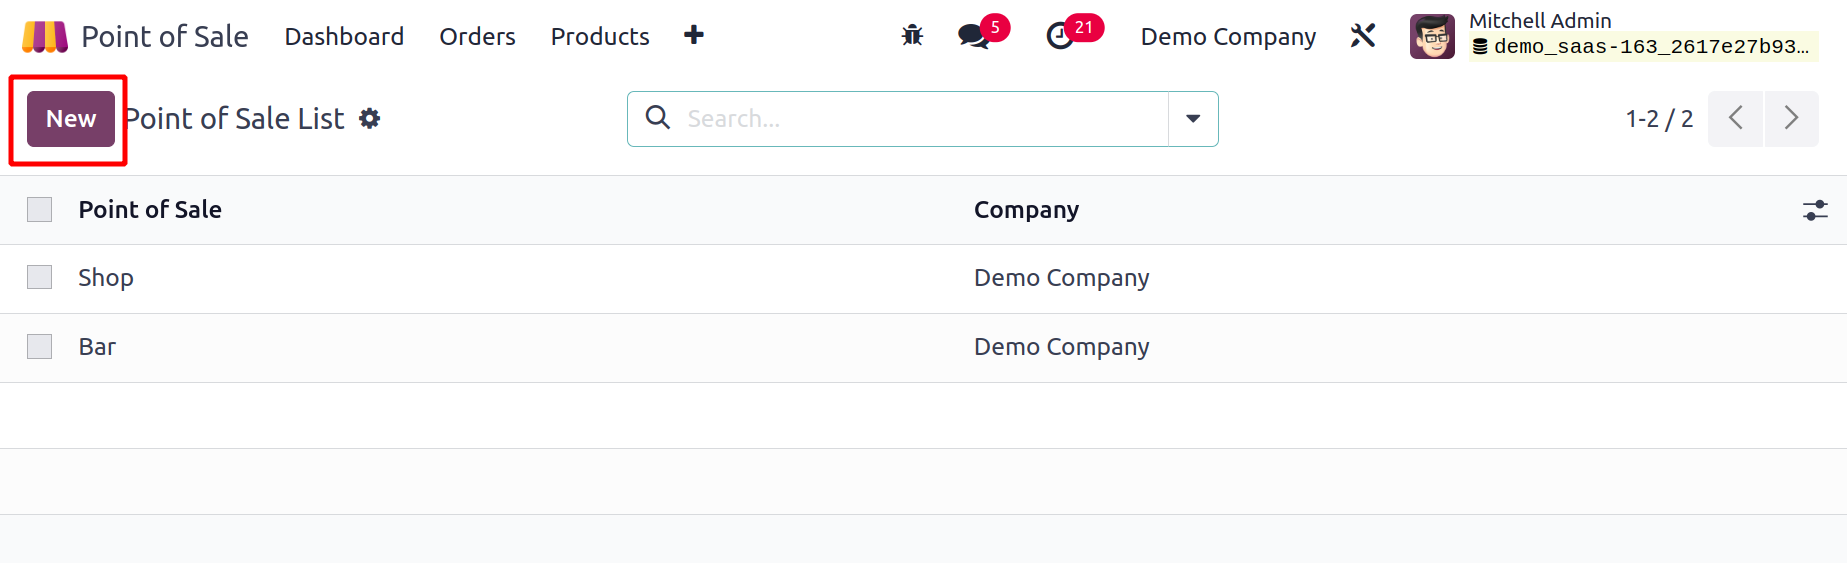
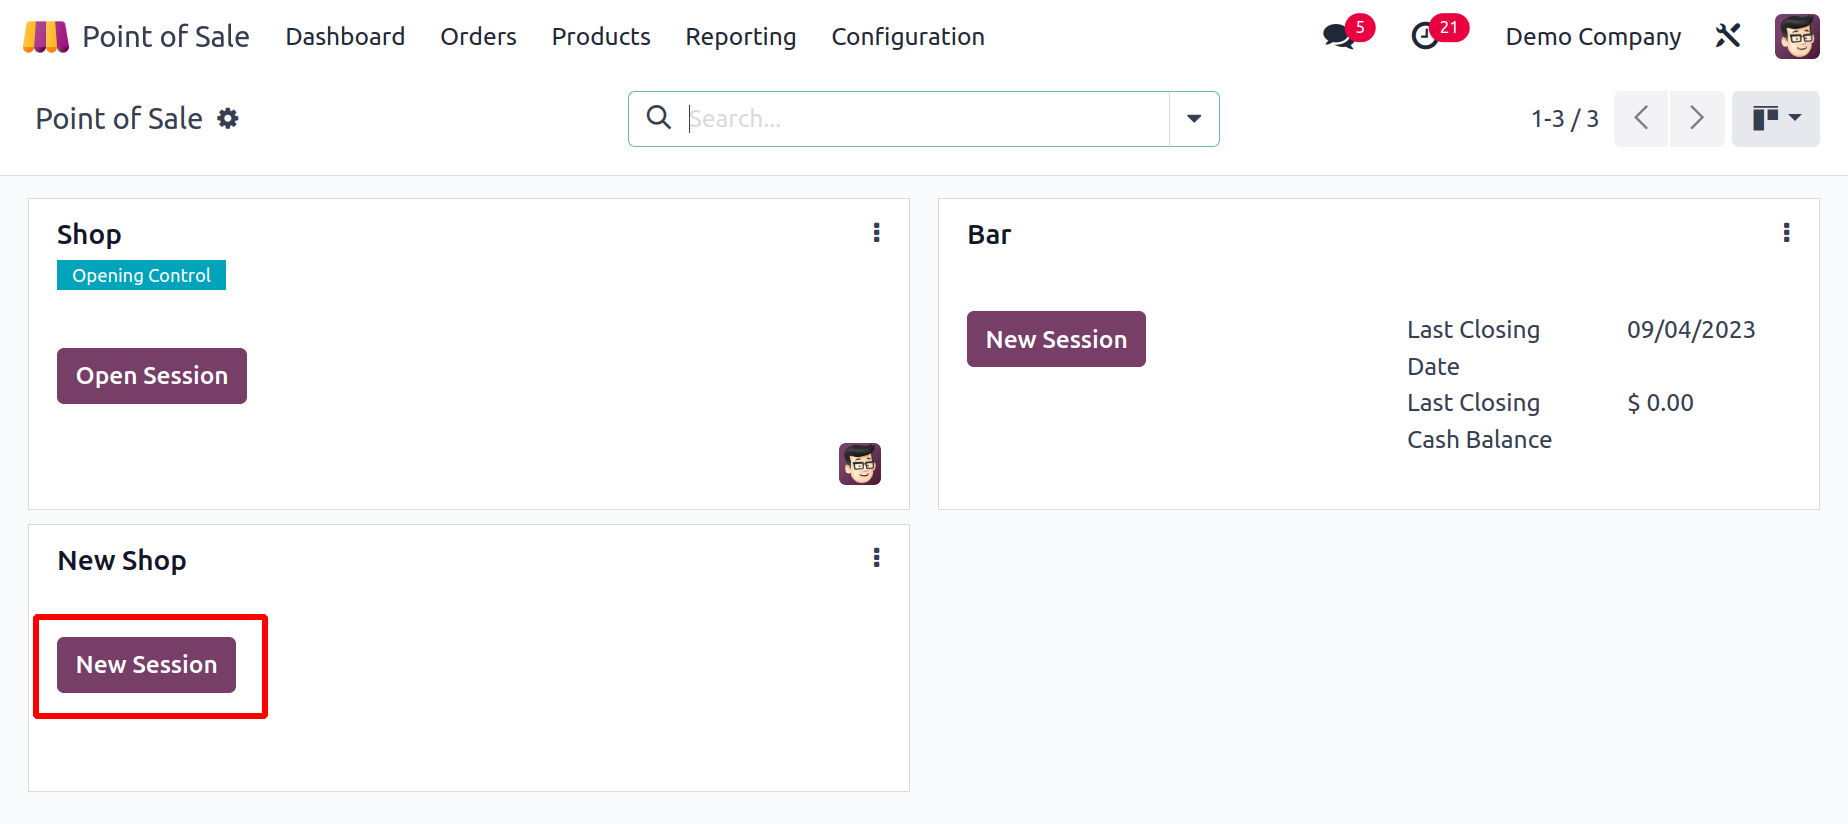
The PoS dashboard's list view looks like this. To change the settings, click any of the various places of sale. In Odoo17, you can build a new PoS by pressing the NEW button.
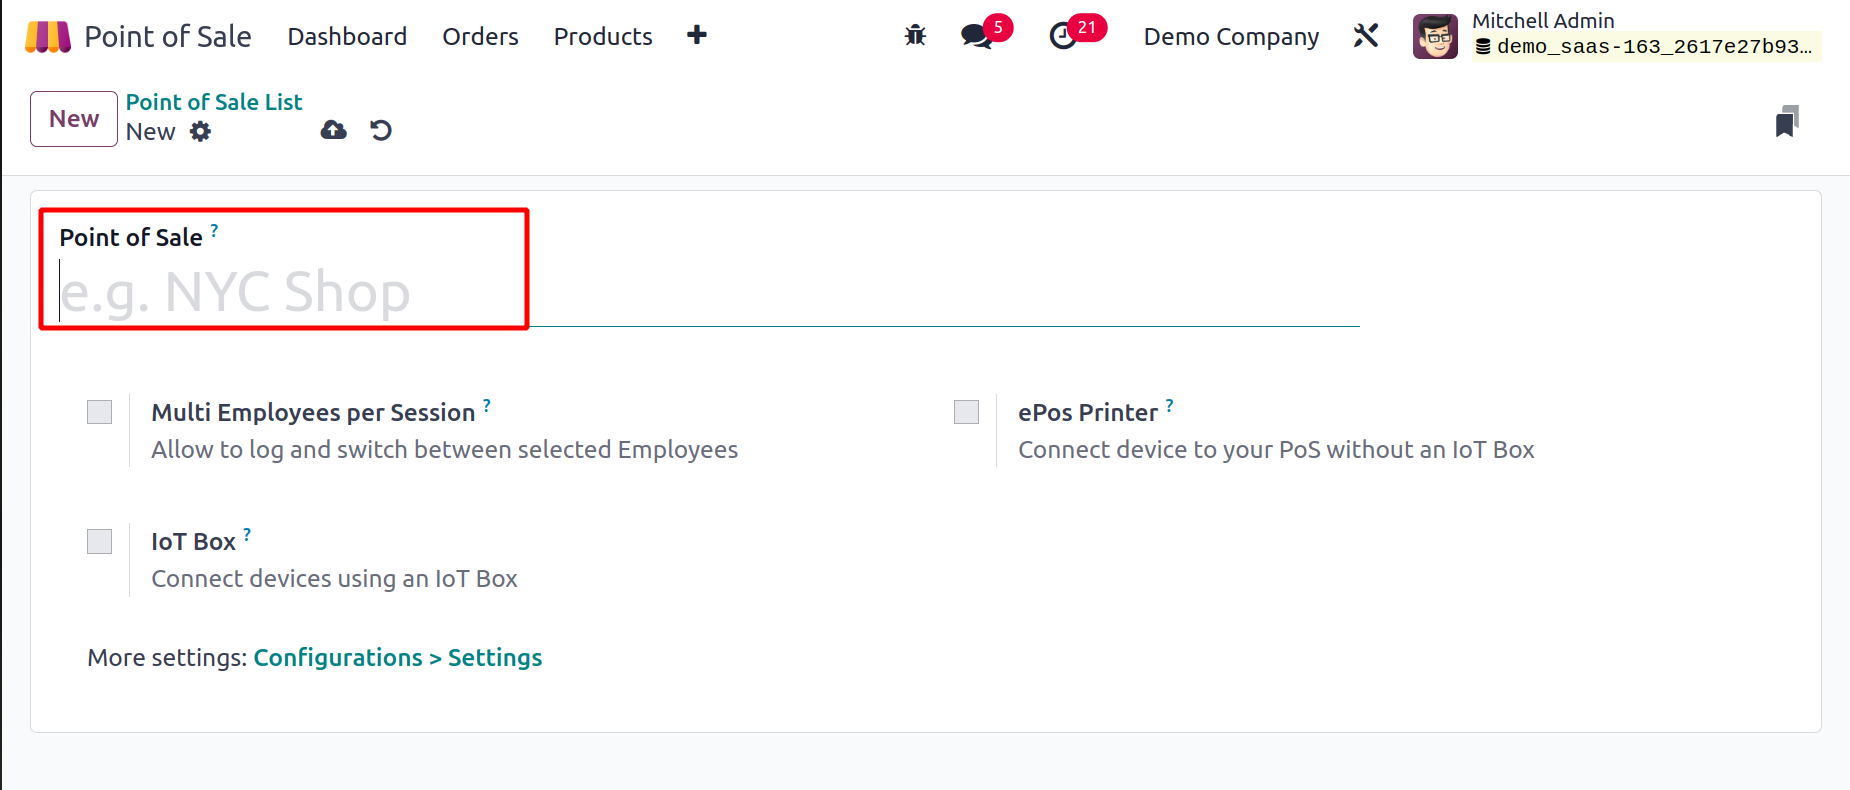
As seen below, Odoo17 will send you to a new Configuration window where you can enter the name of the new Point of Sale in the appropriate field.
You now turn on more functions for the new PoS in accordance with your company's needs. The Multi Employees per Session feature can be turned on if you want to permit several employees each session. In the new PoS, this will enable us to log in and switch between certain employees. The names of the authorized personnel will show in a separate field. To access a PoS session, these employees can either scan their badges or input their PIN.
You can connect devices using an IoT Box by turning on the IoT Box option. The fields allow you to provide information about the receipt printer, customer display, card readers and barcode scanners, electronic scale, and Sweden Fiscal Date Module. You can control the IoT devices that are connected through the external link. By turning on the ePoS Printer field, you can connect devices to your PoS without using an IoT box. You can enter the IP address of the receipt printer in the available space.

Orders
With the help of the Odoo 17, you can take orders and record them by beginning a new session. Similar to how we did in the Sales module, the Point of Sales module allows us to set the products, product variants, and product attributes for the PoS. In the Sales chapter of Odoo 17, we already went into great length about product configuration. You can refer to this chapter if you have any questions about how to configure a product in Odoo 17. Sales - Odoo 17 Enterprise Book Now, start accepting orders by clicking the New Session button.
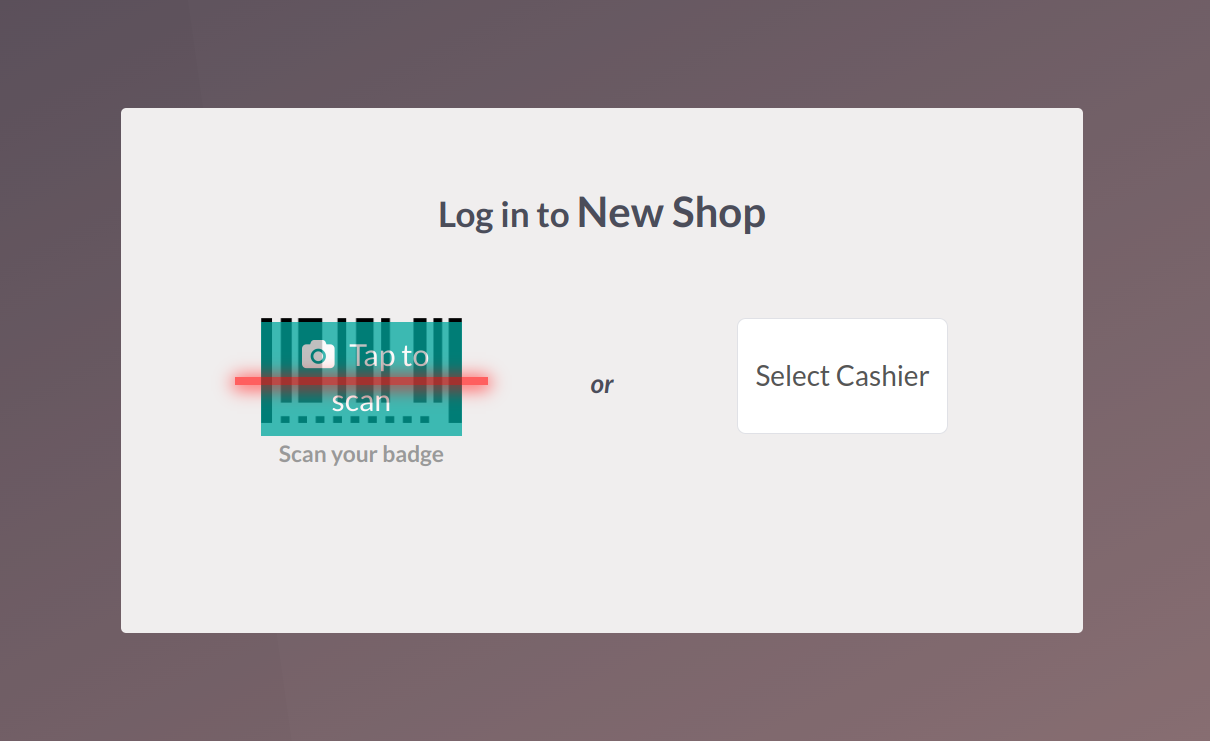
You will then be directed to a new window where you must either scan your IDs or choose a cashier in order to enter the new store.
To sign in to a new session, you can use your employee badge or employee PIN Code.
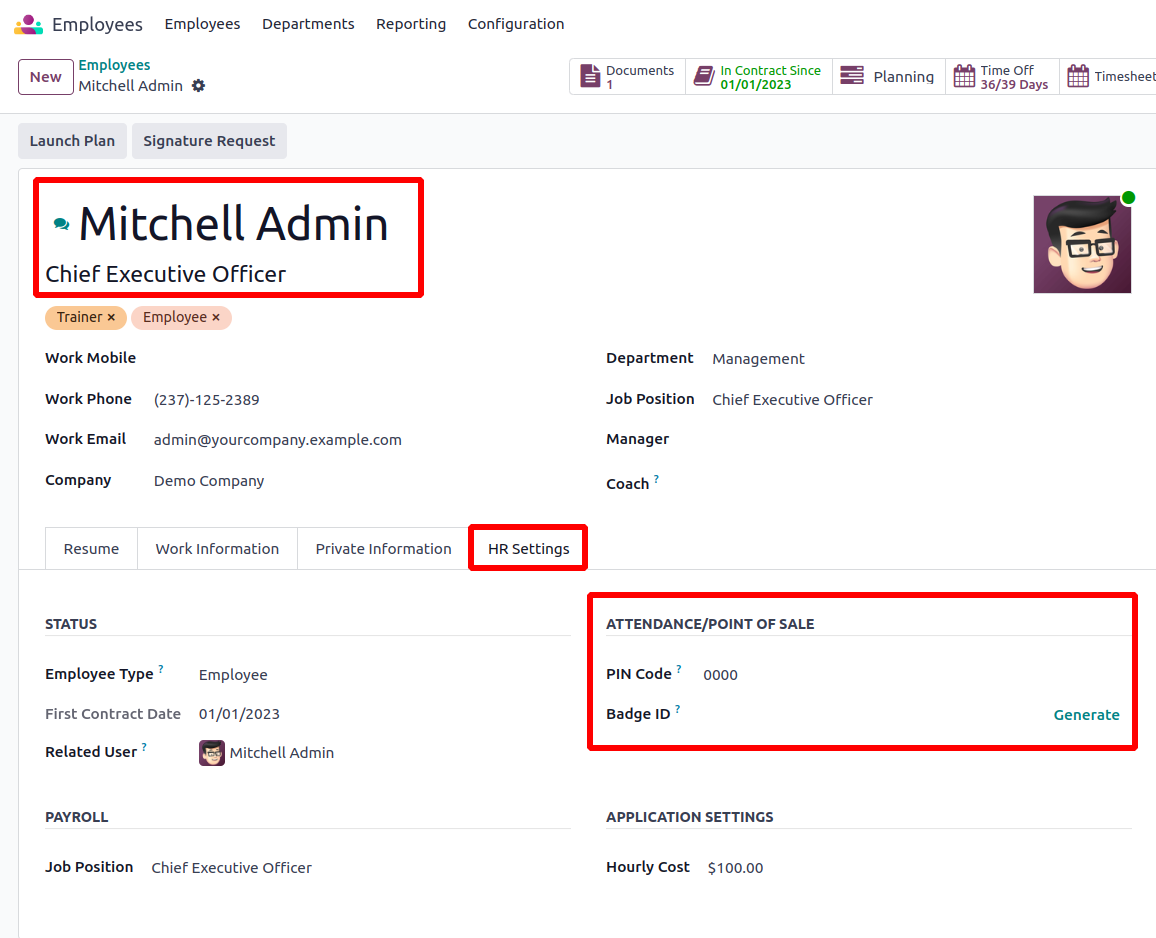
The designated officer or HR will offer a special pin for each employee when creating their record in the Employees module, which may be used to log in to other platforms, including attendance and point of sale. It will be accessible via the Employee form view's HR Settings tab, as illustrated below.
You can access the PoS session by entering the PIN code provided below, or you can print your badge ID by clicking the Print Badge button. The Scan your Badge field accepts the Badge ID. Choose your name from the Select Cashier section and input the PIN if you want to log in using the PIN.
A pop-up asking you to set a starting balance at the PoS cash box will appear as soon as you start the new session.

The sum listed here represents the session's opening balance before the sales start. You can utilize the tiny money icon or just state the Opening Cash. When you click this, a new window will appear.
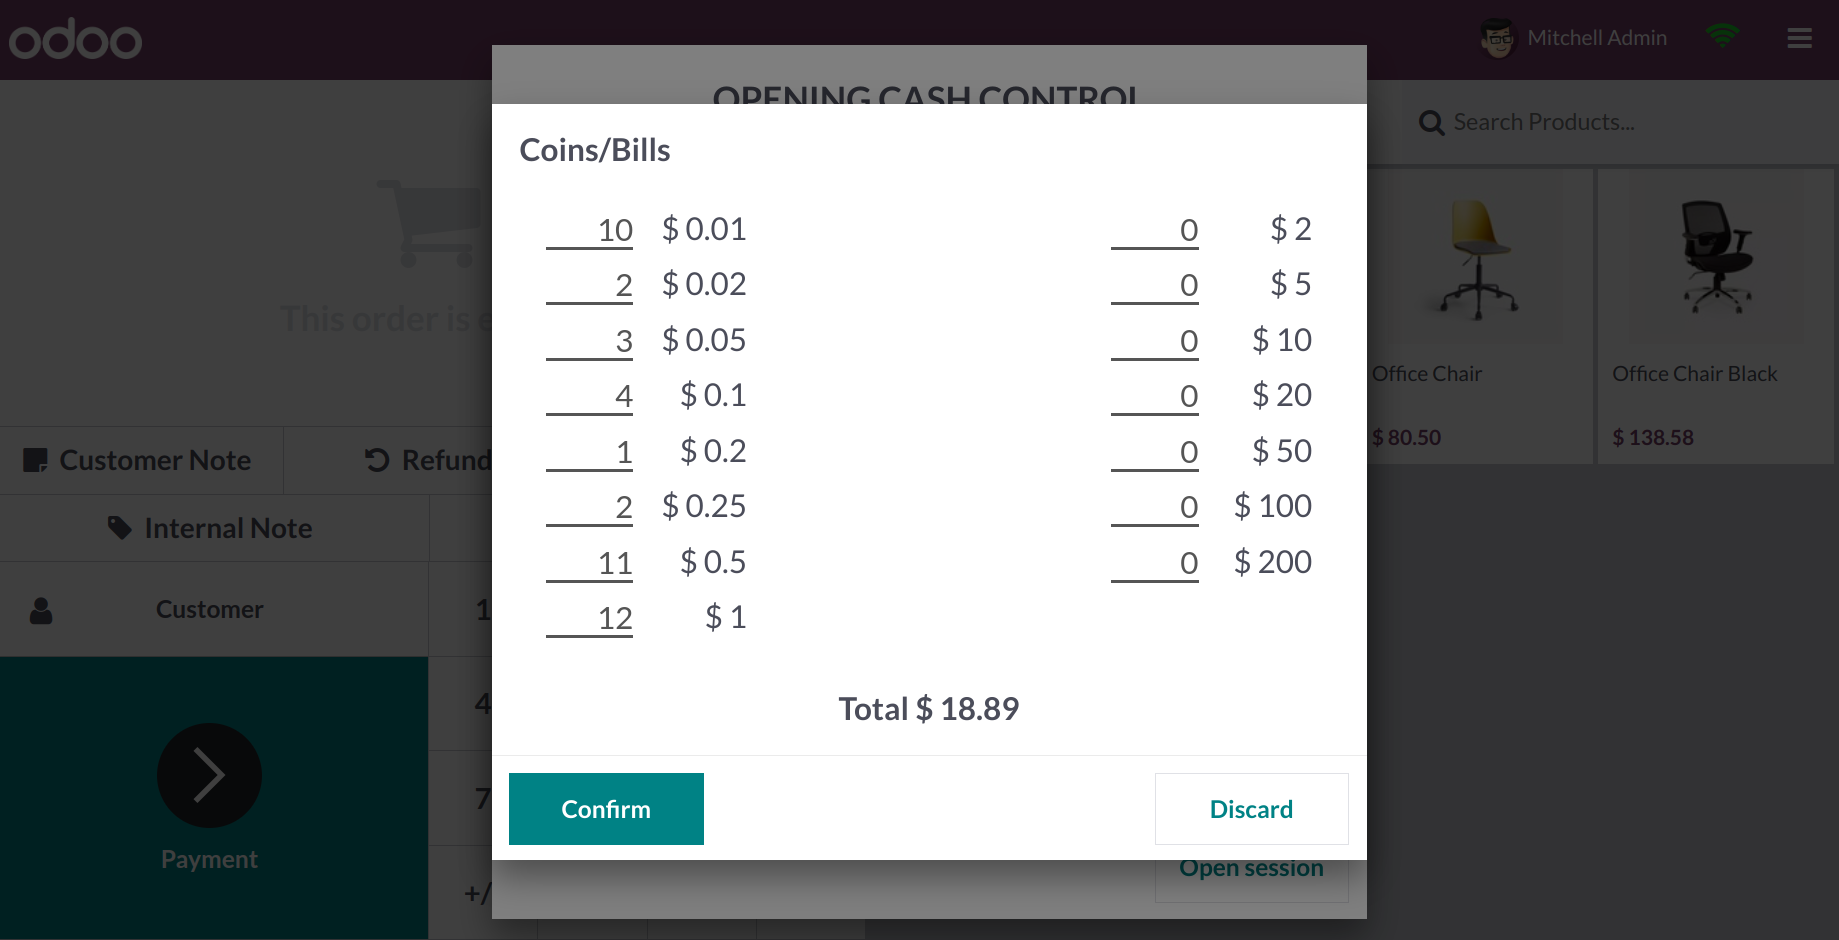
Here, you'll see the coin and bill values that have been set up on the backend. Here, you can choose how many of each currency you want to use, and the entire cost will be shown in the window. The Opening Cash will show up in the corresponding field after you click the Confirm button.
You can now start the session with this amount by clicking the Open Session button.

Logistics purchases Planning And Warehouse Management
Mastering Odoo Inventory Management: Key Advantages & Functionalities& case study.
This is the PoS session's order interface. You can use the PoS Categories of the products, which are visible at the top of the screen, to acquire a list of products in a specific category. Otherwise, you can use the search bar to look for the needed product.
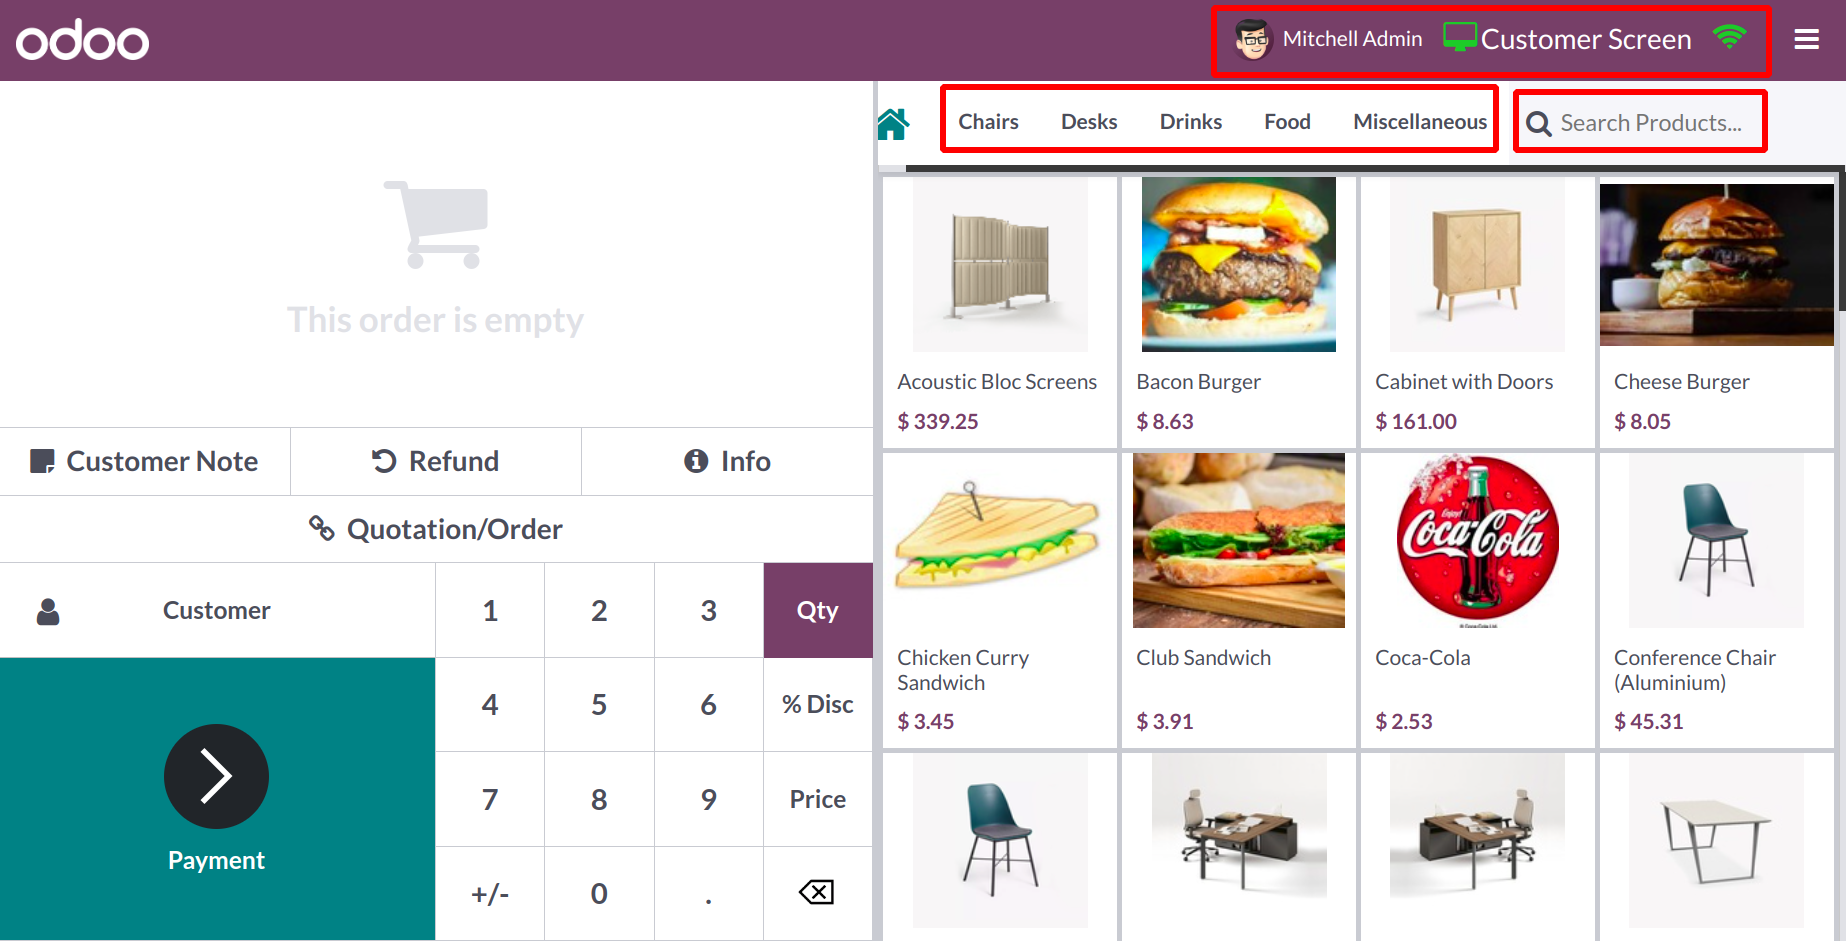
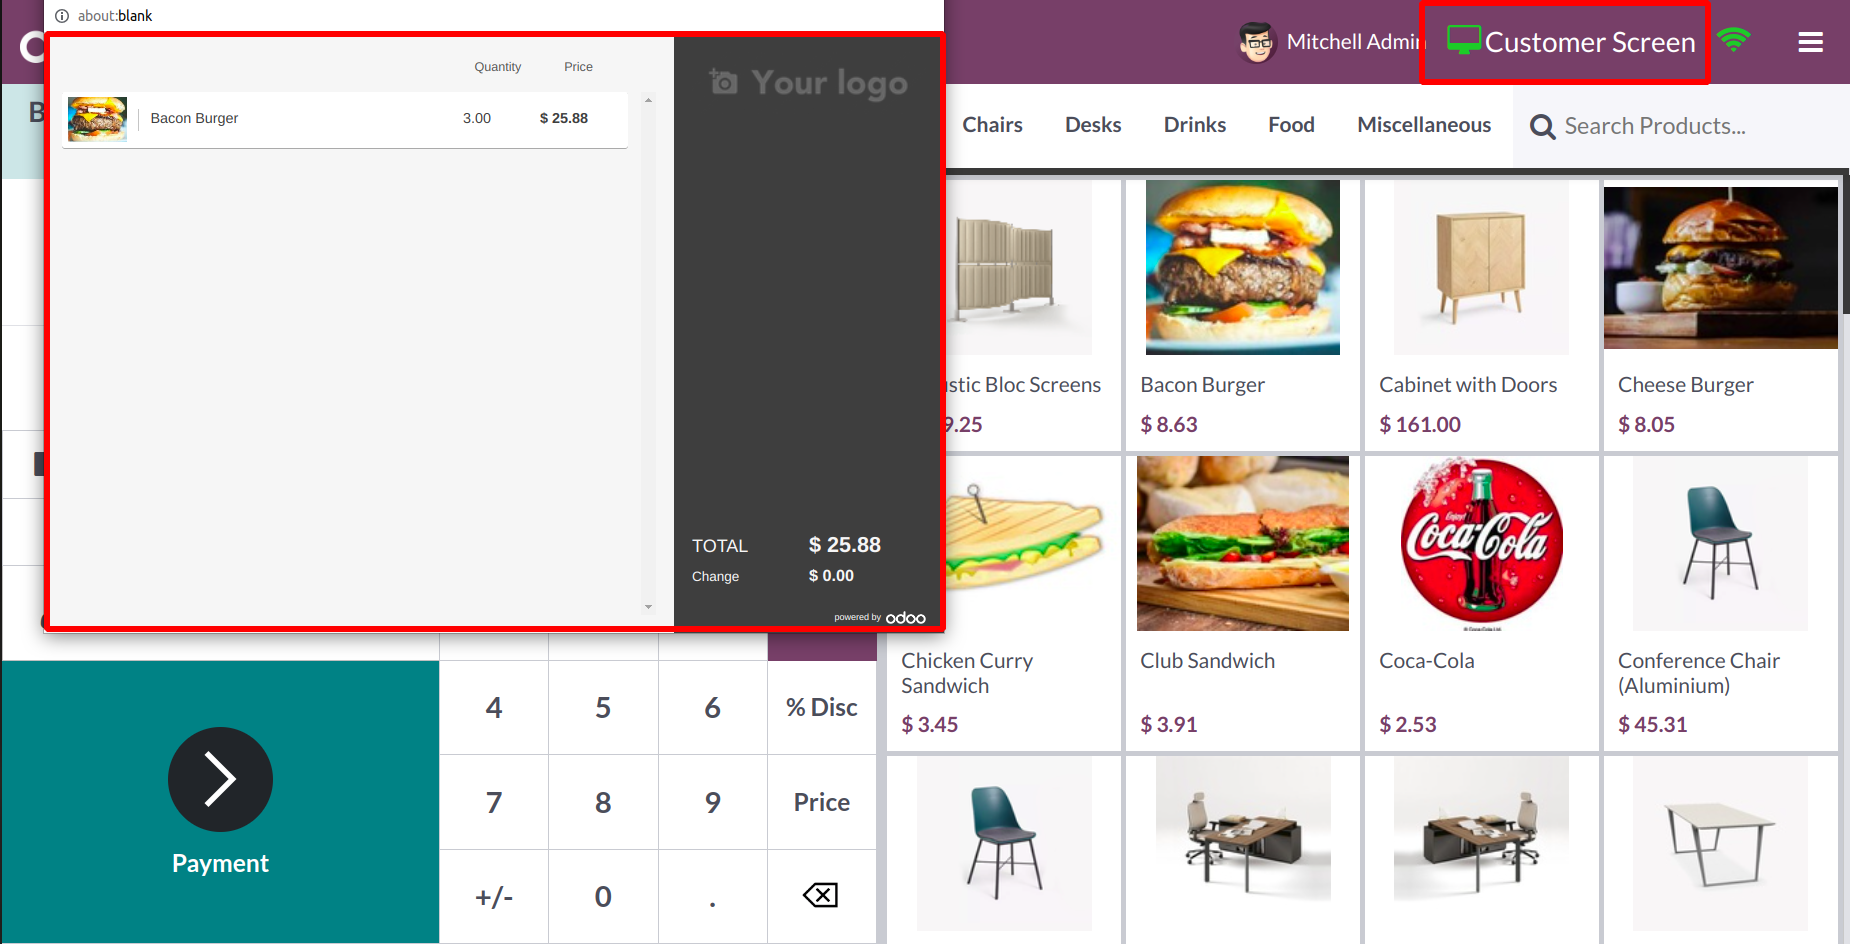
You can see the synchronization and connection status of the customer screen in the top right corner of the screen. Customers will check out on the consumer display via a second display.
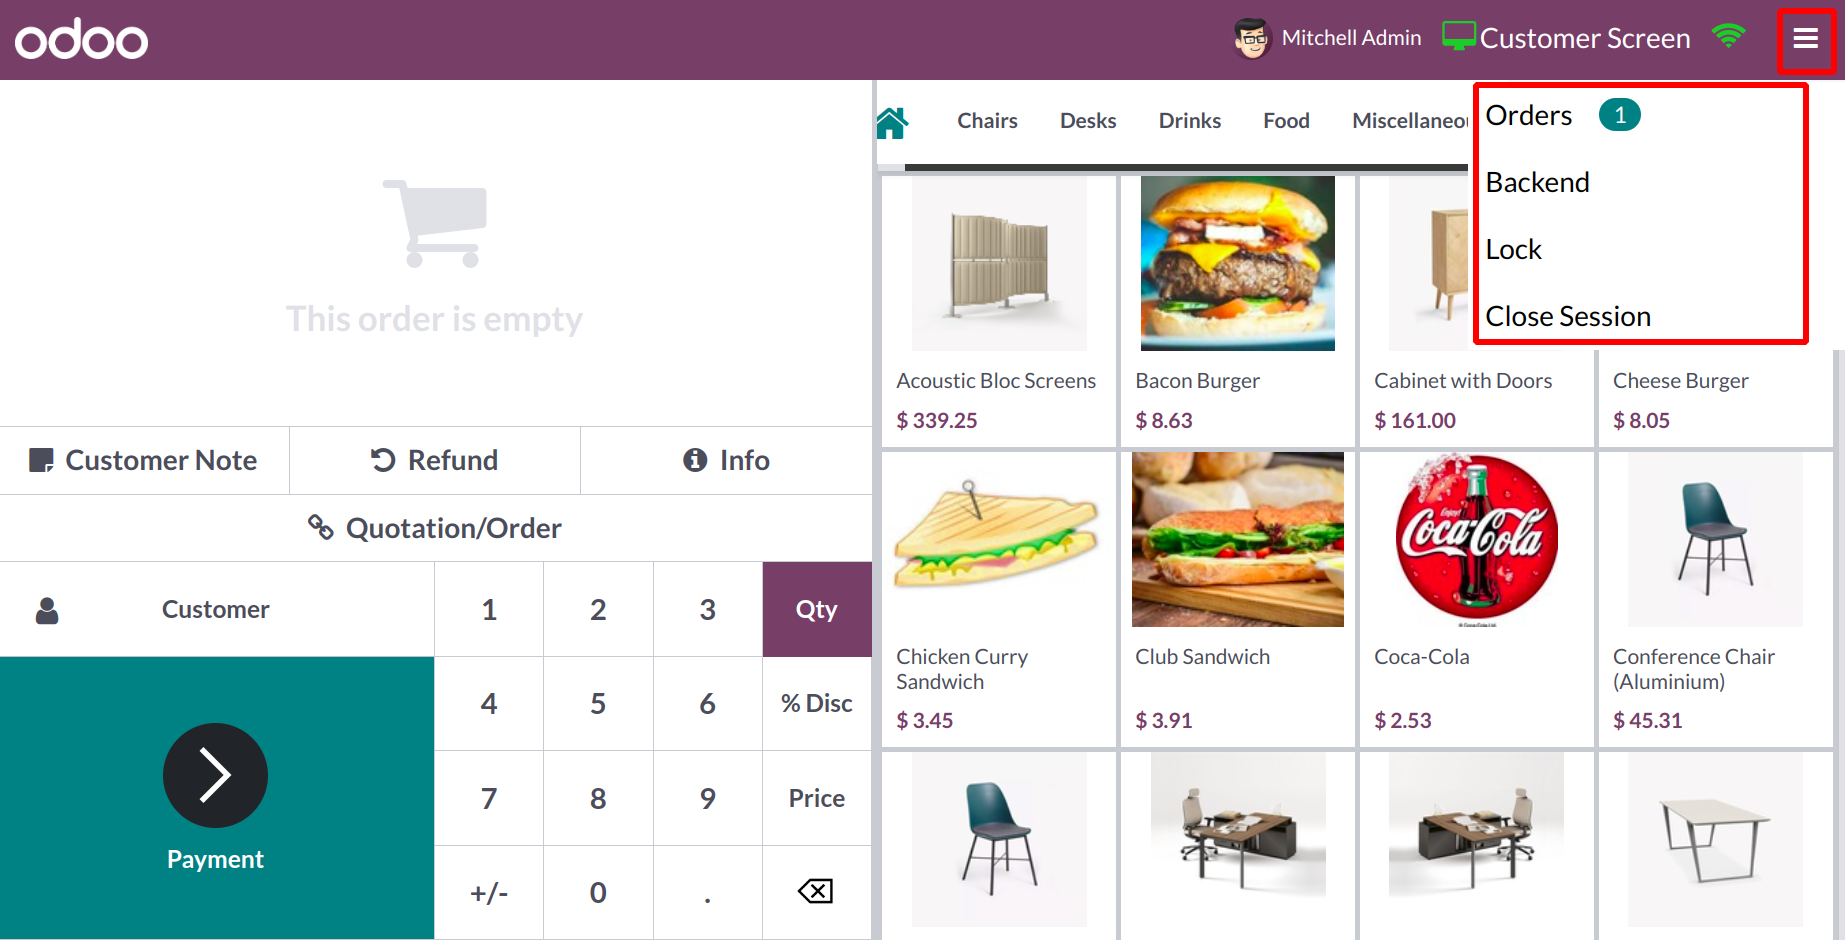
You can utilize the LOCK button, which is highlighted in the picture, to lock the session. The session will end when you click Close Session.
From the Orders option, you may view all the orders made during this session. The date, receipt number, customer, cashier, total, and status of the orders are all displayed in the window.
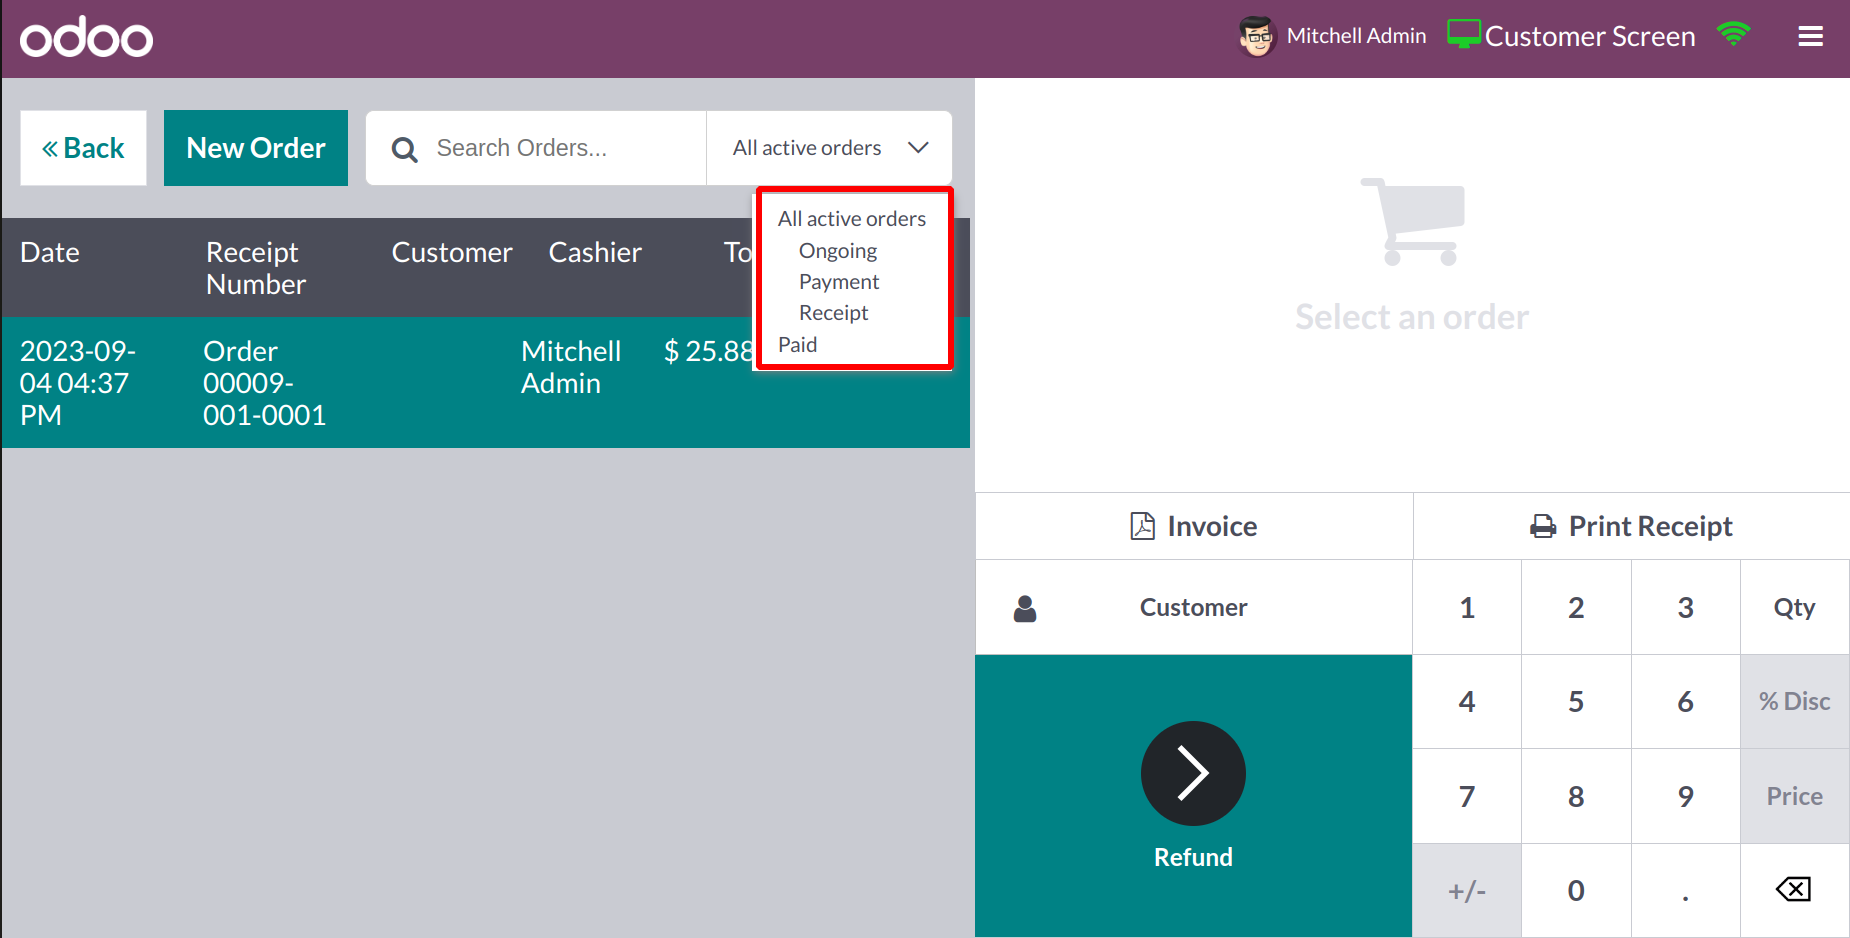
Orders can be searched for using the Search bar, and you can filter the results using the options for All Active Orders, Ongoing, Paid, Payment, and Receipt. You can make a new order right from this window by selecting the New Order button.
You will find a menu specifically designed for entering the Cash In and Cash Out information.
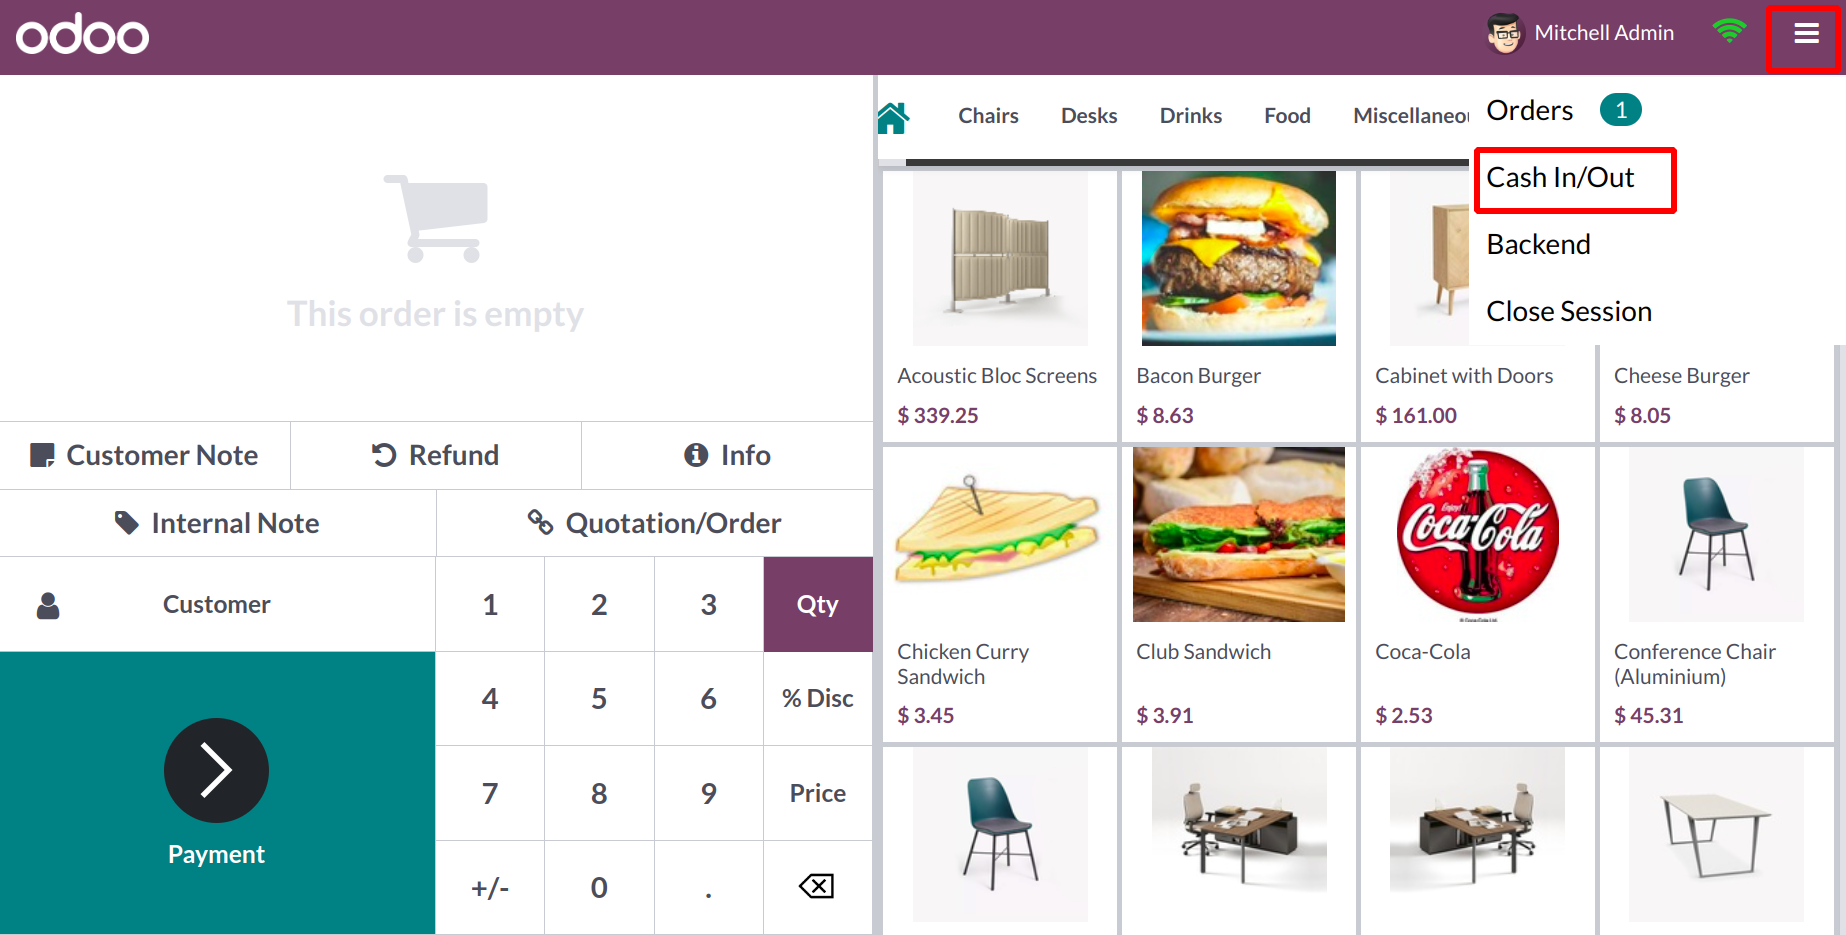
In an emergency, the employees can find themselves with no choice except to steal money from the counter. To ensure transparency, it is crucial to enter the cash in and Cash Out information in the accounting when they return the money to the counter. Let's use an illustration to explain this. Imagine that a worker stole cash from the cash register to pay for travel. To enter the information, click the Cash In/Out option.
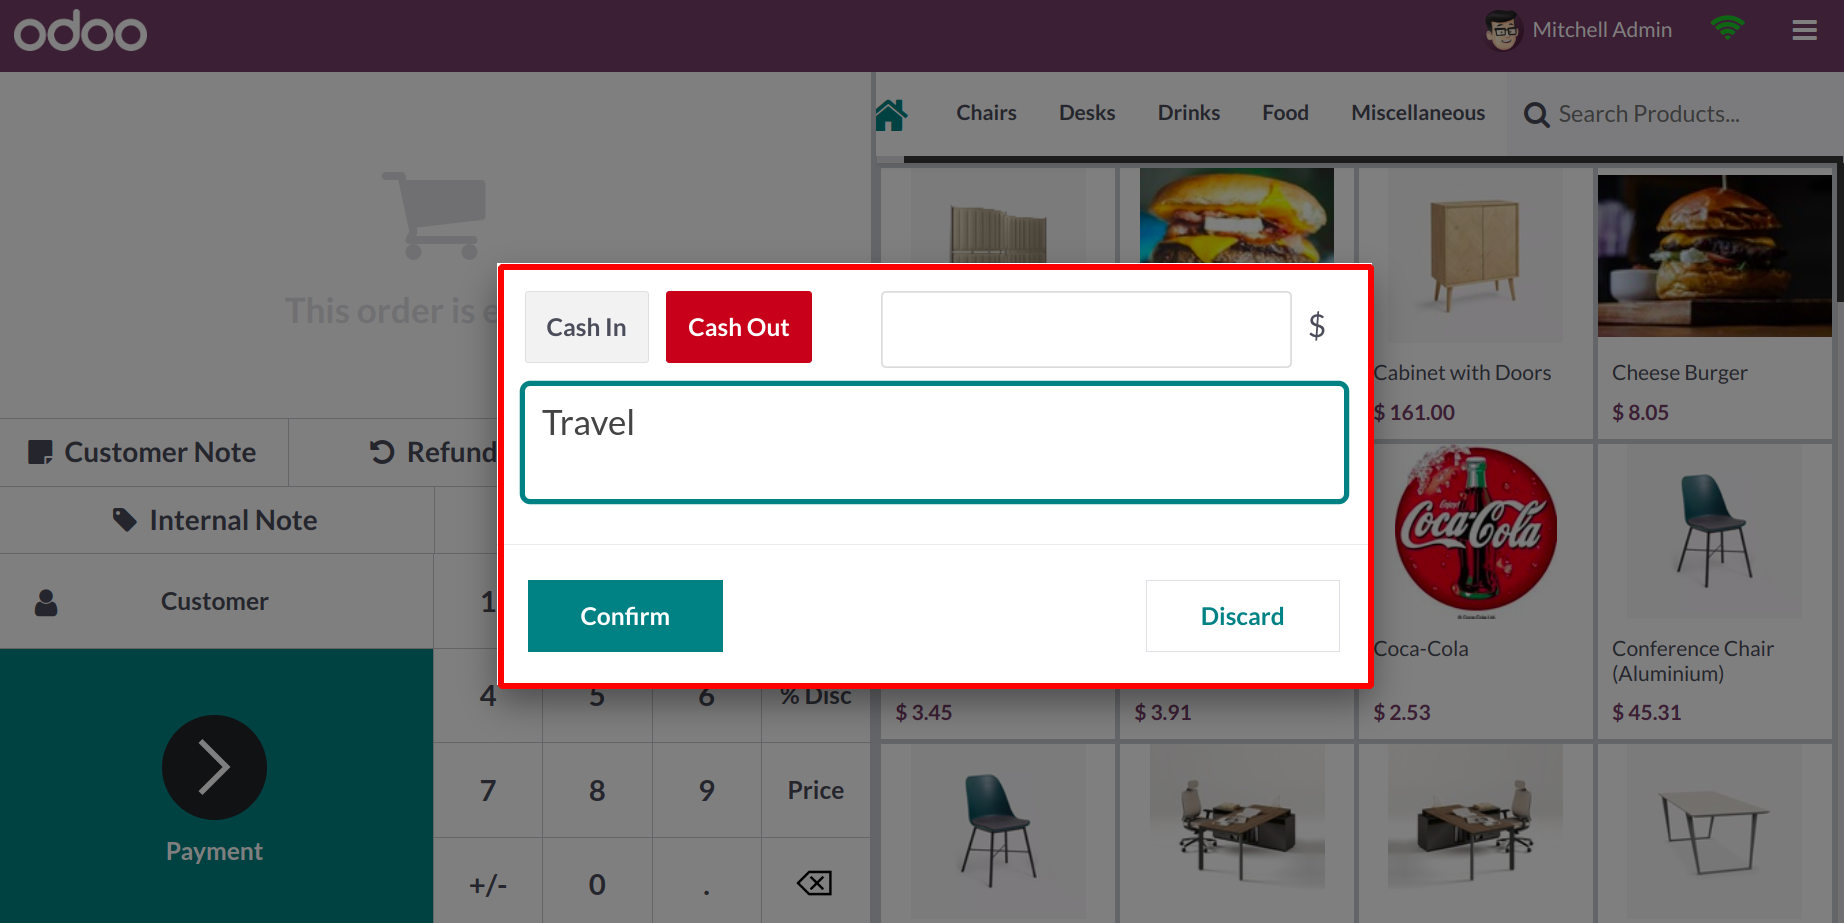
Choose Cash Out from this menu, then enter the employee's withdrawal amount. In the provided box, provide the explanation, then press the Confirm button. Odoo17 will log the Cash Out information. By selecting the Cash In button, once the employee returns the money, you can enter the sum on your counter.
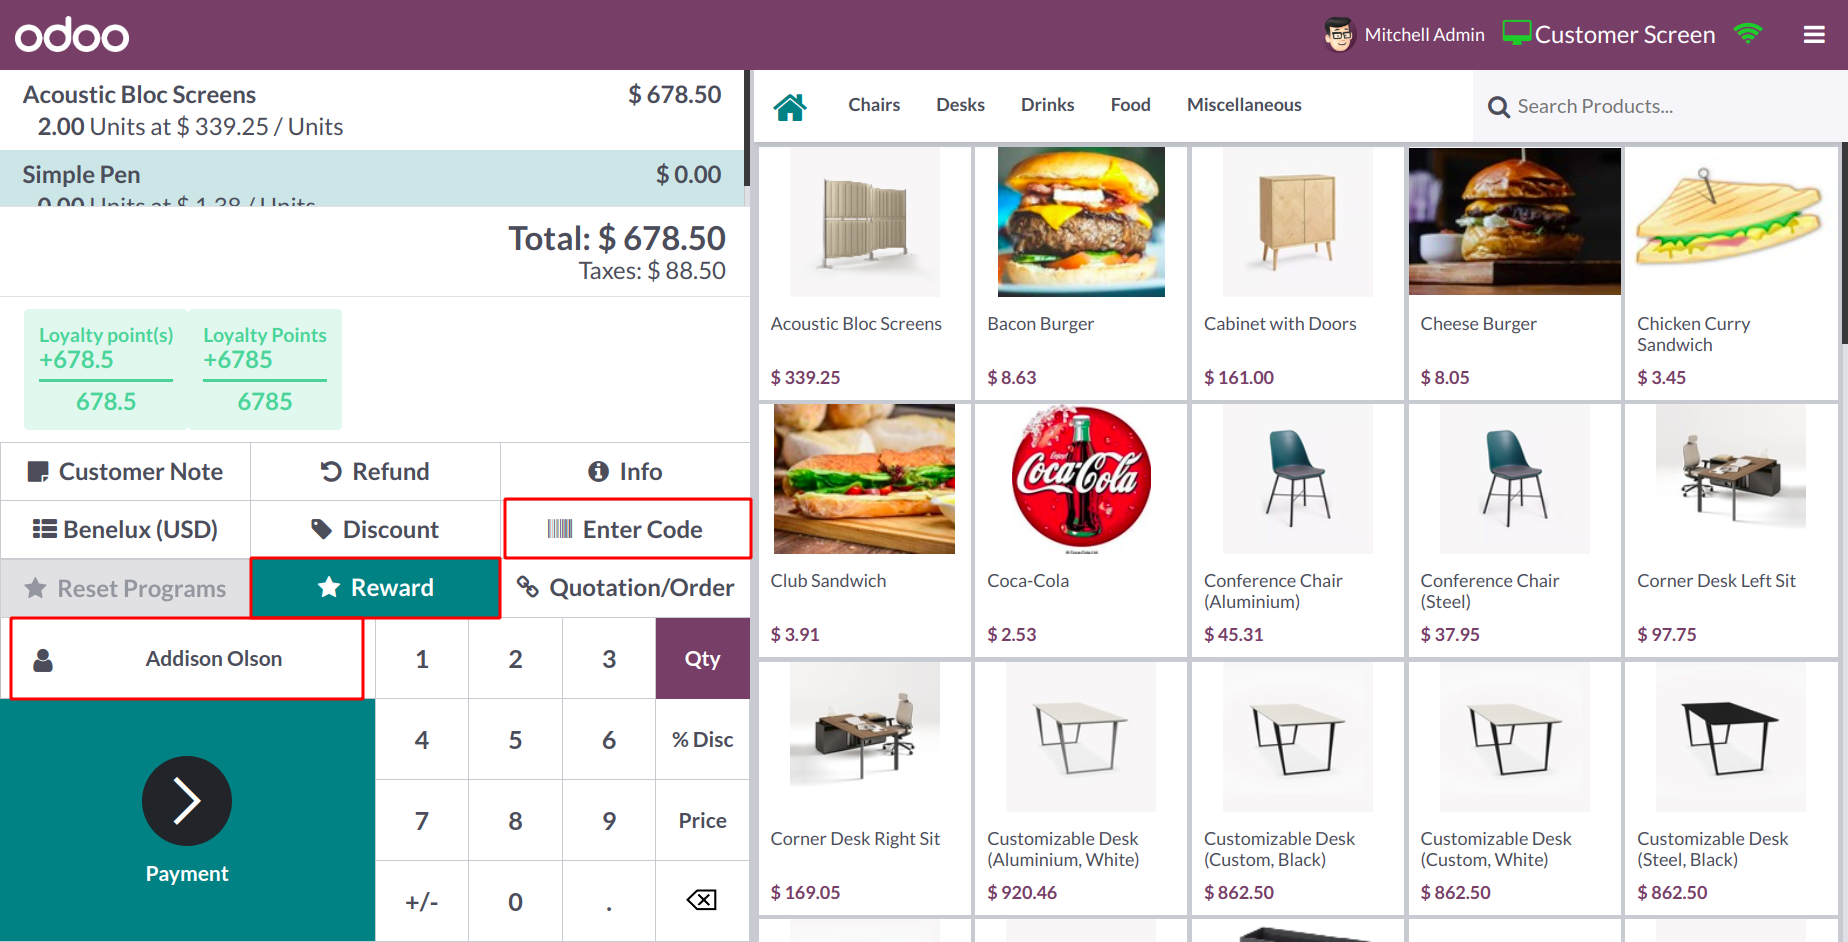
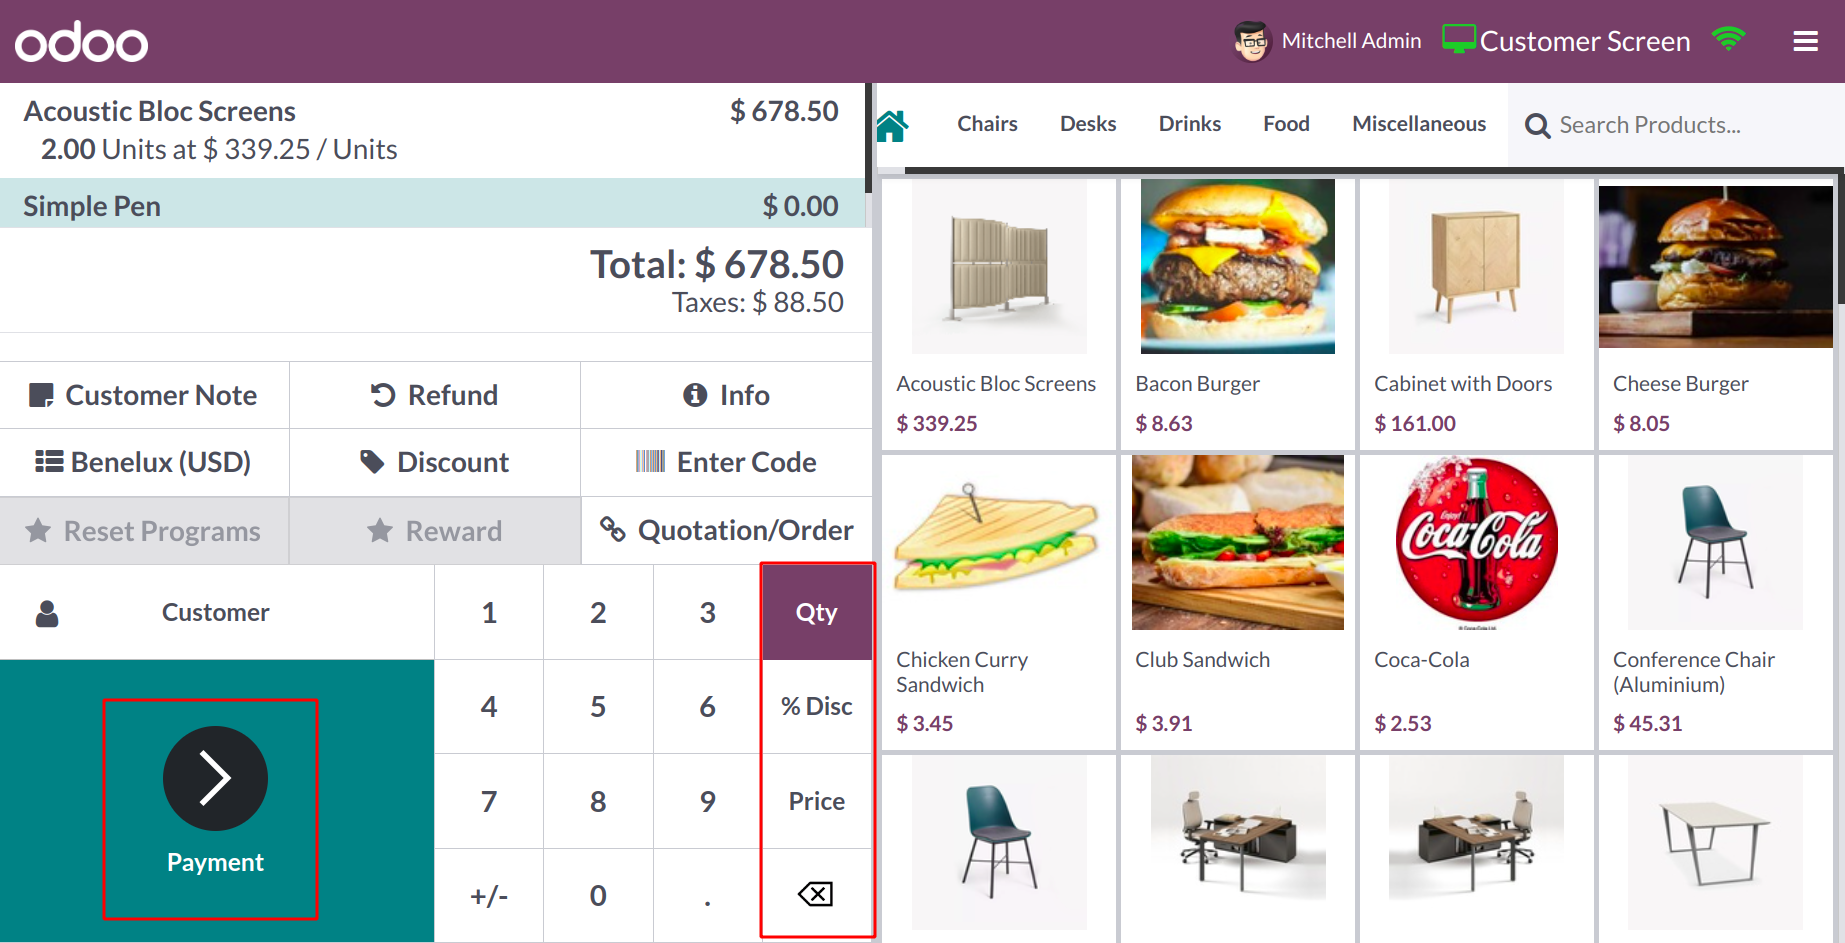
Let's now examine the PoS ordering process. On the right side of the screen, a list of products will be shown along with their names, pictures, and prices.
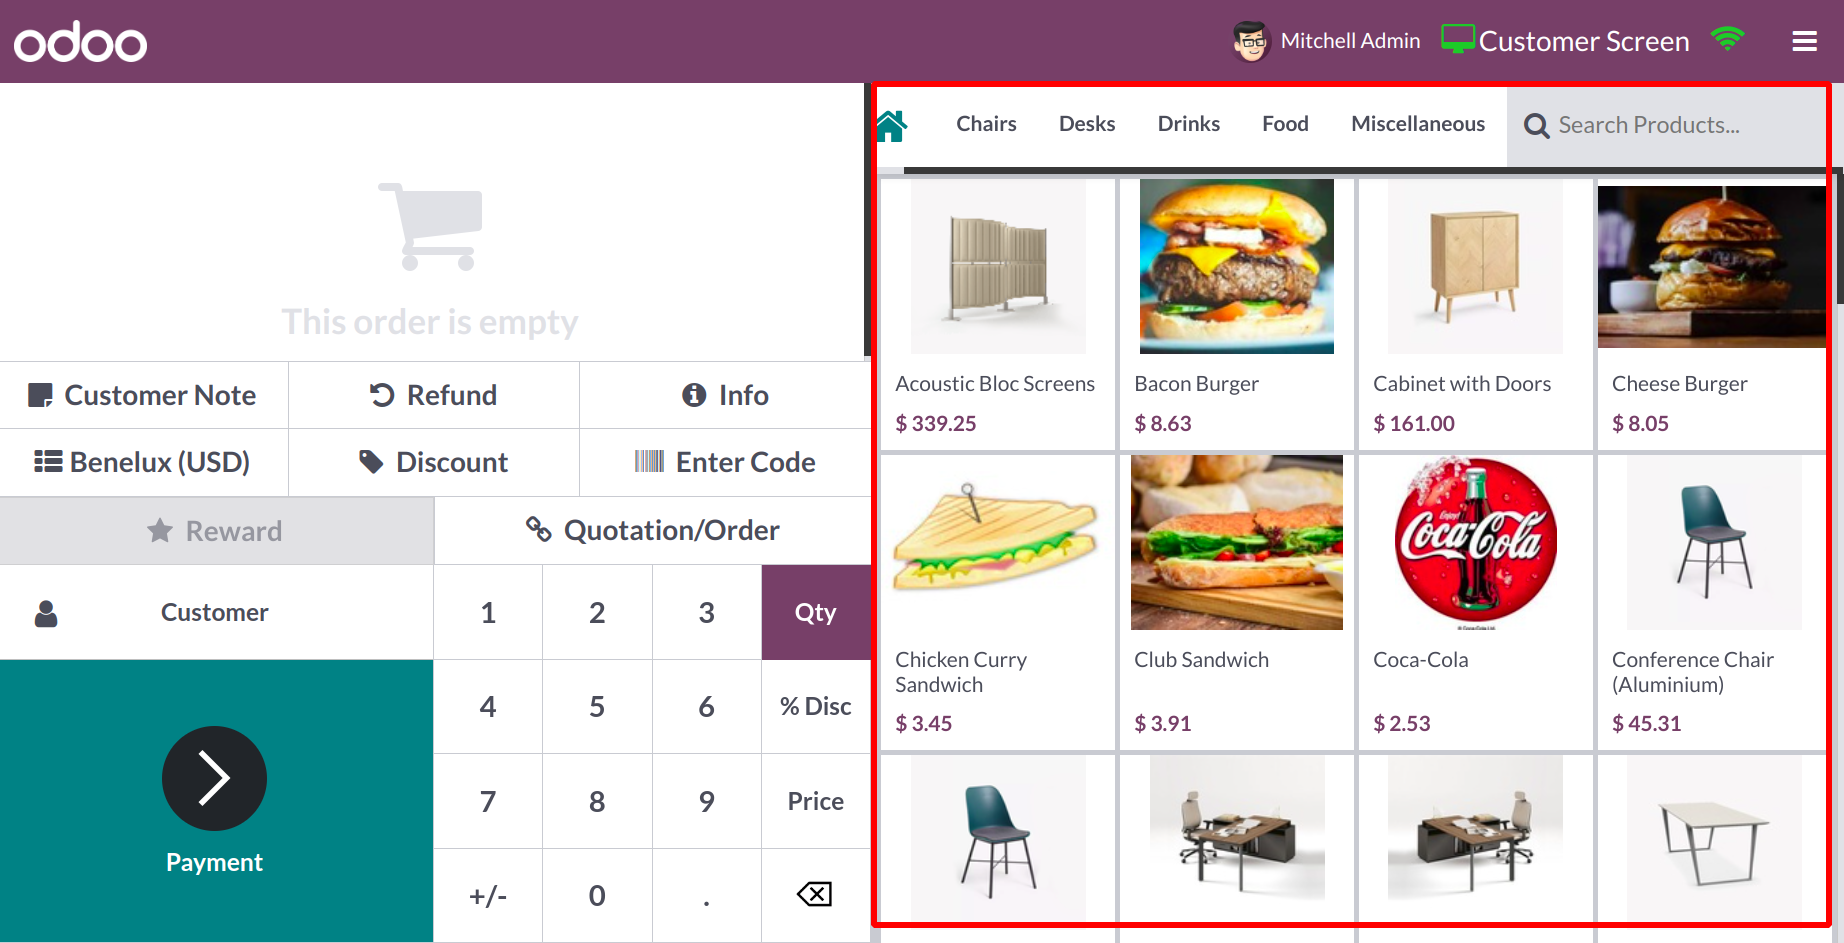
You can choose the product from the provided list when a customer puts in an order, and it will be added to the billing session. You will receive the functionality indicated in the aforementioned graphic in the billing session, depending on how this PoS session is configured in the backend.
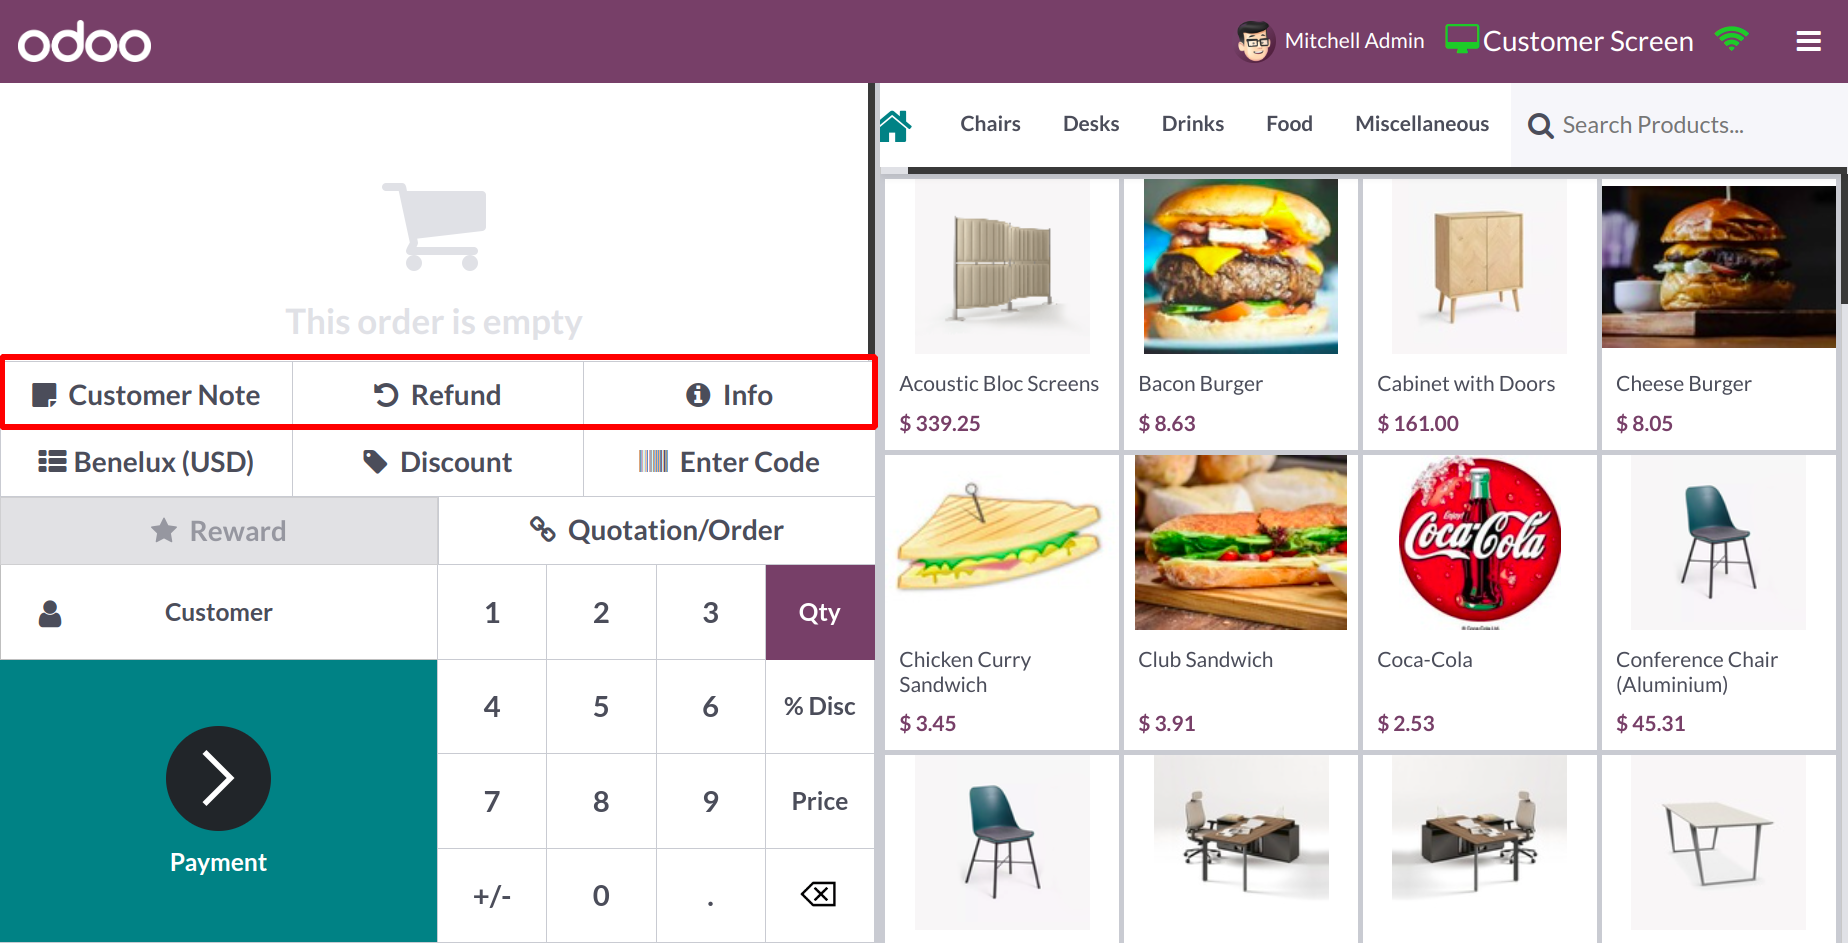
You can include a note in the bill by clicking the Customer Note button. Use the Refund button if the consumer requests a refund after making the purchase for a specific reason. Additional details on the ordered item are available by clicking the little Info button.
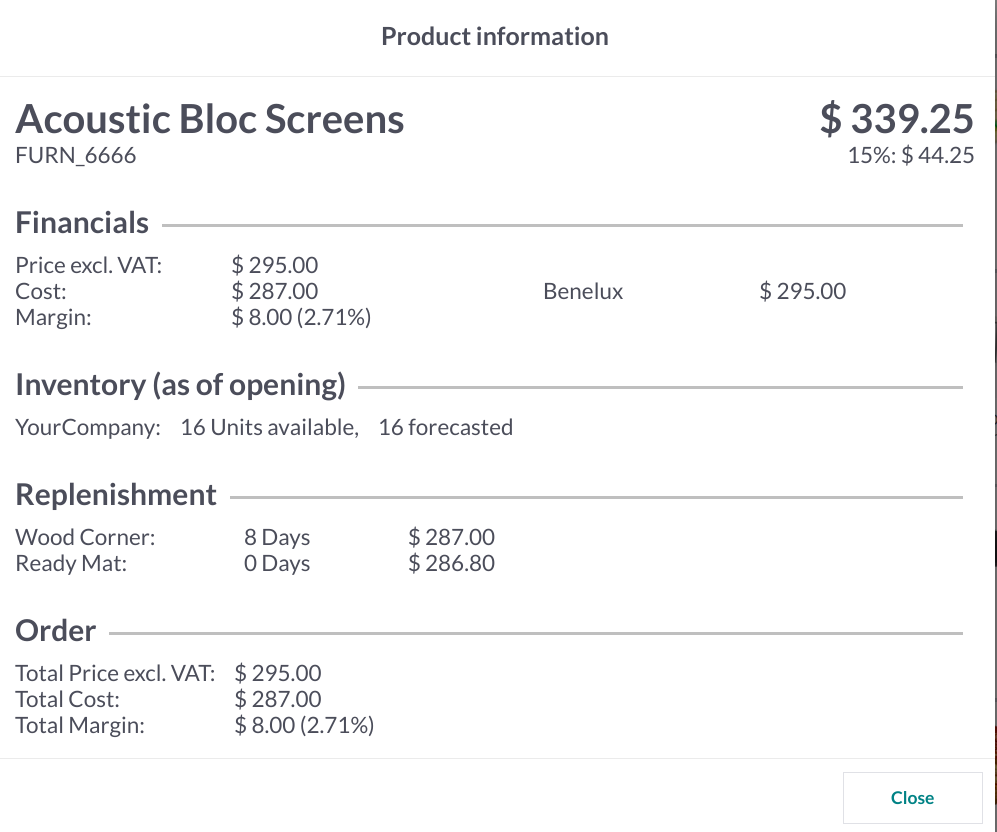
As seen in the figure above, it comprises the financial, inventory, replenishment, and order details.
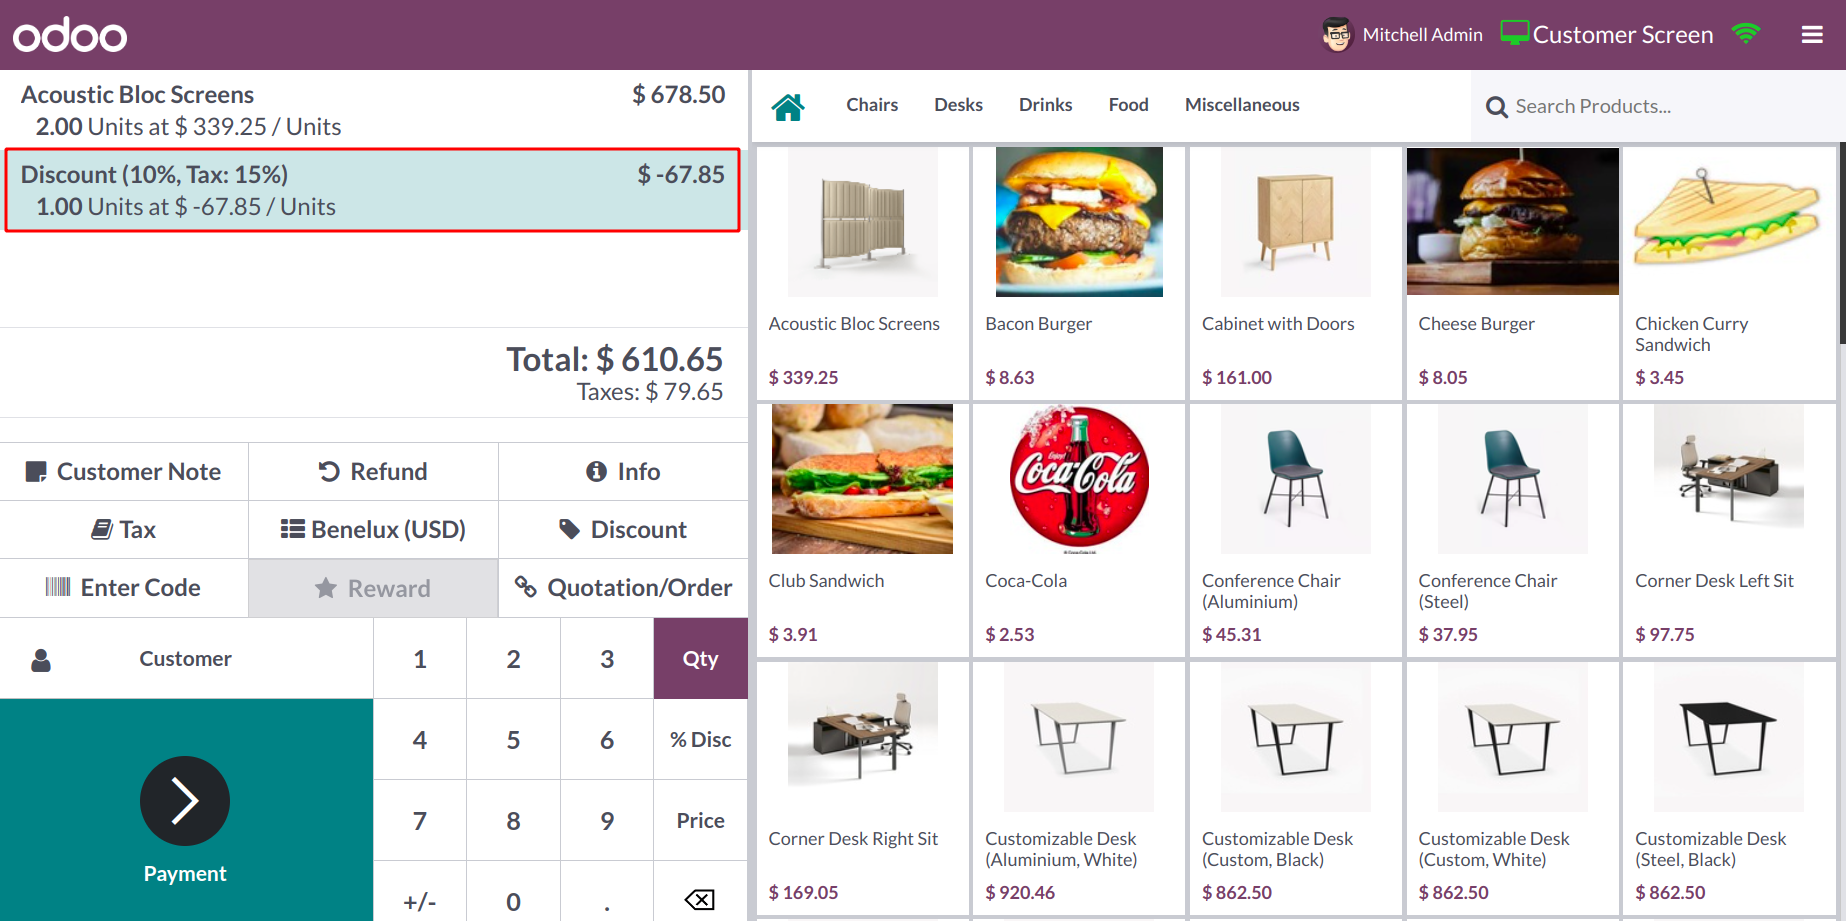
To set the tax on the order, use the Tax field. If there is a Discount that applies to this order, you can select the corresponding button and specify the amount of the discount.
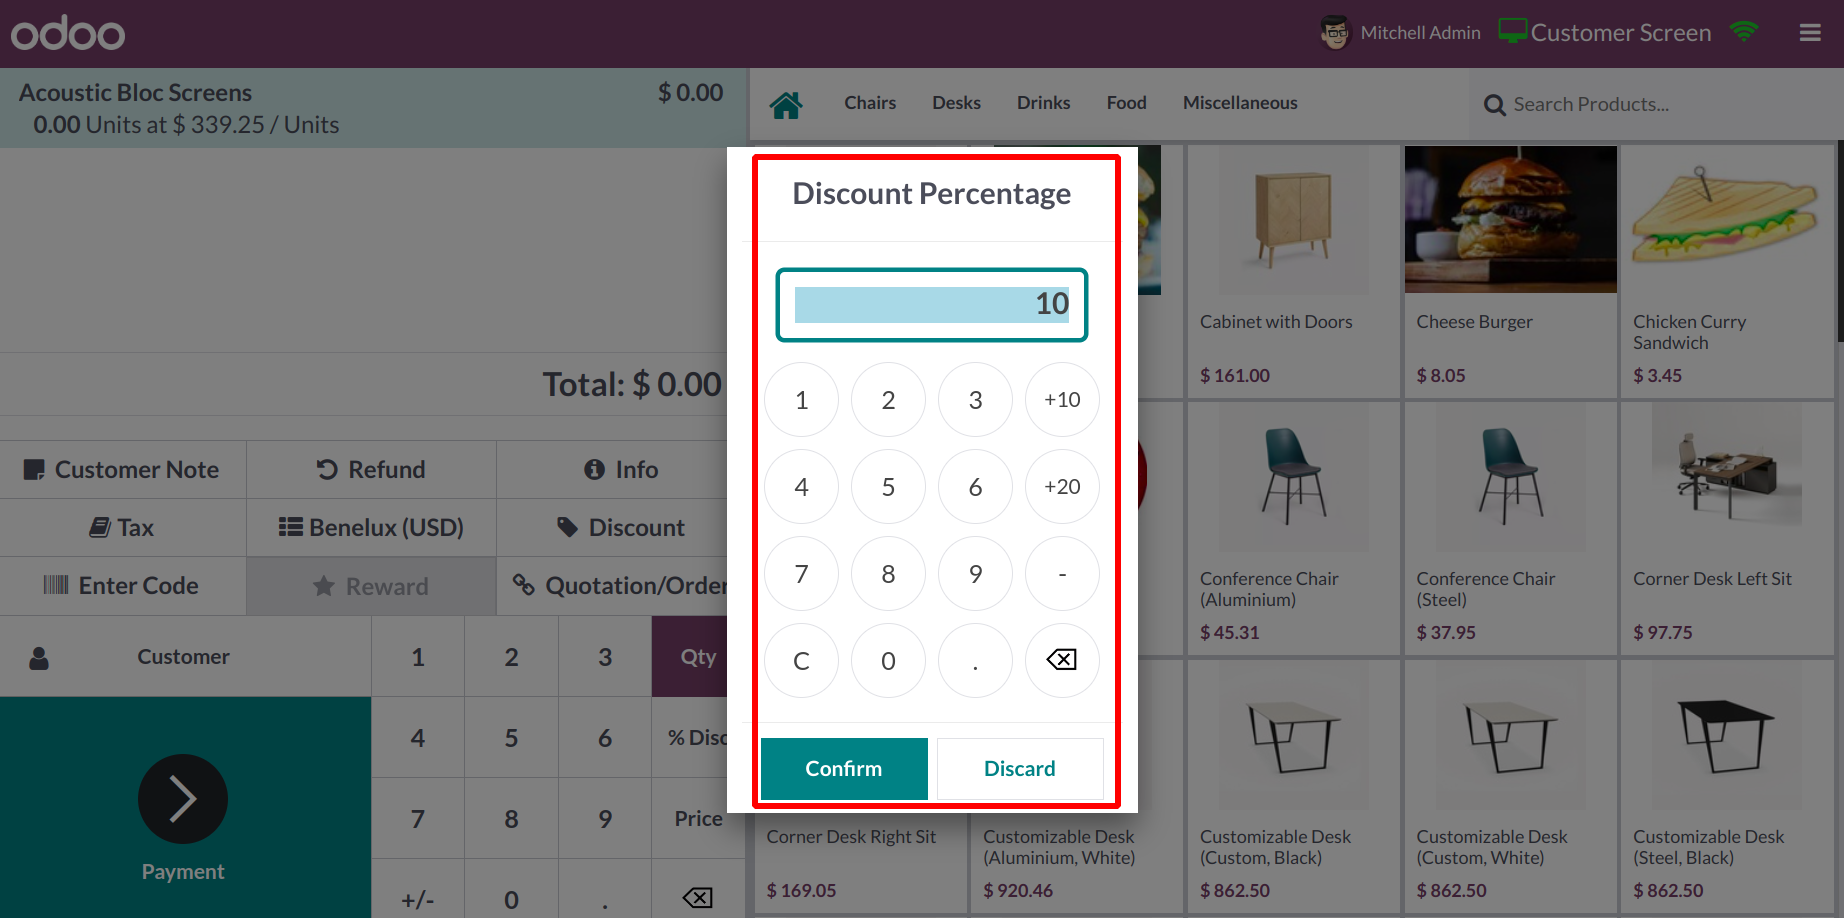
The amount of the discount will be applied to the order once you click the "Ok" button.
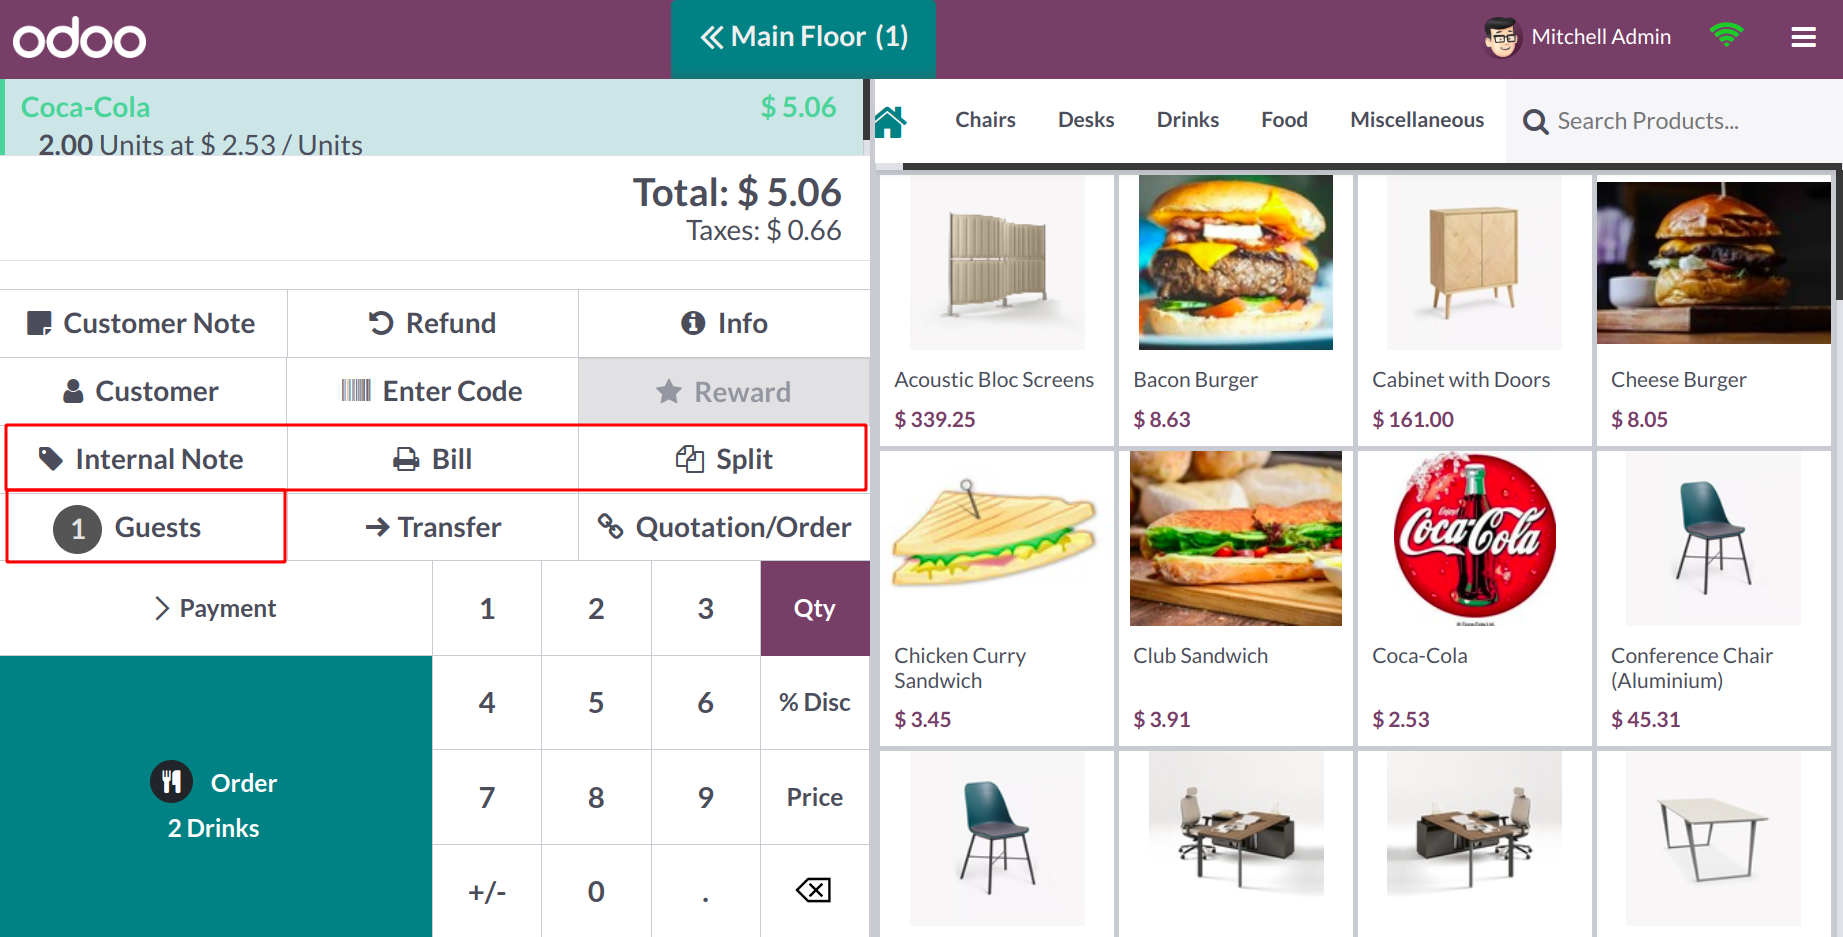
Use the Internal Note button to add any internal remarks to this order. To divide the cost, click the Split option. If the order includes multiple items, you can use this button to divide the cost and pay for each item separately. Bars and restaurants typically employ the Guests button. This button allows you to invite people to a particular table.
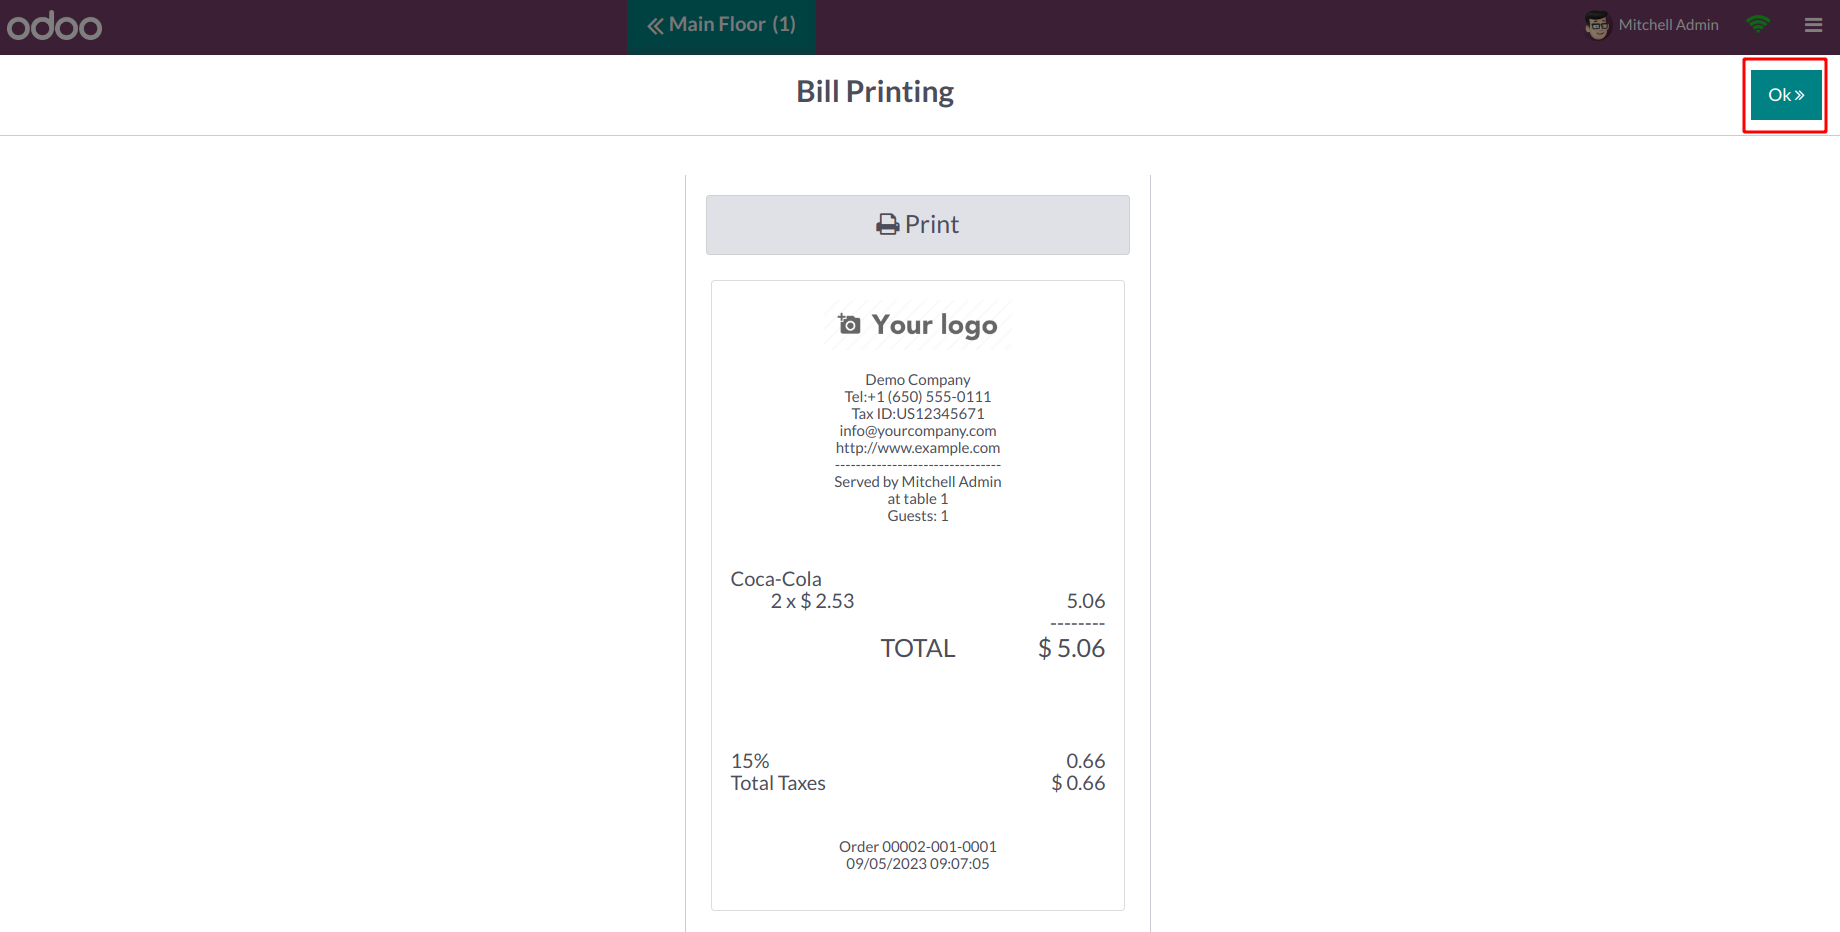
You can print off the bill by selecting the Bill button. The pop-up window allows you to enter printing information and print the bill as needed.
Use the Enter Code button to specify any gift cards or discount coupons that the client may have, and the offer will be added to the order. Likewise, the Reward button will display any rewards that this client is eligible to claim.
You can choose the customer for this order by using the Customer field. The snapshot above depicts the client list that is currently available. You can choose your client from the provided list.
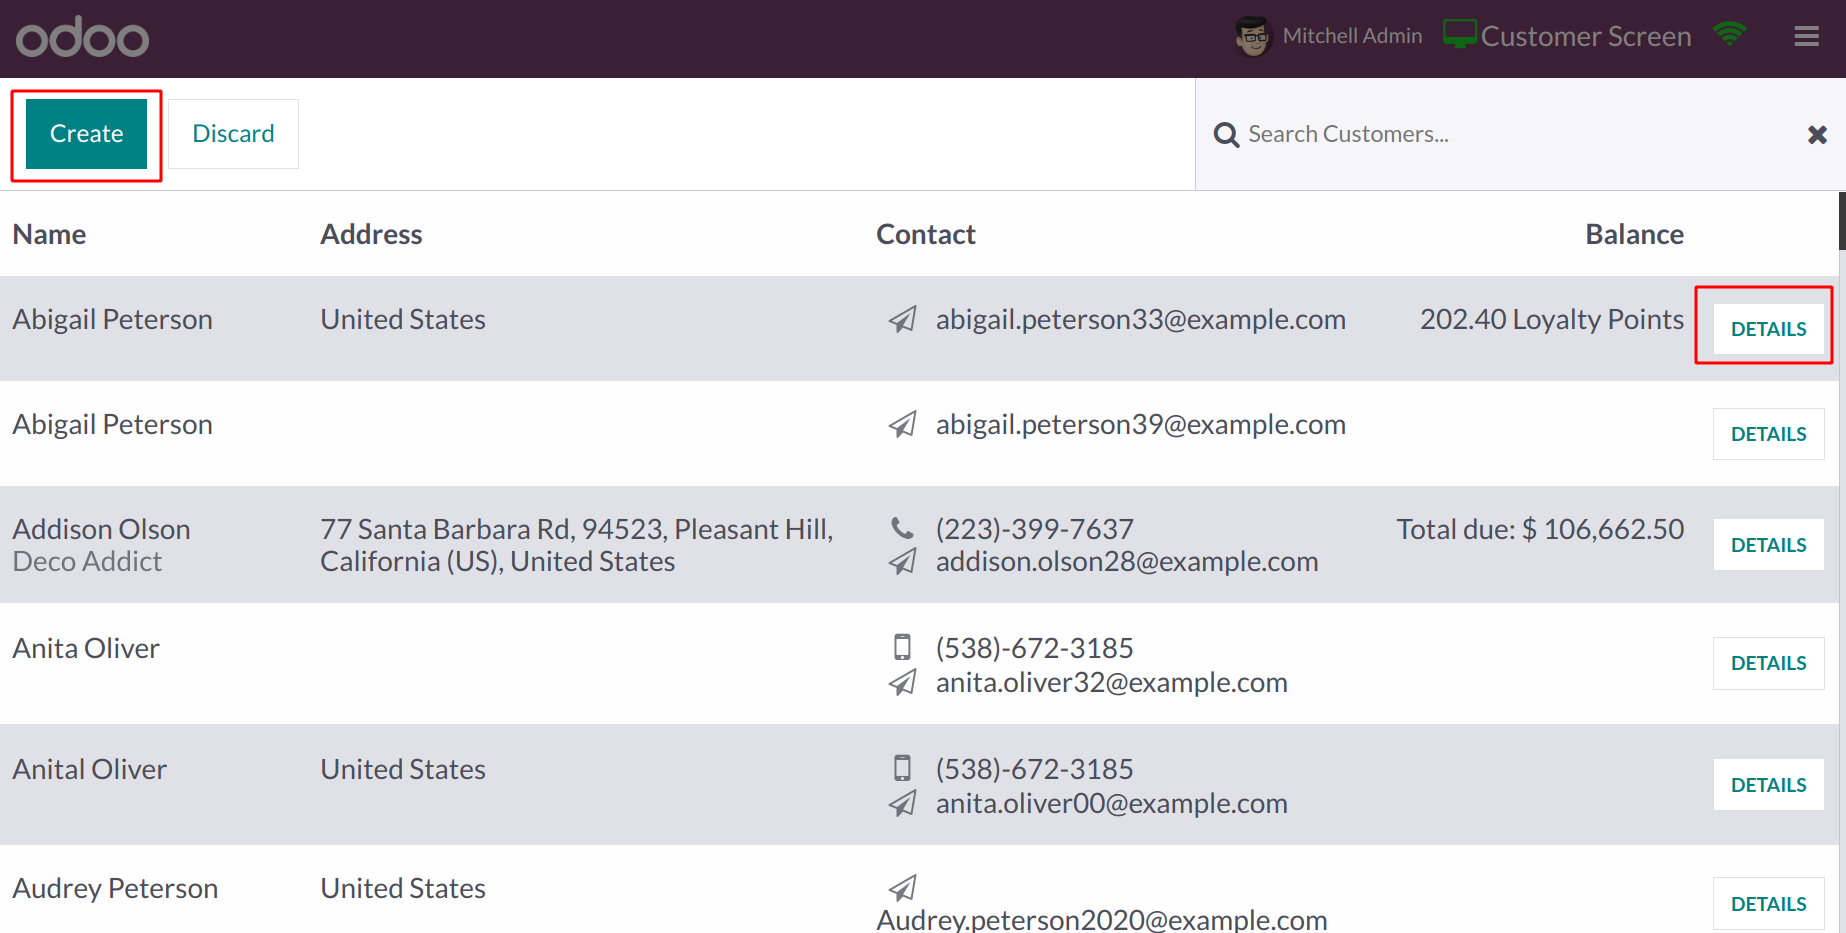
If the customer record is not present, you can use the Create button to create a new customer. The customer you've chosen will be fully described when you click the Details button.
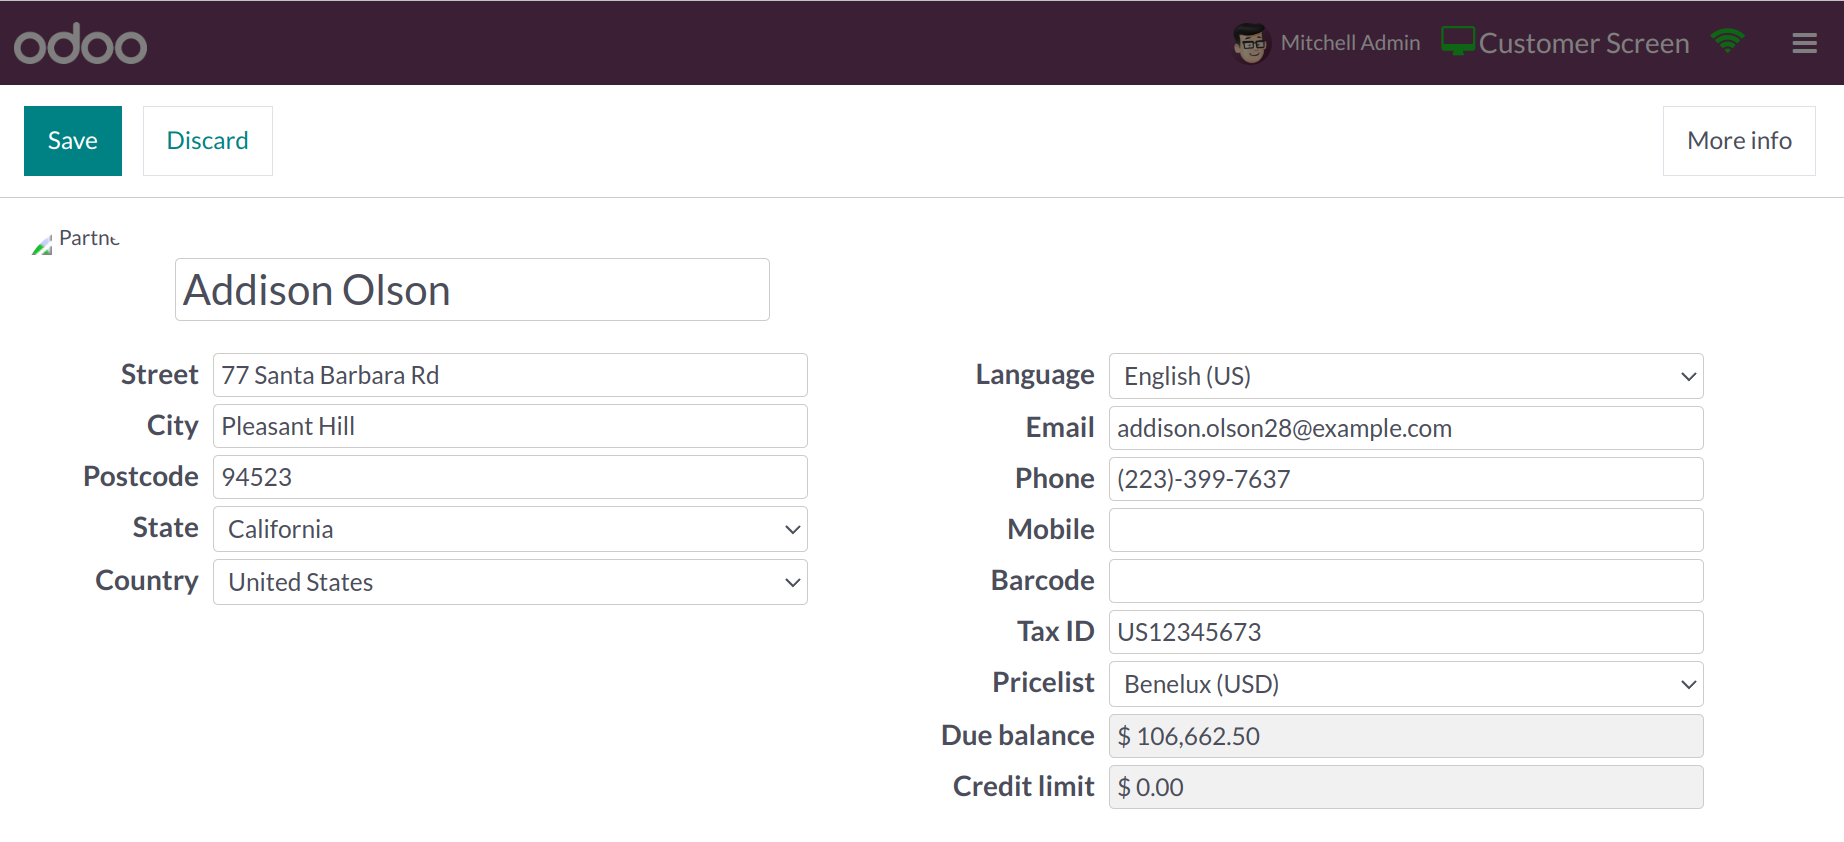
This information comprises the client's Name, Picture, Street, City, Postcode, State, Country, Language, Email, Phone, Mobile, Barcode, and Tax ID. To learn more, click the More Info icon.
Use the associated button to view the Quotation or Sales Order associated with this order. Additional buttons for setting the quantity, percentage discount, and price of the items added to the order will be available.
Click the Payment button to start the payment. As seen below, Odoo takes you to the payment window.
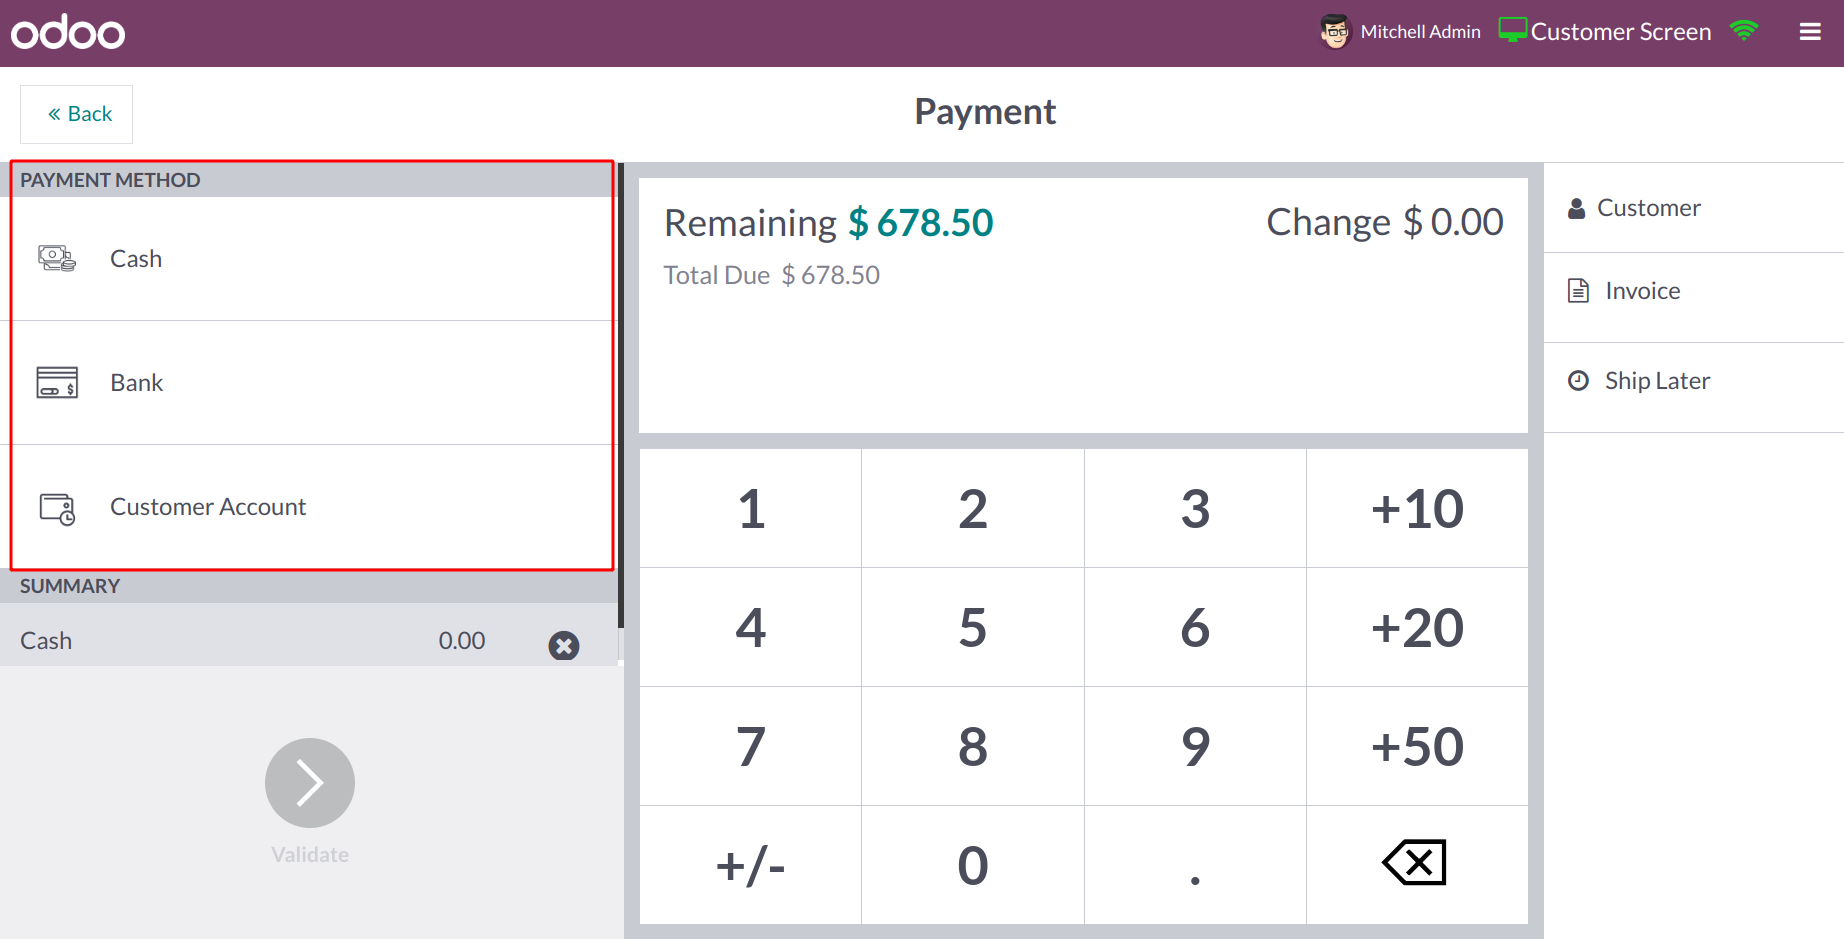
On the left side of the screen, you can see the Payment Methods that are accessible for the current POS session. Choose a payment method that will work for the customer's request. The appropriate Summary will be provided in the given box after choosing the payment option. You can see the customer's name on the right side of the screen. To create an invoice for this order, click the Invoice button. The tip can be entered using the Tip button if the consumer wants to leave the employee any tips. If a consumer wishes to place an order for a product now and have it delivered later, they can use the Ship Later button.
The Remaining Change and Total Due will be displayed on the payment screen. You can validate and confirm the payment using the Validate button. Odoo will ask you if you want to receive the receipt and invoice after you validate the payment.
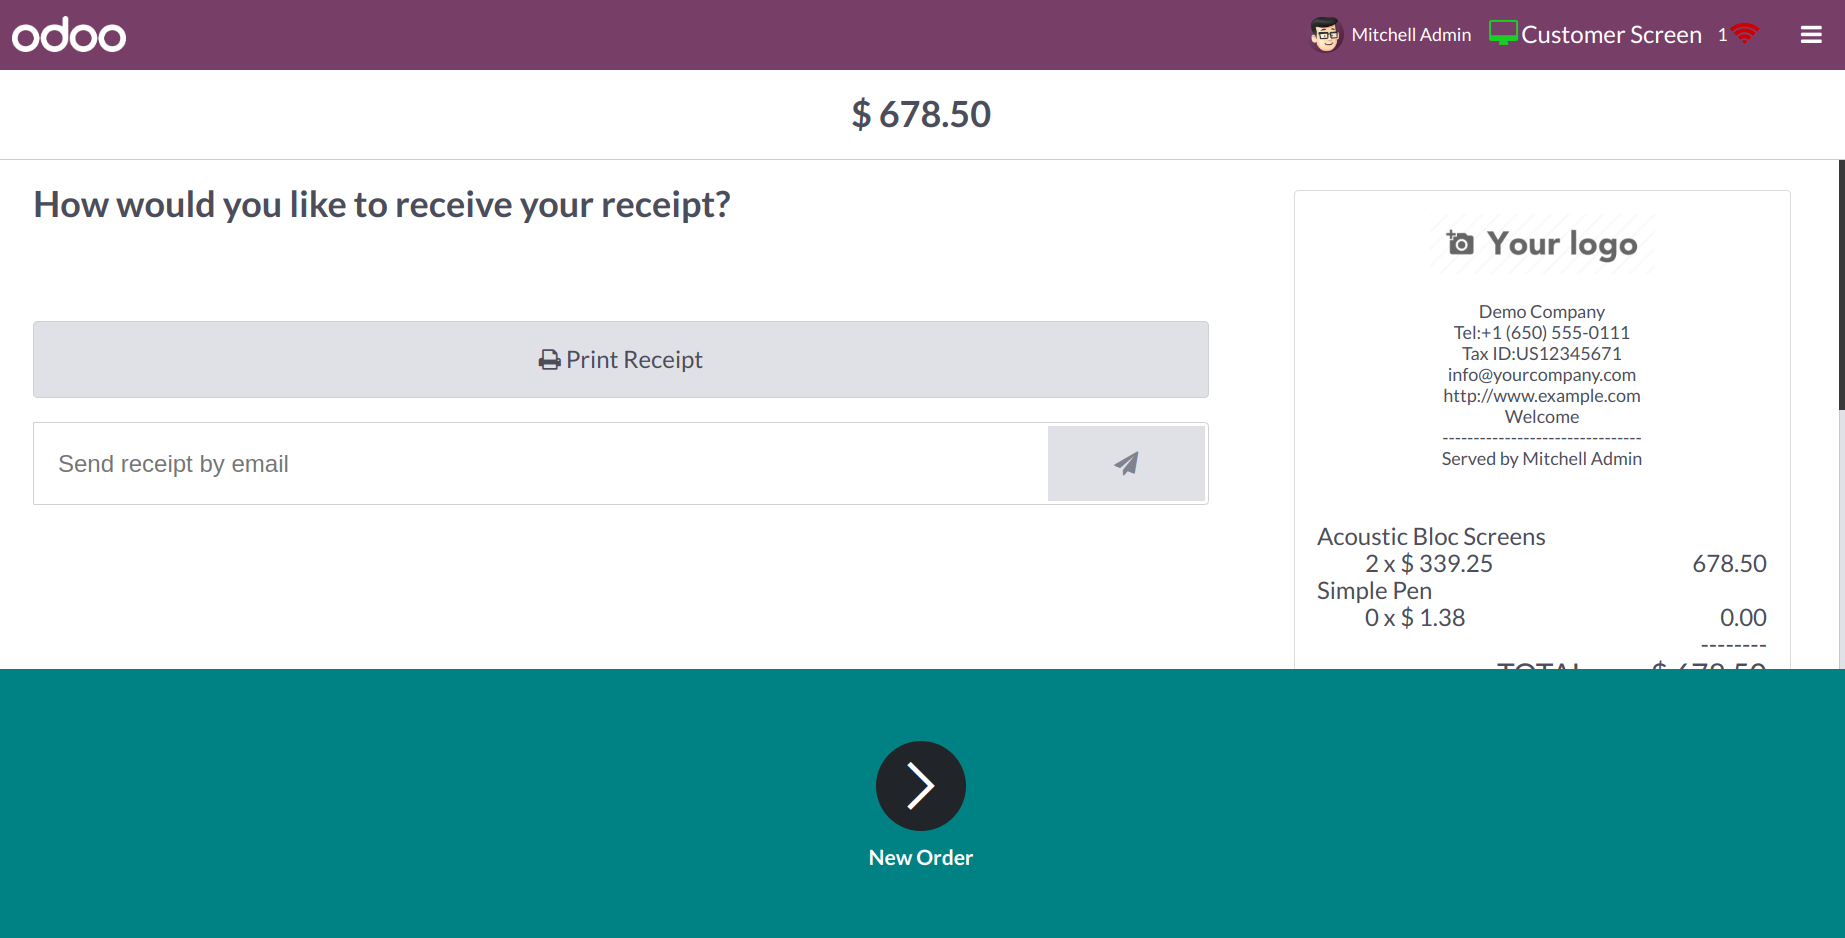
Using the Print Receipt button, you can print the receipt. The receipt and invoice may also be delivered to the client via email. The order is finished after the receipt and invoice have been sent.
To end the current PoS session, click the Close button located in the top right corner of the screen. You will see the specifics of the closing session in a pop-up window when you click this button.
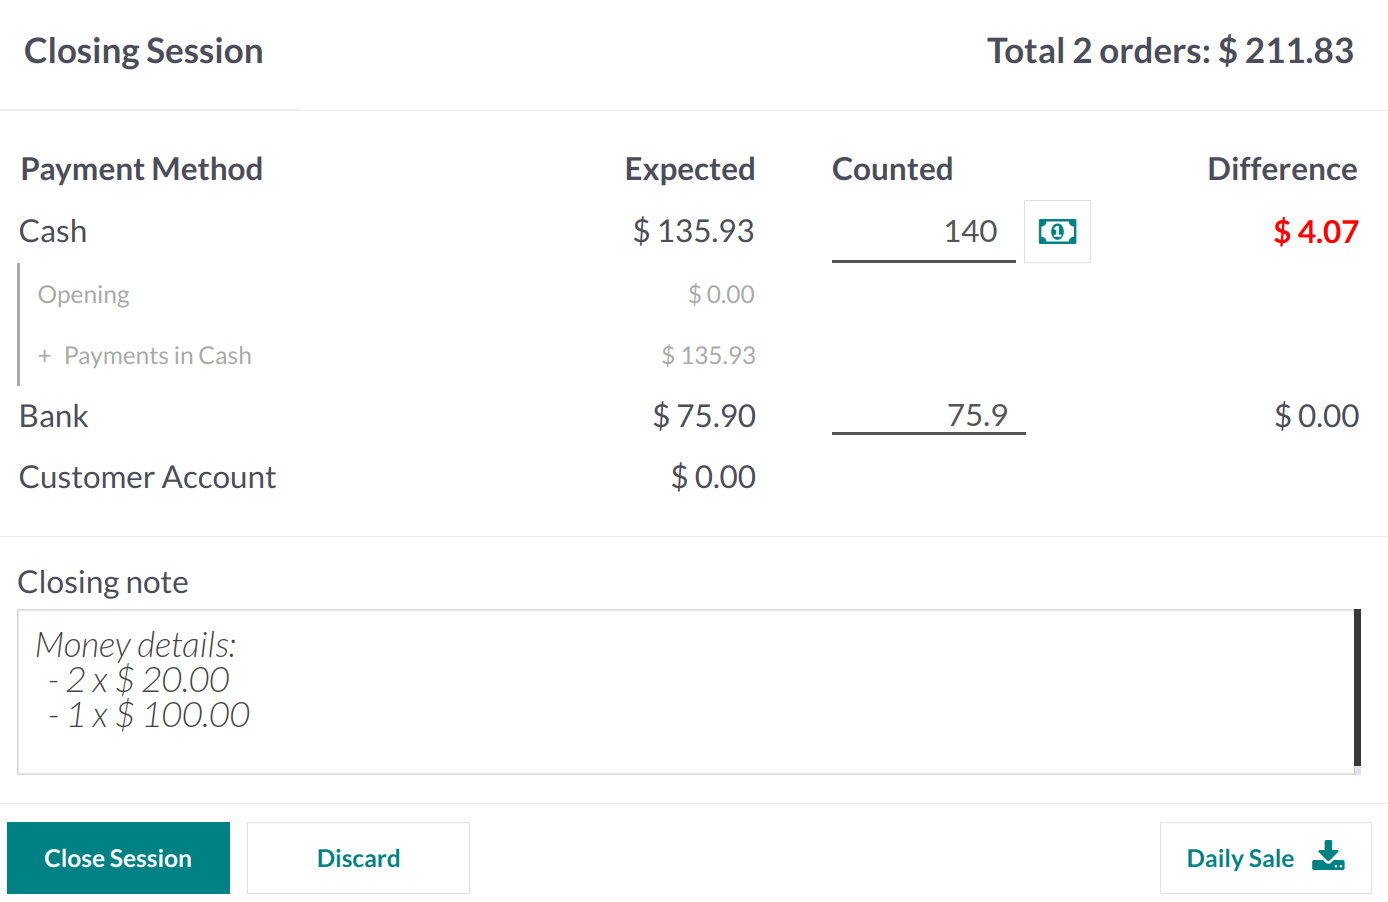
It contains the Payment Methods used to record customer payments as well as the history of the payment information for that specific day. The Opening Cash for the session is displayed in the Expected amount. You can enter the entire amount taken in from today's sale in the Counted area. It is the session's final balance. You can use the money icon to help you figure out the total using the selected coins. The difference between the session's opening cash and closing balance is displayed in the Difference section. Use the Add a Closing Note box to add a note before the session is finished. Press the Close Session button now.
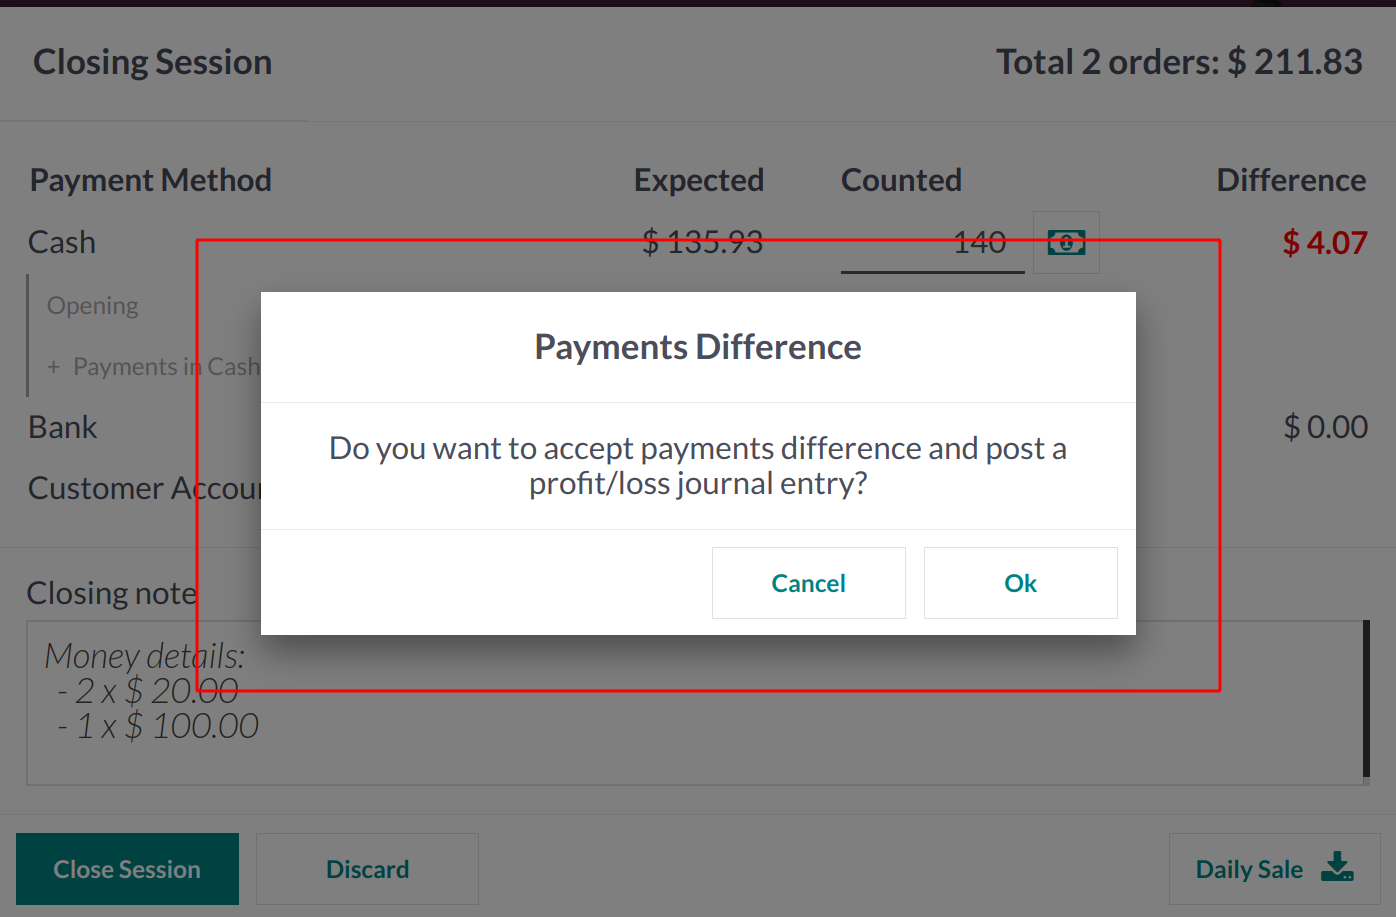
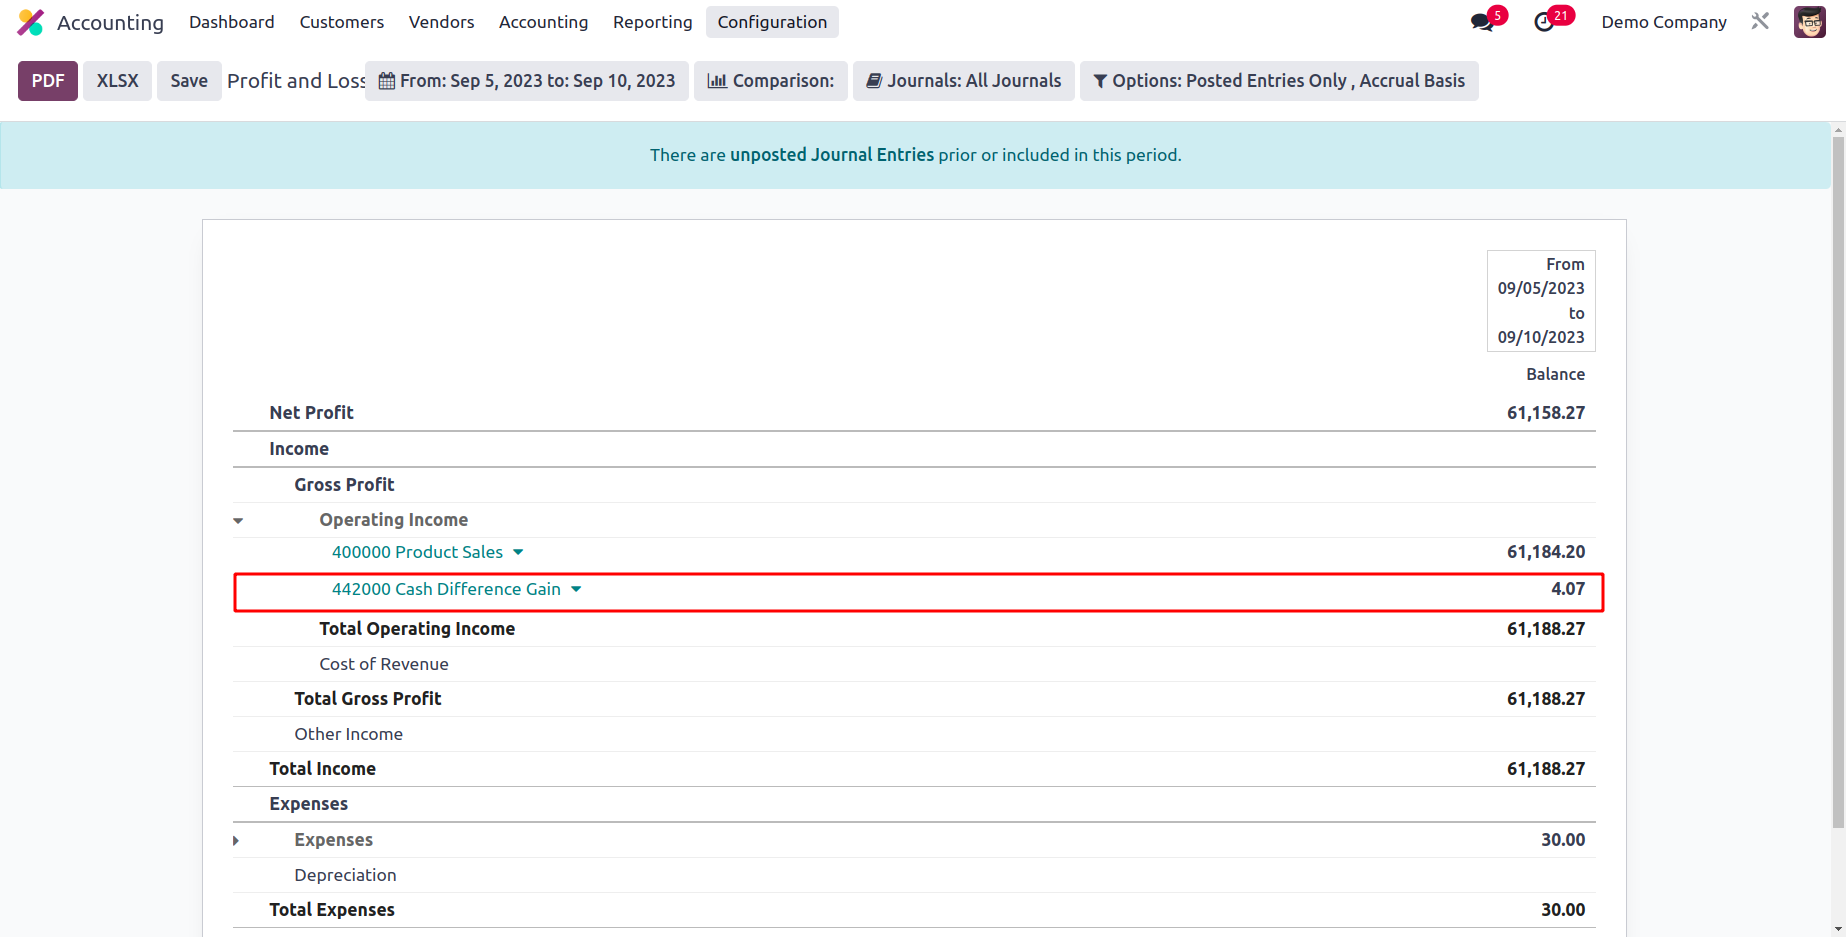
Odoo will ask you to accept the payment difference if there is any difference reported in order to post a profit/loss journal item in your accounting. Let's press OK and observe what happens. The meeting is now over. You can choose the Profit and Loss reporting option in the Accounting module.
The session's difference will be recorded in the Cash Difference Gain account and treated as income in the profit and loss report. The record for the cash discrepancy discovered during the counting can be seen in the General Ledger of this account.
This is how Odoo manages various PoS sessions.
The Orders menu of the PoS module's backend will show a complete list of all orders.
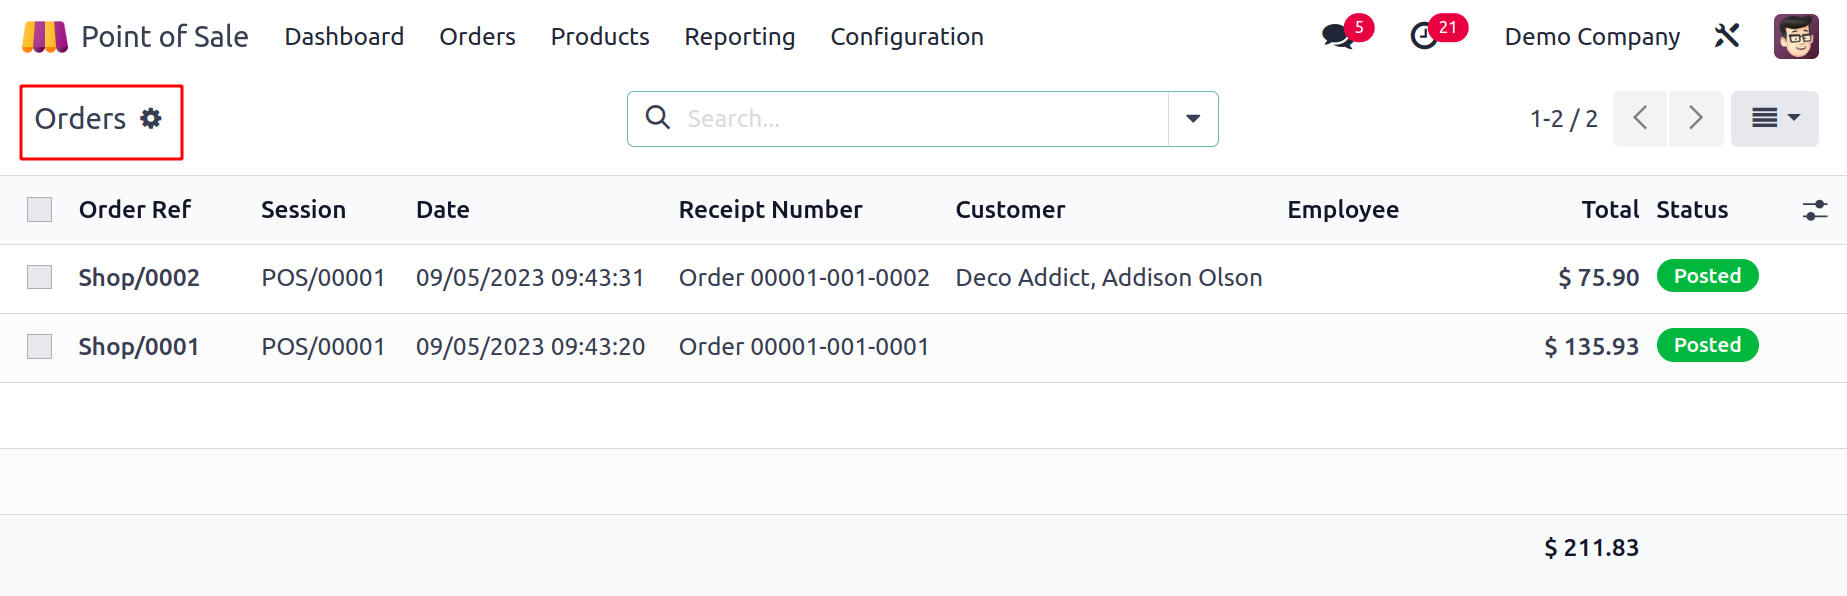
The Order Reference, Session, Date, Receipt Number, Customer, Employee, Total, and Payment Status are all displayed in the list view. You can also view this window at your convenience in Kanban and Pivot. You may organize the orders based on Session, Cashier, Customer, Status, and Order Date. Invoiced, Posted, and Order Date are the window's default filters. To create new sorting choices, use the Custom Filters and Group by options.
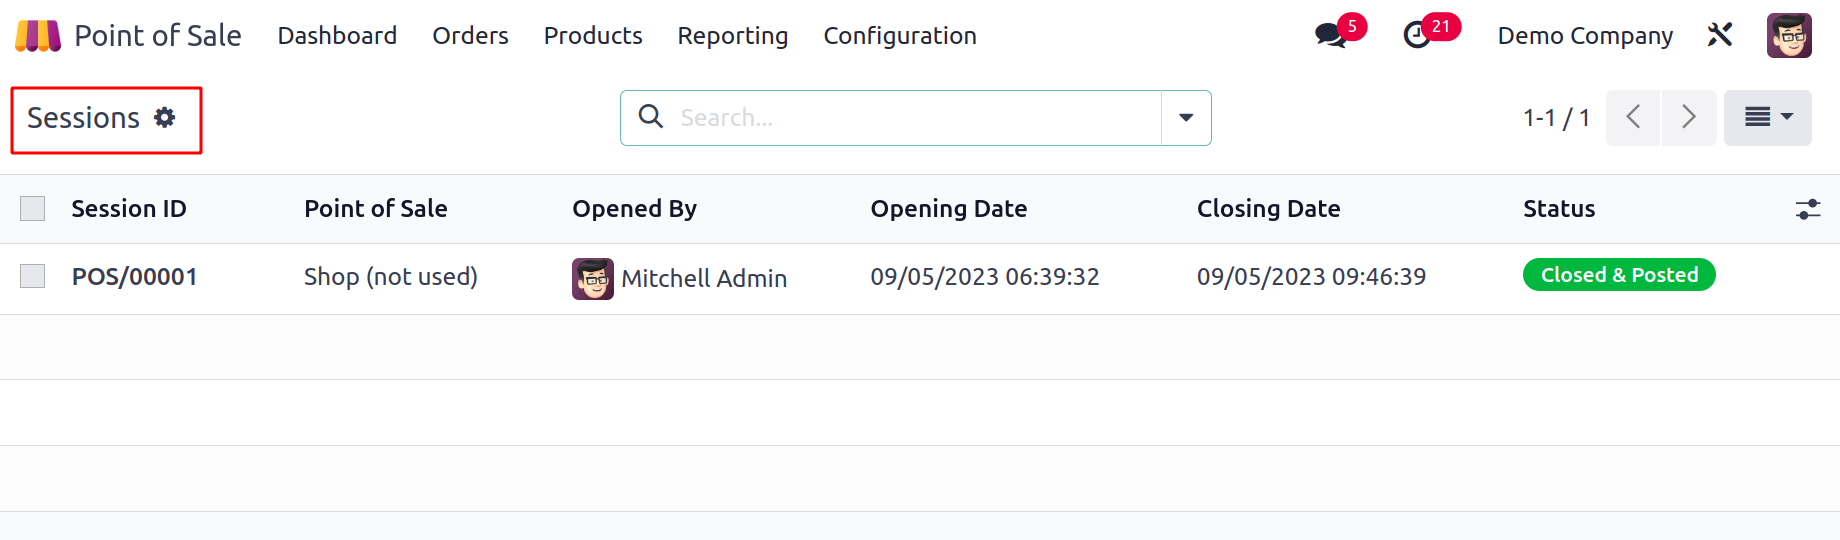
Choose the Sessions option from the Orders menu to access the Sessions history. This window will display the Session ID, Point of Sale, Opened By, Opening Date, Closing Date, and Status.
You will see My Sessions, In Progress, and Opening Date as default filters.
By Point of Sale, Opened By, Status, Opening Date, and Closing State, the sessions can be divided. You can click on a session to gain more details, and then a form view will appear, as seen below.
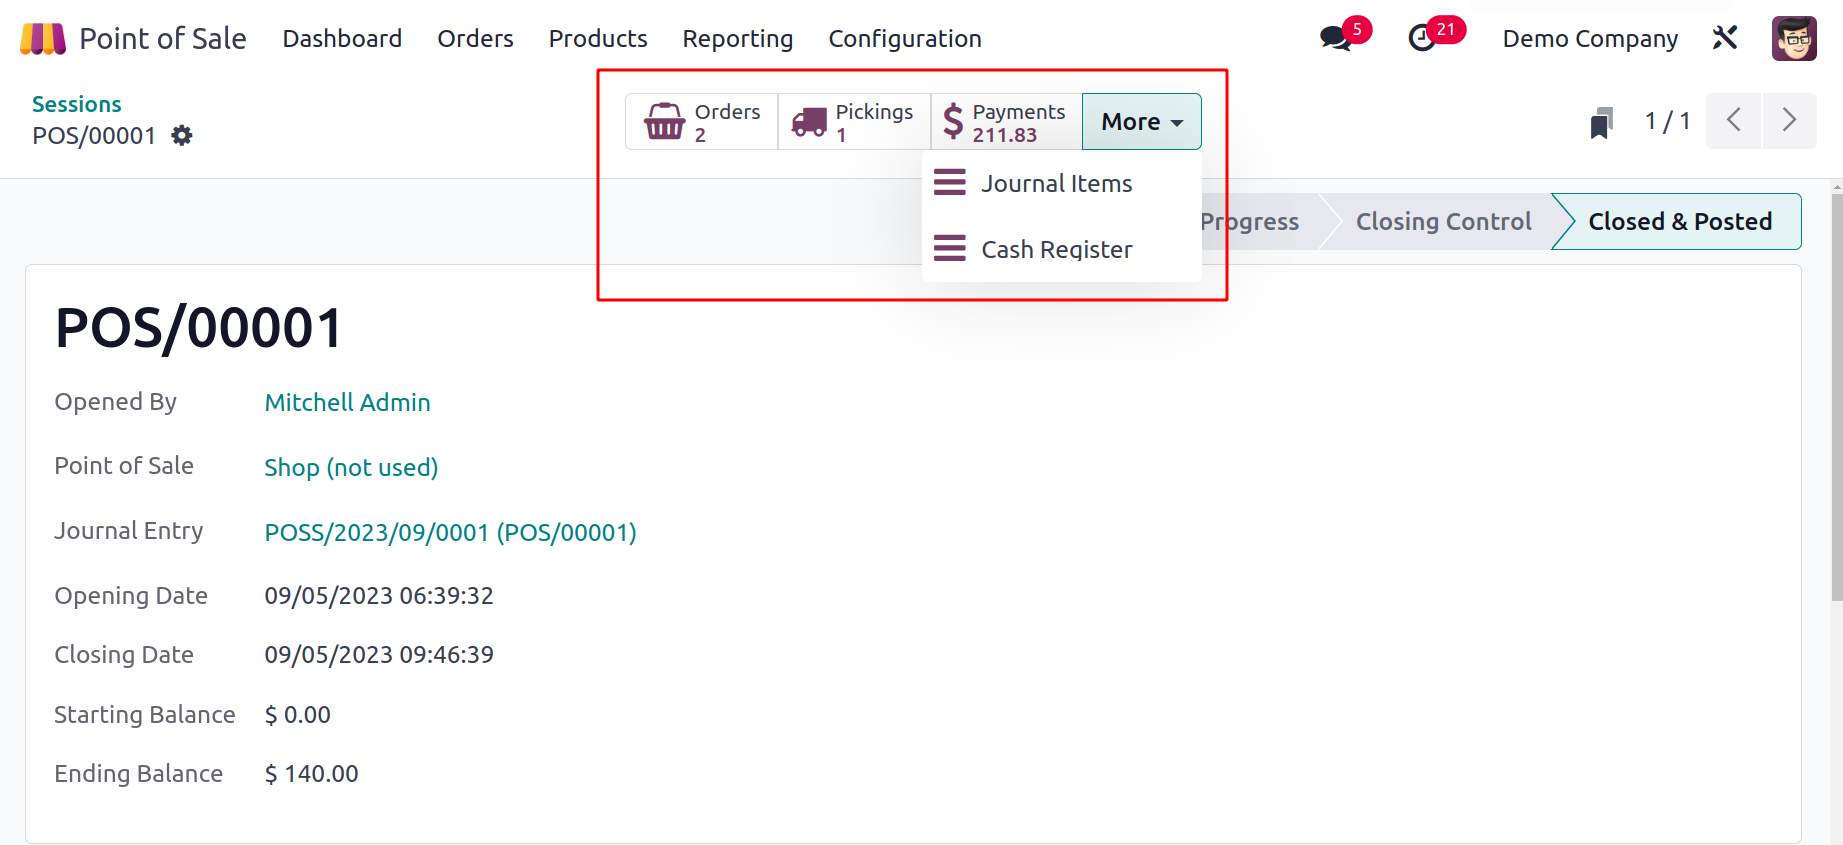
You may find information about the total number of Orders, Pickings, Payments, Journal entries, and Cash Register in the smart buttons. The session status is displayed in the window's upper right corner.
Reporting
Analysis of a company's activities on a frequent basis is crucial for its success. Then, and only then, can you comprehend the losses and gains in your company. You may quickly identify the areas that need improvement with the aid of effective monitoring. Odoo provides the Reporting feature in the PoS module to assist you in efficiently summarizing the sales activities on a daily, monthly, and annual basis since it recognizes the value of sales analysis in a business. These reports are useful for evaluating the general effectiveness of every point of sale in your business. Let's go over each of the Point of Sale reporting features individually.
Orders
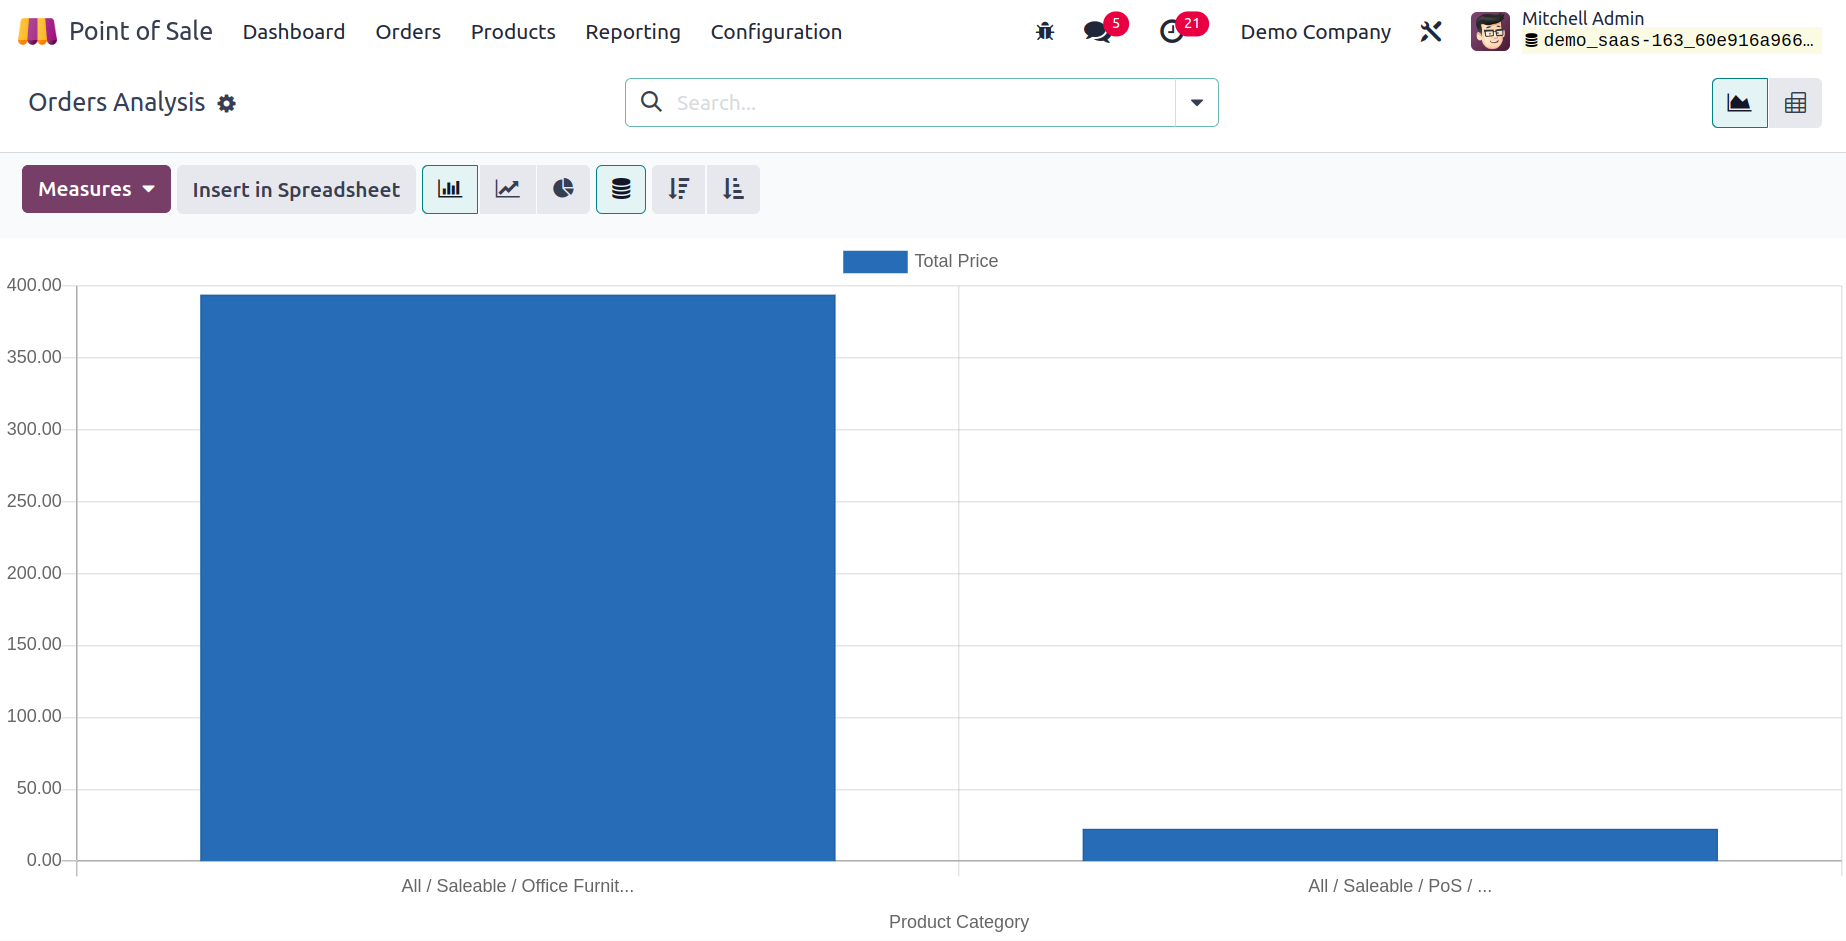
A great overview of all orders entered into your system is provided by the Orders reporting feature. The reports can be examined both graphically and pivotally. You can switch between Line, Bar, and Pie charts in the graphical view.
Choose appropriate Group by, Filters, and Measures to achieve the desired reporting outcome.
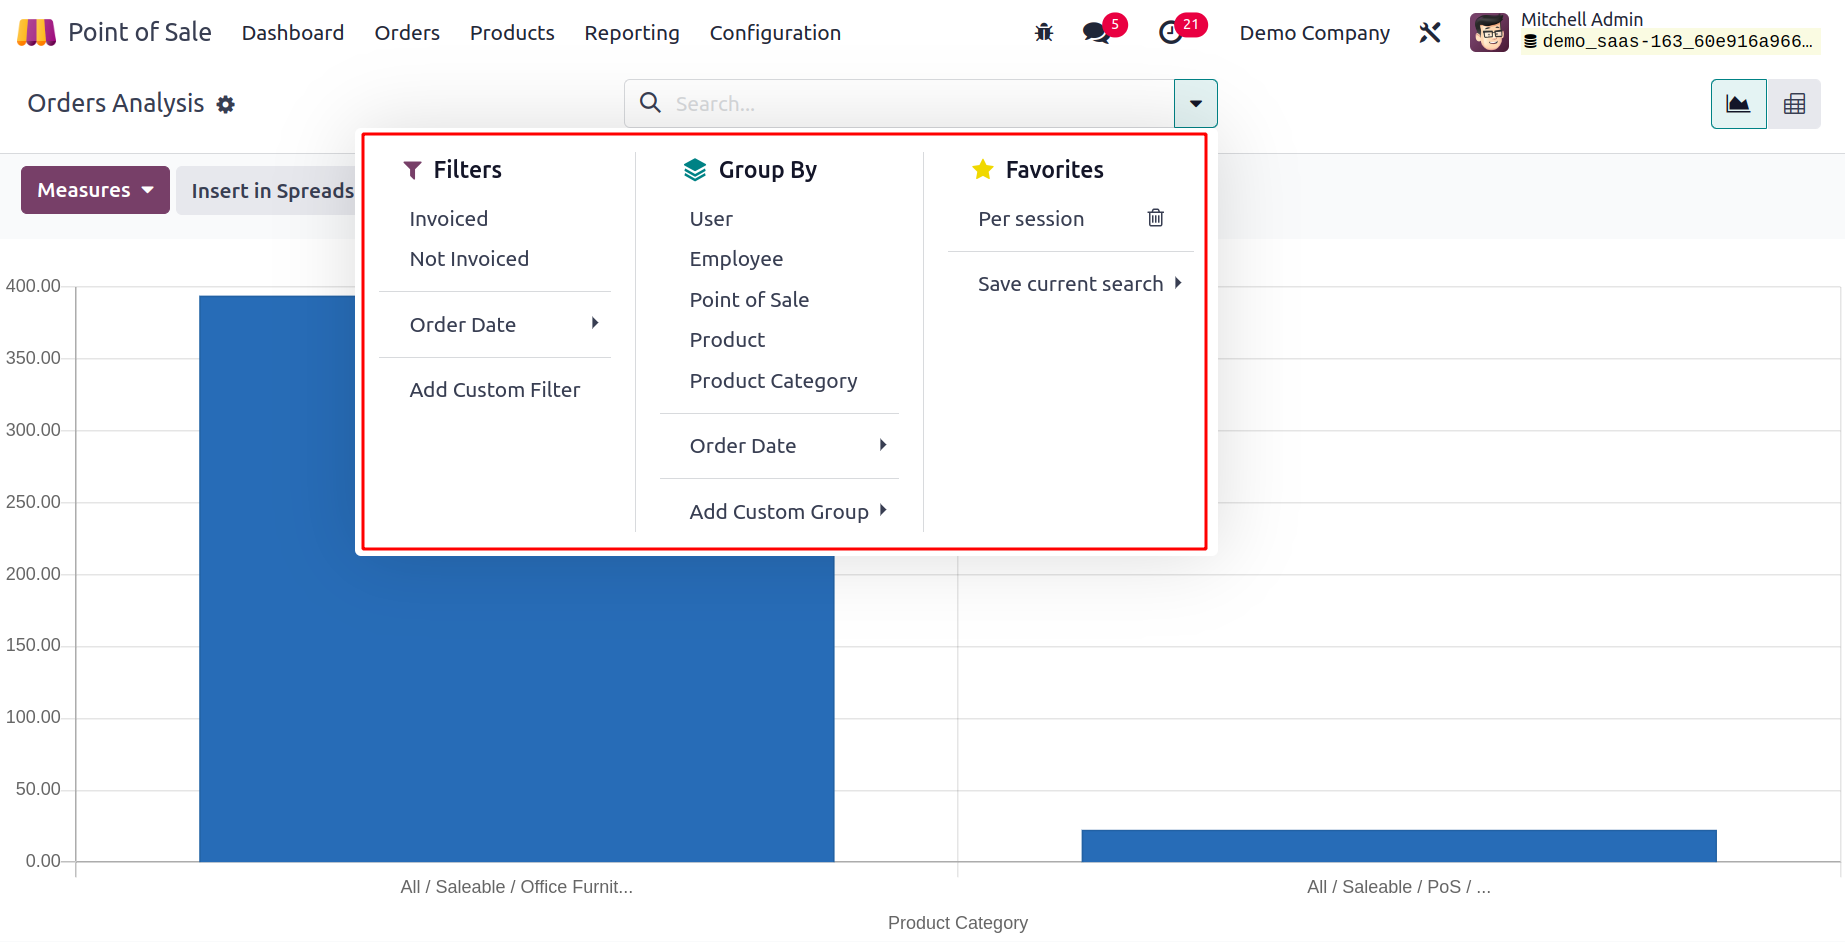
To create Order reports, you can use the default filters Invoiced, Not Invoiced, and Order Date. The reports can be categorized using the default Group By option based on User, Employee, Point of Sale, Product, Product Category, and Order Date. To improve the reports, the Custom function can be utilized to generate the necessary Group By and Filter choices.
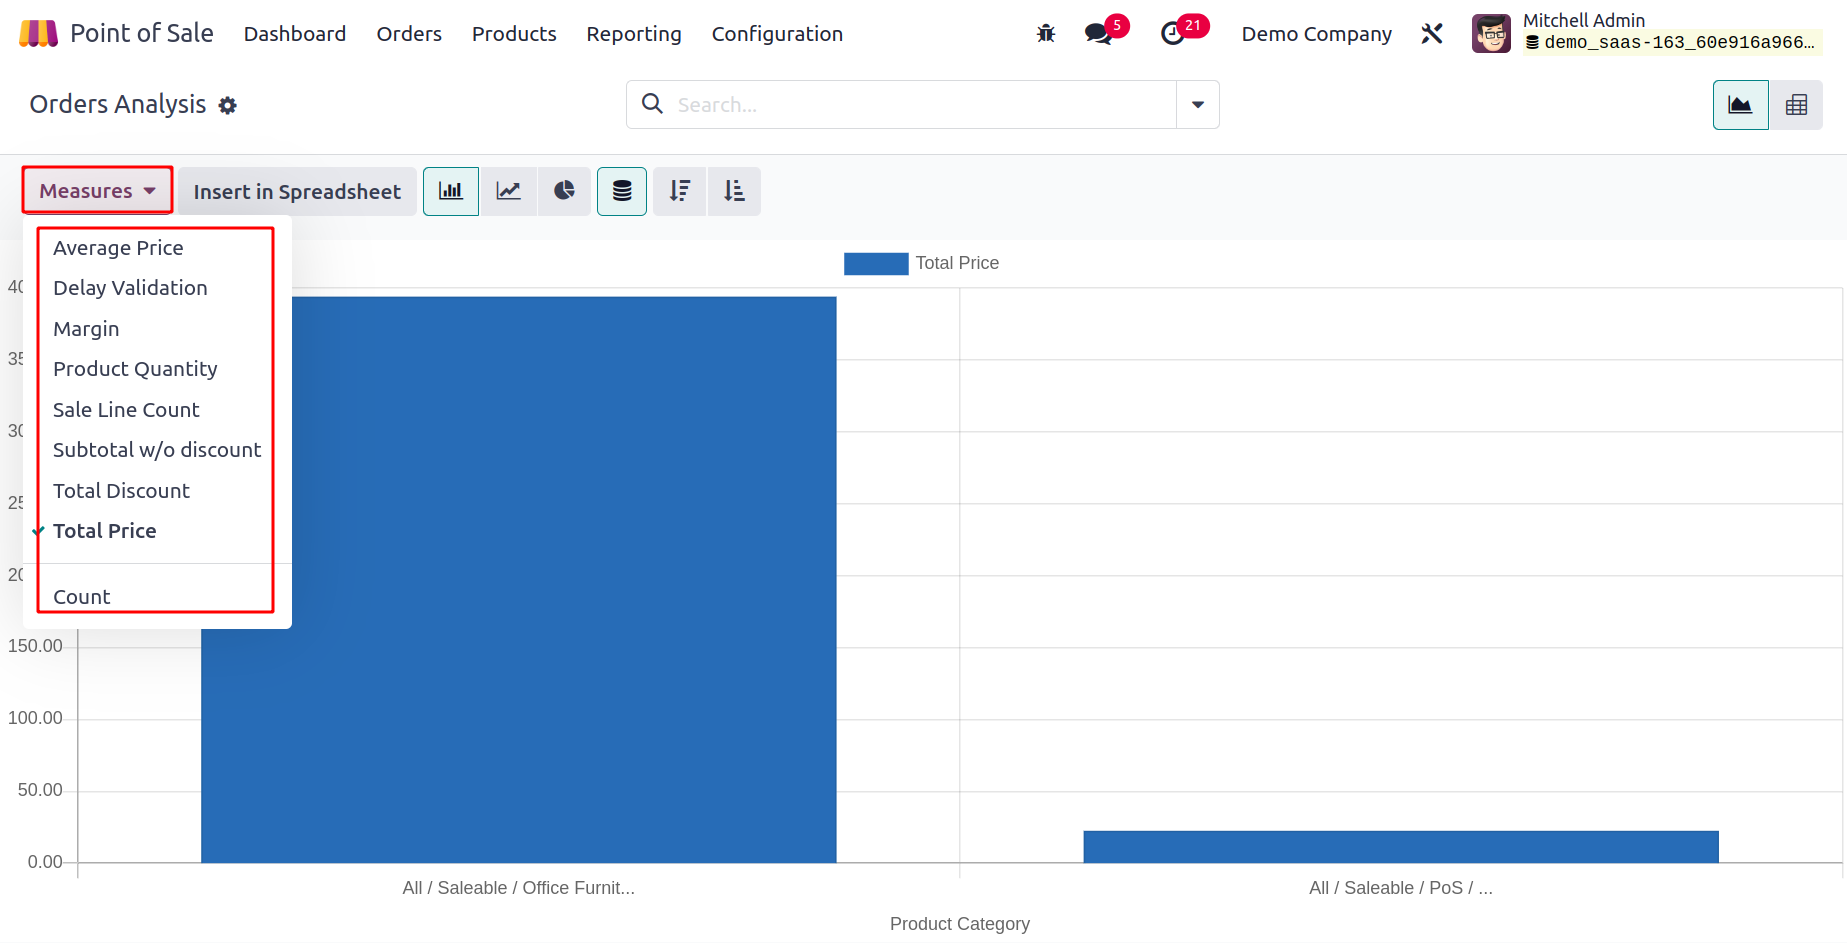
You can use Count, Subtotal w/o Discount, Total Discount, Total Price, and Average Price as Measures. You can also use Delay Validation, Margin, Product Quantity, Sale Line Count, and Average Price.
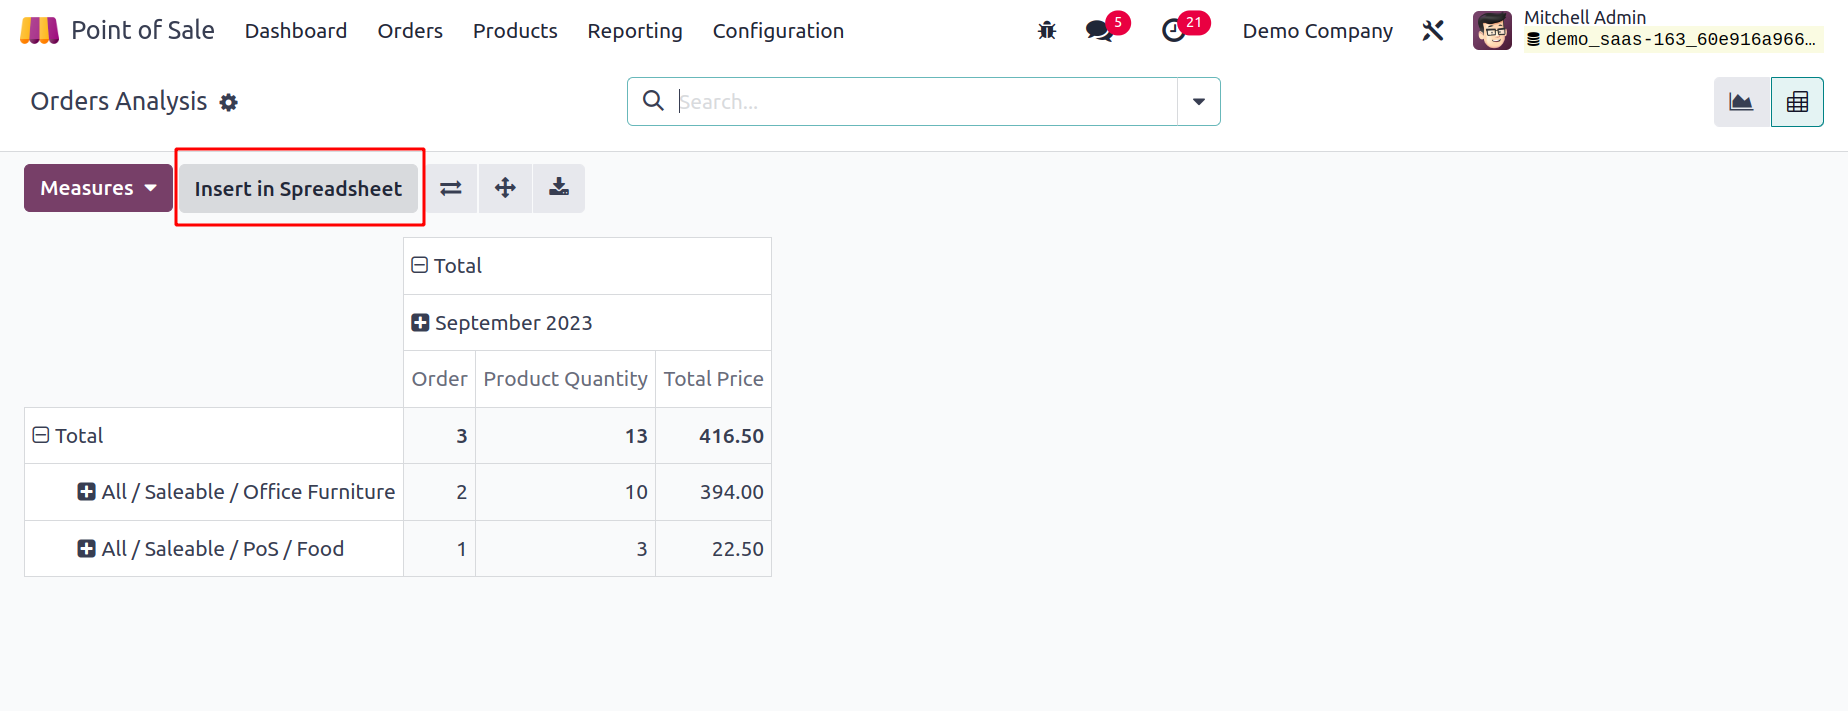
The pivot table of the Order report is depicted in the screenshot. The data can be added to a spreadsheet for further processing by using the Insert in Spreadsheet button.
Sales Details
Use the Sales Details option under the Reporting menu to view the sales information for a certain time period. When you select this option, a pop-up window similar to the one below will appear, allowing you to enter the Start Date and End Date of the period.
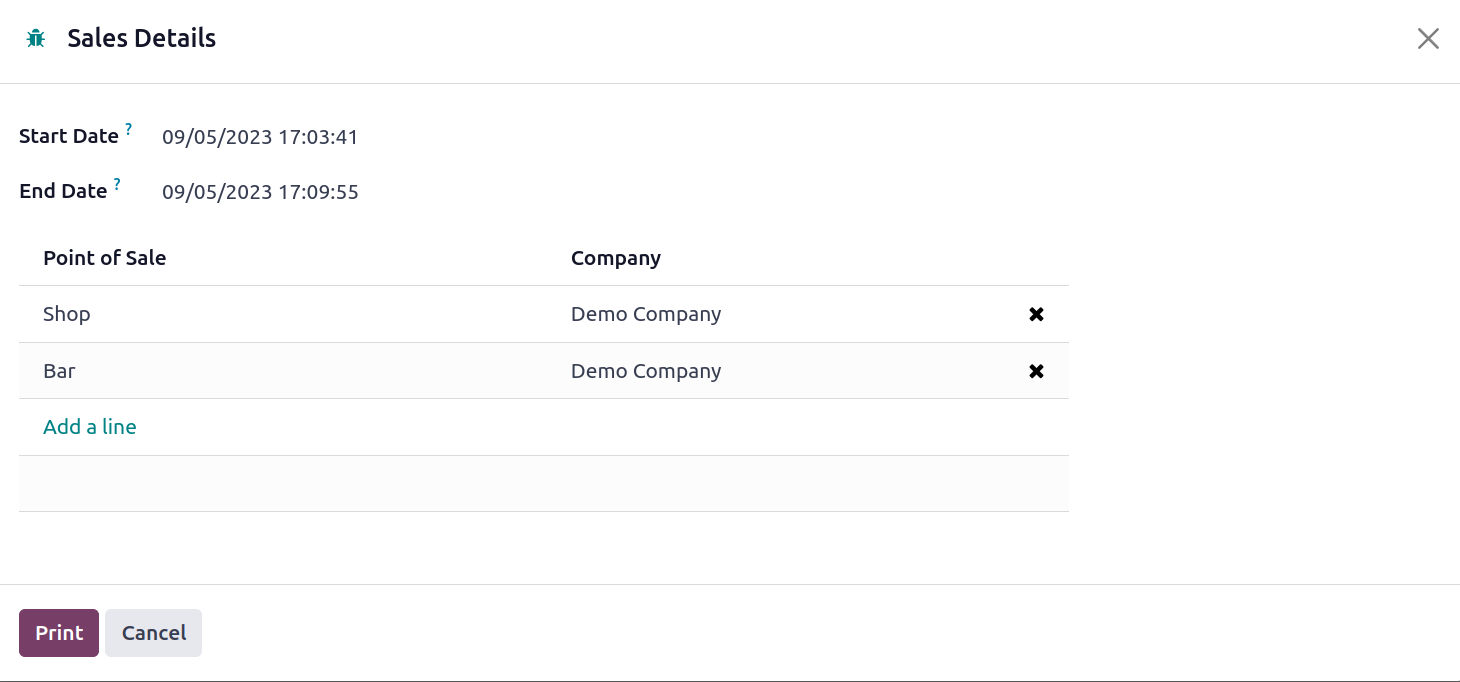
You can obtain the sales information for the indicated Point of Sale by selecting the Print button after adding the Point of Sale using the Add a Line button.
Session Report
The Session Reports function in the Reporting menu of Odoo allows you to create daily reports for the operations of the point of sale. From the reporting menu, choose Session Reports. A pop-up window will appear where you may enter the Point of Sale Session's ID.

You can obtain the daily report for that specific session by selecting Print after entering the Session ID.
An example of a daily report from an Odoo Point of Sale session is given in the image up top. This reporting function makes it simple to carry out daily sales analysis.
Automate Restaurant Management Operations with AI Odoo 17
Studying food and beverage management will equip you with a comprehensive understanding of the food and beverage industry and the skills and knowledge needed to succeed in this dynamic and exciting field.