
Ever tried to put up a tent blindfolded? Navigating the consulting world without a business plan can feel the same overcomplicated.
We created this guide to help you set a strategic, actionable plan on how to operate your early-stage consulting business.
We’ll help you define your services, set achievable and clear goals, and arrange strategies for growth.
So are you ready to pitch your tent with both eyes open?
Key takeaways
- A consulting business plan starts with defining your unique selling proposition (USP). Identify a niche and ideal client by conducting thorough market research and competitive analysis.
- Develop a 12-month marketing strategy with specific targets. Allocate 10-15% of projected revenue to marketing for optimal results.
- Realistically estimate your expenses and revenue based on billable hours/fees and retention rate assumptions.
- Use a proven template rather than starting from scratch to not overlook important elements of the plan.
What is a consulting business plan?
A business plan is a document covering all the aspects of your future consulting business in terms of achieving business goals.
In other words, this specific plan removes the guesswork from how one runs their consulting business.
In the upcoming sections, we’ll explain the key pieces needed to create your business plan.
Your consulting business plan should offer a detailed overview of your consulting firm.
Let’s briefly review the essential sections of the plan and what should be in each of them.
- Executive summary is a short overview of the main points of the document.
- Business overview highlights the mission, vision, history, and services offered by the consulting firm.
- Management team provides bios and expertise of key team members.
- Customer analysis defines target clients, their needs, and how the consulting service solves their problems.
- Industry analysis evaluates the landscape including growth, trends, regulations, and competition.
- Competitive analysis compares the consulting firm’s positioning and offerings versus competitors.
- Marketing plan outlines promotional strategies, lead generation, and metrics.
- Operations plan details the logistics of service delivery, staffing, resources, and customer service principles.
- Financial plan projects costs, revenue, cash flow, and profitability timelines.
Key steps for developing your consulting business plan
Building a thriving consulting business requires thorough planning and a keen eye for detail. Let’s walk through this journey step-by-step.
Step 1. Identify your niche and ideal clients
Kick off your business plan by diving deep into industry research. Look for sectors and trends where there’s a gap that your expertise can fill.
To validate the demand, consider surveying potential clients.
Once you’ve got a handle on that, create a detailed profile of your ideal client, considering factors like their company size, revenue streams, challenges, and objectives.
By the way, focusing on ideal buying personas in B2B (with all these fictitious names, bios, etc.) is one of the greatest sales mistakes, according to Corporate Visions’ findings and Gartner B2B sales research results.
Step 2. Analyze the competition
Understanding your competition is crucial. Examine competitor services offered, how they are marketed, and what they charge.
This is your chance to find your unique selling proposition.
Step 3. Set your rates and service packages
Following the actual industry norms to appoint your consulting fees. However, the price that you use should mirror both your expenses as well as the premium value that your expertise brings to your clients.
Let’s say you work out your overhead costs (utilities, office rental, equipment, etc.) to be roughly $50 per hour, while your hourly work value, which includes your experience and knowledge in this field, is $100.
So, your primary costs in total for an hour of consultation would be $150.
A standard practice in the consulting industry is to have a 100% markup rate on your primary costs.
Applying that rule to your scenario would mean doubling your total cost of $150, which brings your final hourly rate to $300.
Create bundled service packages that combine different services, such as business strategy consultation, market analysis report, and a follow-up action plan. You can offer these at a discounted rate compared to purchasing each service individually.
For example, Bronze is an entry-level package with initial consultation and some basic professional business advice.
Silver is a mid-tier package covering everything from the Bronze plus a detailed action plan for improving business operations.
Finally, the Gold package is a top-tier one complementing what’s in Silver with extended support and follow-ups.
Step 4. Create a marketing and client acquisition strategy
Outline a 12-month marketing strategy that includes a mix of content marketing, events, referrals, and lead-generation campaigns.
Set achievable targets for each quarter, focusing on metrics like leads generated, sales appointments set, and deals closed.
When it comes to budgeting, aim to allocate 10%-15% of your projected revenue or even more to marketing.
According to Gartner, the average startup spends 11.2% of its revenue on marketing.
Artificial Intelligence In Consulting & Project Management
Consultancies are implementing AI into their project management consultancy services and winning more business, cutting costs, and reducing risks. Follow this course on to find out how.

Step 5. Calculate potential project expenses and revenue
You’ll need to account for various expenses, including staffing, office space, equipment, software, and marketing.
Don’t forget about professional services, travel, and other overhead costs.
On the revenue side, forecast your monthly earnings based on projected billable hours or fixed fees, and assume a client retention rate between 80%-90%.
Extend these projections to create 3 to 5-year profit and loss statements and cash flow forecasts.
Step 6. Plan for sustainability and growth
Your business plan shouldn’t just be a launchpad; it should be a roadmap for long-term growth.
Given that self-funding for growth beyond 20% annually is often unrealistic for most consulting firms, you’ll need a plan B.
One smart move is to establish strategic financial partnerships with investors, banks, or other financial institutions.
These partnerships can offer the capital injection you need to scale your services, break into new markets, or even acquire other businesses.
More than just a financial lifeline, these partnerships can also provide invaluable business insights and open doors to new opportunities.
Step 7. Use an appropriate consulting business plan template
Having a consulting business plan template is like having a roadmap for your contractual relationships.
It ensures you don’t overlook key elements such as scope, payment terms, and legal considerations.
Why developing a consulting business plan is so important
Let’s talk about the positive outcomes of planning. A well-defined consulting business plan…
…directs your business operations
A business plan defines your strategy and major goals, simplifying day-to-day decision-making and helping you focus on long-term objectives.
In other words, you know what to do next at any given moment of operating your early-stage consulting business.
…mitigates your risks
With a comprehensive business plan in place, you can anticipate and prepare for potential challenges, turning risks into opportunities.
…attracts investors
If you want to secure investments, the first thing venture investors or business angels will ask you for is (surprise, surprise) a business plan.
Not just any plan, but a detailed, convincing blueprint of your consulting business that highlights growth and potential returns.
A well-crafted consulting business plan is essential for guiding your strategy, operations, marketing, finances, and growth.
Carefully working through each component will ensure you launch your firm following a clear plan on how to achieve success.
Using business planning platforms like odoo that offer templates and tools can help streamline creating a professional plan.

Odoo Comprehensive Functional Course | Learn Odoo ERP
The Odoo functional training is necessary to give insight into the extensive functionalities of Odoo ERP modules to its users. Without having knowledge of the features and functionalities of the system, users will not be able to use Odoo correctly.
if you want to start a consulting business, then you need to write your consulting business plan.
Or do you?
I’ve watched countless starry-eyed entrepreneurs “start” their business with a 50-100 page business plan.
They spend weeks — or even months — toiling away at their desk after their 9-5 detailing everything about their future business.
After they’ve written it, they beam with pride.
“This plan is the key to my success in consulting! With this plan, I can’t fail.”
Then, they take their plan out to the real world.
The real world isn’t as perfect and pretty when starting your business.
And that golden business plan? Well, it almost always doesn’t work the way they’d hoped.
All of the projections they made? Naw, not even close.
So they scurry back to their desk to revise the plan — and the cycle continues.
Here’s the truth about consulting business plans…
You don’t need a long, complex business plan.
If your business plan is more than 5 pages, every extra page you write is almost certainly wasting your time.
All you need is a 1-3 page document to cover the foundations of your business.
By the end of this post, you’ll write your 5-part entrepreneurial consulting business plan — and have everything you need to start a successful consulting business.
Let’s begin with the first part: your consulting business model.
1. Consulting Business Model
“What kind of consulting business do you want to build?”
That’s the first question you want to answer for your consulting business plan.
That way, you’re building a business to support your lifestyle and not the other way around.
Your consulting business should enrich your life and create a fulfilling lifestyle for you and your family.
For your consulting business model, you have 4 options:
1. Solo Model: The classic independent consultant. Your business is just you (and maybe a few contractors). From delivering projects to marketing and sales, you are responsible for every part of the business.
2. Firm Model: The typical large consulting firm. Your firm consists of consultants, associations, junior and senior people. Your role starts off as doing a bit of everything — but eventually, your role becomes hiring, training, and managing your team.
3. Productized Model: This model comes out of one of the above models. You identify a particular problem your clients have, and you build your business around solving that problem with a focus on efficiency. This model is all about systems, efficiency, and scale.
4. Hybrid Model: The hybrid model is a mix of the models above. For example, you might offer a productized consulting offer — but also do some solo custom consulting. Once you’ve mastered one of these models, the hybrid model helps you add new products and services to create more revenue.
Pick one of the models above. If you’re unsure about which one to use, start with the solo model. You can always change it in the future. Chances are, your business will evolve in the future anyways.
With your consulting business model selected, let’s move to the next part of your consulting business plan — clarity around your ideal client.
2. Ideal Client Clarity
“Who is the ideal client my consulting business will serve?”
That’s the second question you’ll answer with your consulting business plan.
This is all about how you’re going to specialize.
As an entrepreneurial consultant, specialization is crucial.
You can’t offer everything to anybody.
You’ll have to begin by choosing a specific type of client to serve — your niche.
A niche is a certain subset of people whom you might potentially serve — SaaS companies, manufacturing, pharmaceuticals, etc.
To find your ideal client, you’ll have to test out different niches.
Using this scorecard, you score each potential niche from 1 to 5 based on the following factors:
- EXPERIENCE. How would you rate your experience with this niche?
- EXPERTISE. How would you rate your status as an expert within this niche?
- RESULTS. How would you rate your confidence that you can deliver results for this niche?
- POTENTIAL. How would you rate this niche’s growth and how willing they are to hire consultants?
- INTEREST. How would you rate your interest in this niche?
- ACCESS. How would you rate your ability to speak with ideal clients in this niche?
By going through these exercises, you’ll figure out which niche is best for you to start with.
Picking a niche and defining your ideal client is the foundation on which you’ll build your business — and get clients.
You shouldn’t move on with your consulting business plan until you’ve defined your ideal client.
Once you’ve done that, you can move on to the next part: Magnetic Messaging.
Artificial Intelligence In Consulting & Project Management
Odoo 17 AI : Your Gateway to the Future of AI-driven Consulting Services & Project Management
3. Magnetic Messaging
“What message will get my ideal client’s attention?”
That’s the third question you’ll answer on your consulting business plan.
You’ve picked your business model.
You’ve defined your ideal client.
Now, you’ll write a message designed to get your ideal client’s attention.
We’ve created a formula to make writing this message as simple as possible: Magnetic Messaging.
Here’s the formula:
I help [WHO] to [solve WHAT problem] so they can [see WHAT results]. My [WHY choose me]…
Let’s break each part of the formula down.
- WHO: Who you serve.
- WHAT (Problem): What problem you solve for them.
- WHAT (Result): What result you create for them.
- WHY: Why they should choose you.
Why does this message grab your ideal client’s attention?
- It speaks to who they are.
- It mentions what problem they have.
- It showcases what result they can get.
- It differentiates you from others who might provide a similar service.
When your message contains these 4 elements, it will draw interest from your ideal clients. They’ll want to learn more.
They’ll browse your marketing materials, read your articles, sign up for your email list, and reach out to you for conversations.
Effective messaging is the foundation of your marketing: what you communicate to the marketplace to get your ideal client’s attention.
You won’t write the perfect message on your first try.
But you do need to write a first draft — and actually put it to work in the marketplace.
Once you’ve written down your first magnetic message, it’s time to start planning your strategic offer.
4. Strategic Offers
“What can I offer my ideal client — and at what price point?”
That’s the 4th question you’ll answer on your consulting business plan.
With clarity around your ideal client and a message that grabs their attention…
…you must create an offer — a service — that solves their problems and gets them the result that they want.
The classic custom consulting service is the “full engagement.”
our discovery offer helps get your “foot in the door” with the client. Once you get them that quick, low-risk win, they’ll trust your expertise. This will open the door for larger projects with the same client.
Discovery offers are easier to sell, create, and deliver.
Here’s our discovery offer checklist:
- Align with what the buyer wants
- Is a logical first step
- Leads to the next steps
- Ranges between $1.5K to $15K
- Provides tangible benefits (growth, clarity, etc)
5. Marketing Engine/Sales Pipeline
“How am I going to create conversations with my ideal client?”
This is the final question you’ll answer on your consulting business plan.
And it’s where you start to see real results: winning clients, delivering projects, and earning revenue.
However, according to our How To Become A Consultant Study, marketing and sales are where consultants struggle the most.
Your Marketing Engine is what you’re doing every day to get in front of your ideal clients.
Your Sales Pipeline organizes all of the leads who come into contact with you.
Your pipeline is organized into 6 columns:
- LEAD. You’ve identified the prospective client and have begun reaching out to them to set-up a conversation.
- CONVERSATION. You’ve had a sales conversation with the prospective client.
- PROPOSAL. You’ve sent a proposal to the prospective client.
- WIN. The prospective client has accepted your proposal and you won the business.
- LOSS. The prospective client has declined your proposal and you lost the business.
- NURTURE. Most people you reach out to won’t be ready to buy or make a decision right away. In fact, even people who say ‘No’ to a proposal now, may buy from you later as long as you stay top of mind through your nurture process.
All of your prospective clients fit into one of these 6 categories.
Using a CRM to create and organize this pipeline will help you organize your marketing and sales efforts.
CRM
The Odoo 18 Community CRM module is a powerful tool for managing lead generation and client acquisition. It streamlines the lead-to-opportunity conversion process by integrating with modules like Sales and Inventory. Its user-friendly interface enables tracking prospects, managing communication history, scheduling meetings, and organizing customer data in a centralized database. With menus for Sales, Leads, Reporting, and Configuration, the CRM module supports collaboration across departments, improving customer relationship management and overall productivity.
Sales Menu
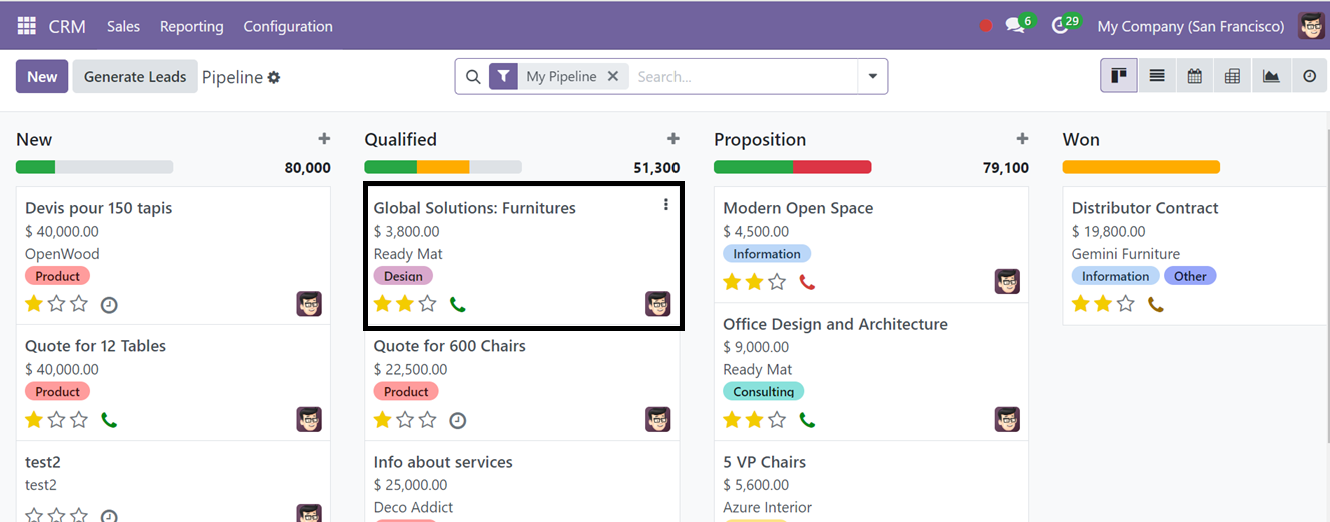
The Odoo 18 CRM module's main dashboard, which can be found under the Sales menu, is the My Pipeline option. Similar to previous Odoo versions, the dashboard has a revamped color interface that lets users alter the platform's presentation to Kanban, List, Calendar, Pivot, Graph, Map, and Activity. Leads produced via different pathways are shown in the My Pipeline window, as shown in the screenshot below.
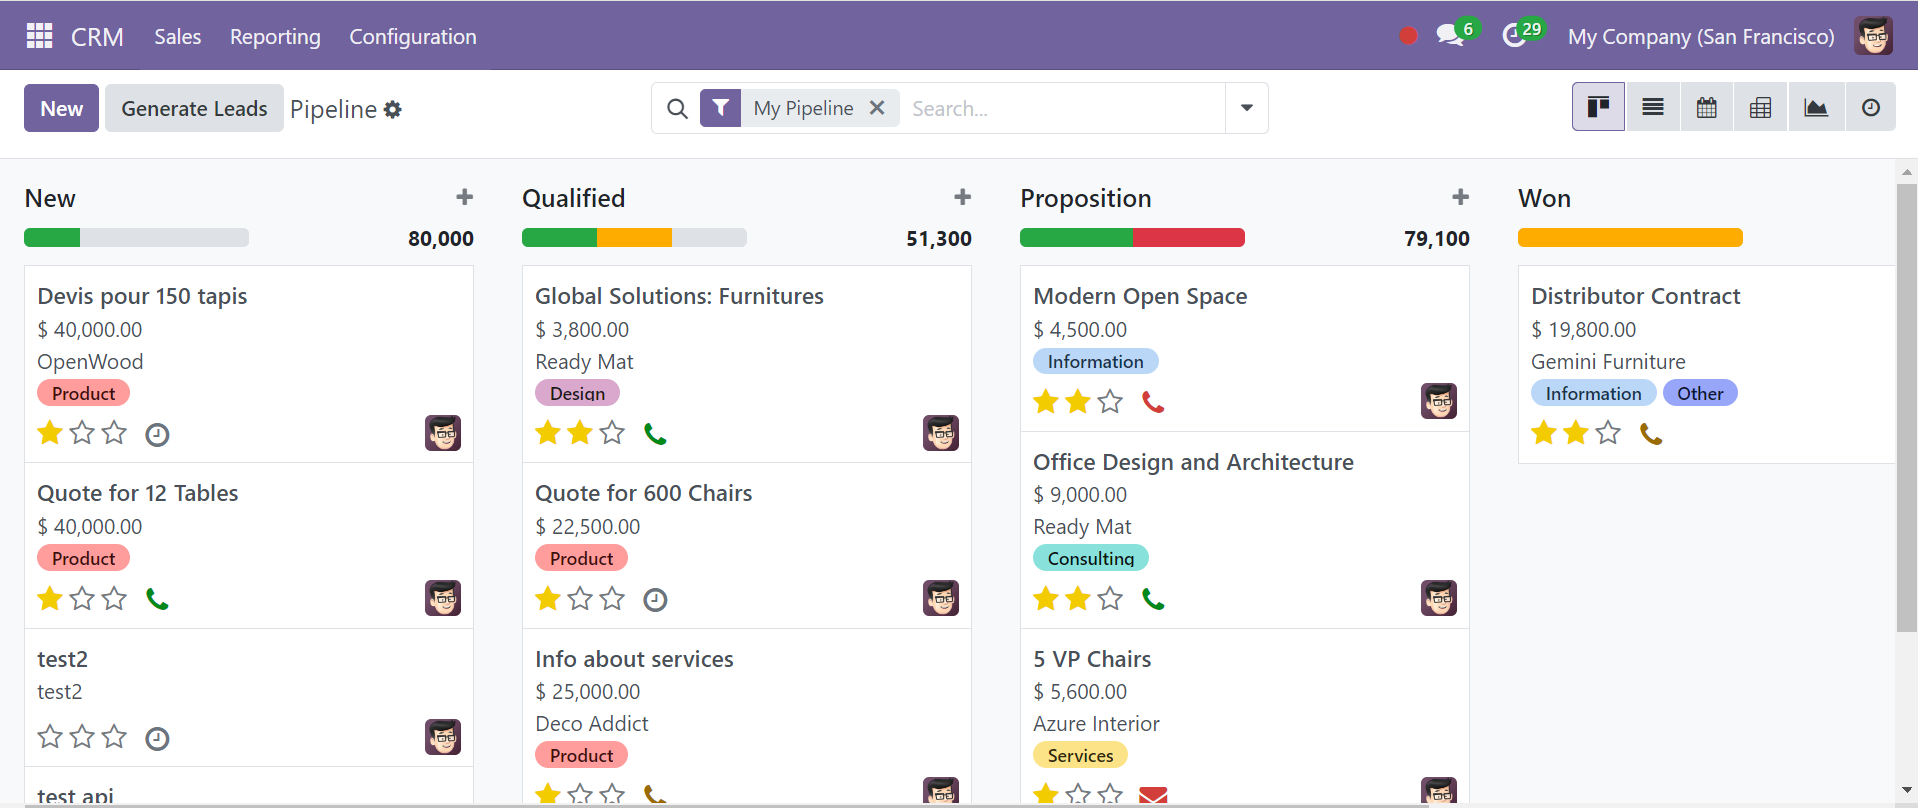
Records in the CRM pipeline are arranged according to their operational progress in the Kanban view. The order of the leads allows for a rapid overview of each lead's development.
Leads may be assigned to many stages in accordance with business requirements. Phases including New, Qualified, Proposal, and Won are included in the CRM module. While qualified leads from new leads advance to the Qualified stage, fresh leads are shown under the fresh stage. The lead can proceed to the 'Won' stage once the consumer provides confirmation. With a new field for the stage name, the ‘+Stage’ button makes it easy to quickly generate the stages that the lead needs.
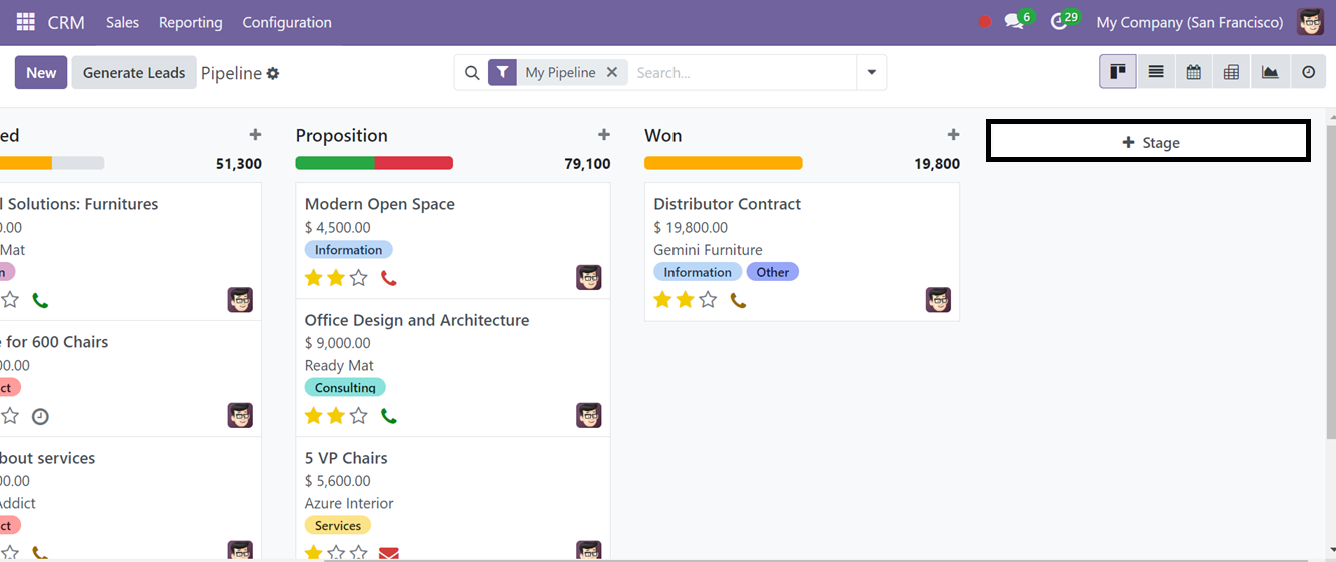
The ‘+Stage’ button will open a new editing field where we can add the new stage name and press the ‘Add’ button.
Now, your new stage is added to the dashboard, and you can add various stages according to your project requirements using the same method.
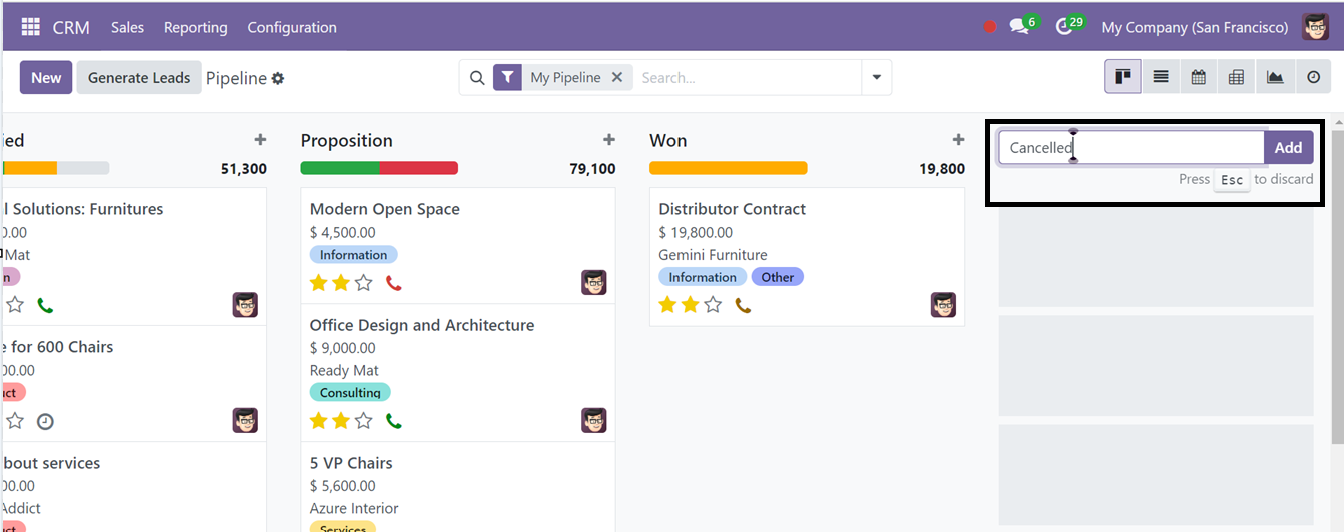
Managing the Pipeline Stages
To modify the available stages in Odoo CRM, click the Settings icon next to its title. You can fold, edit, automate, and delete the stages by selecting the required options as shown below.
The edit button opens a pop-up box where we can edit or alter the Stage Name, Won Stage, Folded in Pipeline, Sales Team, and REQUIREMENTS, as illustrated in the screenshot below.
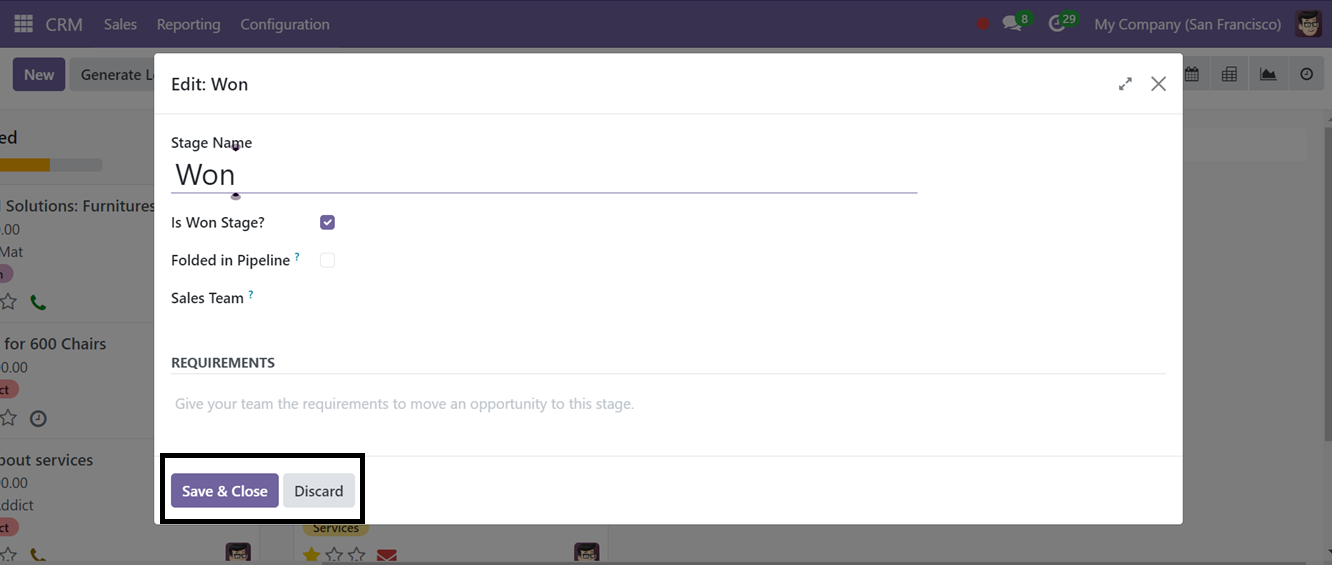
After editing the stage details, save the data. Then, we can check the automation feature by pressing the ‘Automation’ option. This will open a new dashboard window of all the automation created earlier.

To create a new automation rule, click the New button. Then, a new form view will be opened. You can edit the Automation rule name in the first blank field below.
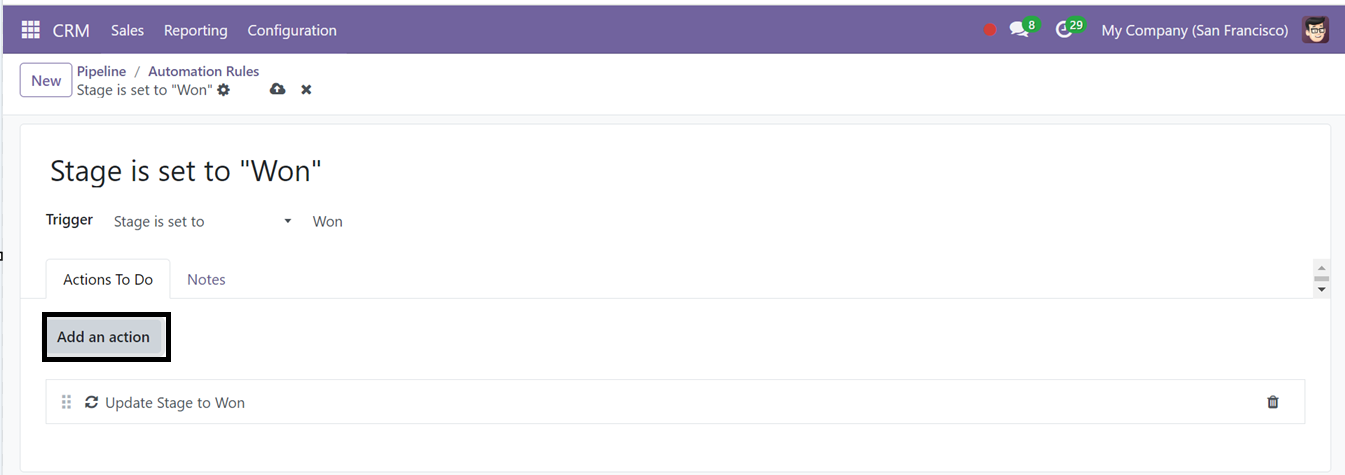
Then, you can set the automation triggers in the Trigger field. You can also add actions to execute the trigger functions with the use of the ‘Add an action’ button provided in the ‘Action To Do’ tab area. Pressing this button will open a new pop-up window that can be used to set different types of actions, their related triggers, and other filters, as illustrated in the screenshot below.
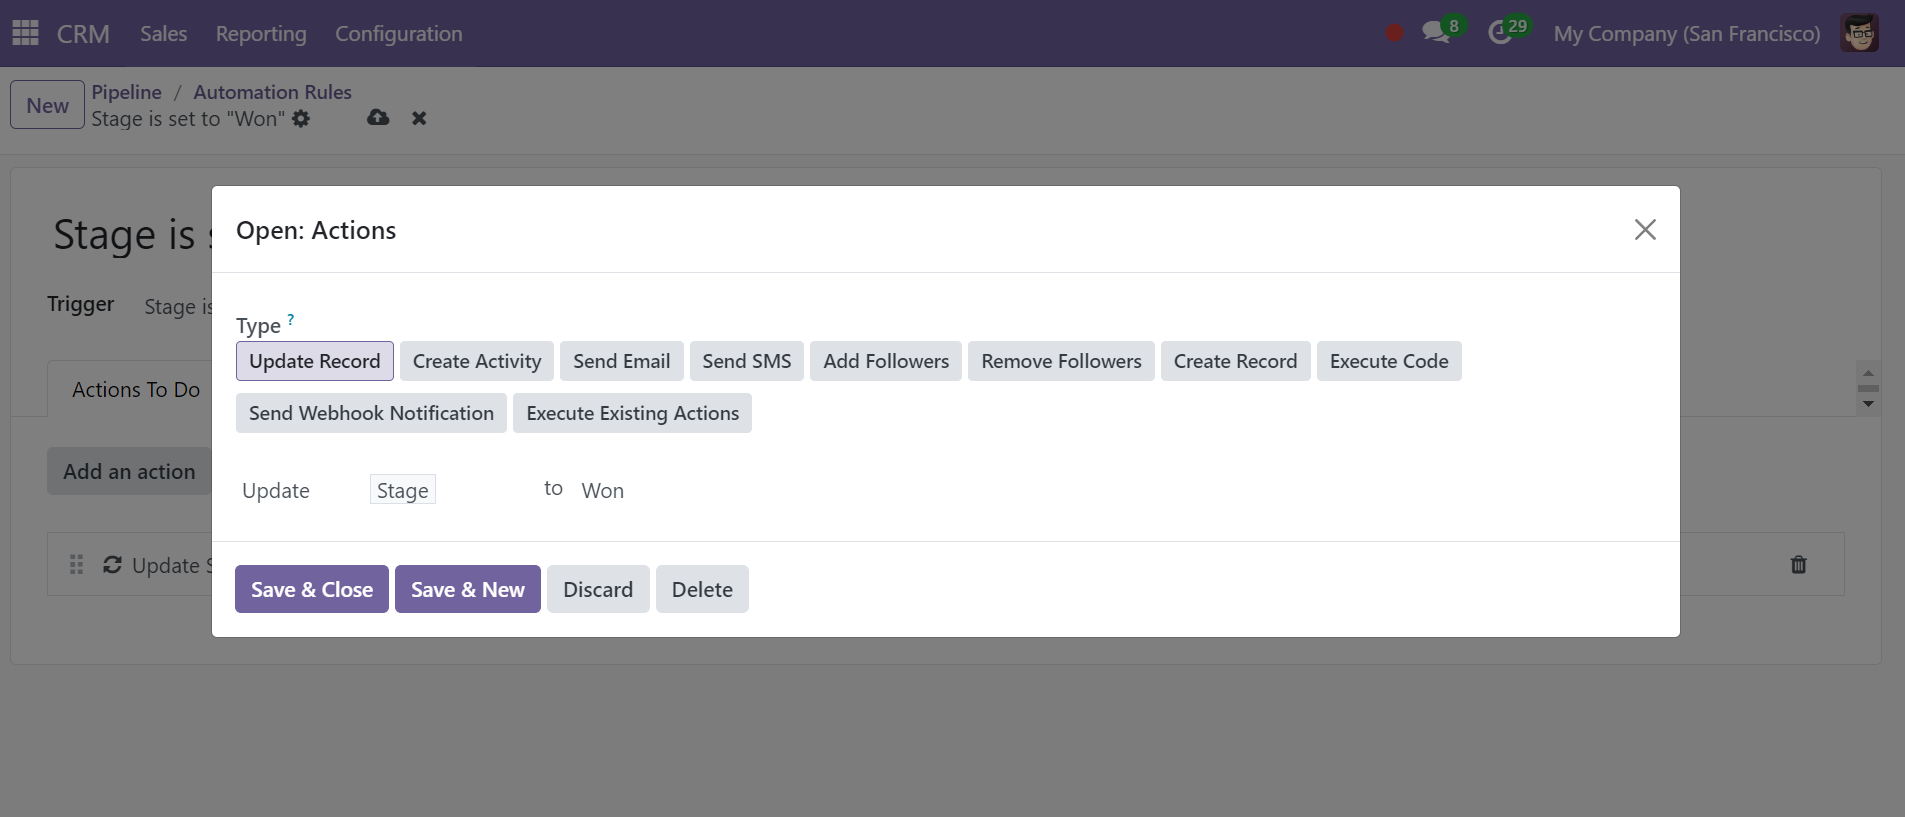
Select an action type from various options, such as updating records, creating activities, sending emails, adding and removing followers, creating records, executing code, sending webhook notifications, and executing completed actions.
In the next section, you can add permitted groups and specify the action you wish to do for this action (e.g., Compute or Update).Next, in the corresponding fields, as shown in the picture above, indicate which field you want to update and what stage you want to put in the field that was previously indicated. To delete any particular stage, you can choose the ‘Delete’ option from the settings icon. Immediately, the stage will be deleted. Finally, the ‘Fold’ button can be used to fold the stage in the Kanban view.
Artificial Intelligence In Consulting & Project Management
Consultancies are implementing AI into their project management consultancy services and winning more business, cutting costs, and reducing risks. Follow this course on to find out how.
My Pipeline Menu
In Odoo 18 CRM, creating a quotation is simple and can be done from the My Pipeline window. Go to the Sales tab, click My Pipeline, and select the opportunity you want to quote.
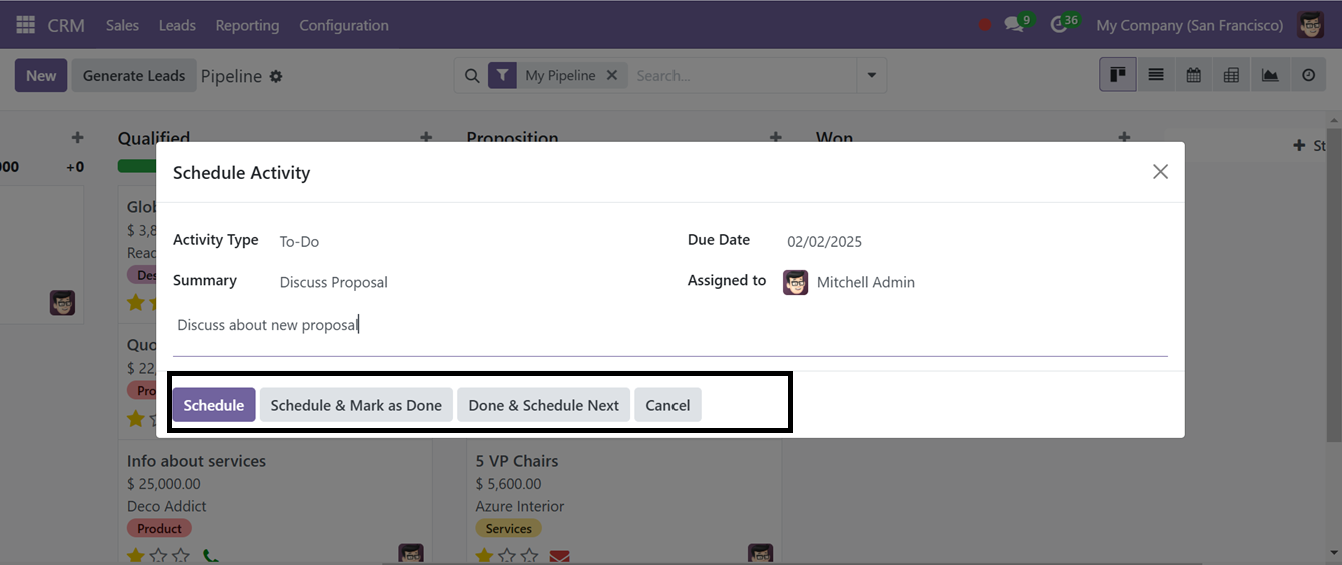
Effectively planning business tasks helps you manage time and duties more efficiently. In the Pipeline window, you can schedule activities or organize events with clients. If no activities are scheduled, a clock icon will appear in the Kanban view. Depending on the type of activity (phone, email, etc.), the icon will change. Click the icon to open a dialogue box and choose Schedule an Activity.

A pop-up window will appear where you can mention the Activity Type, and Summary, Set a due date, and Assign a responsible person. You can also add a note before clicking Schedule.
Then, you can open the opportunity kanban card to view its configuration form. If the opportunity meets the requirements, click Won to mark it as ready for a quote.
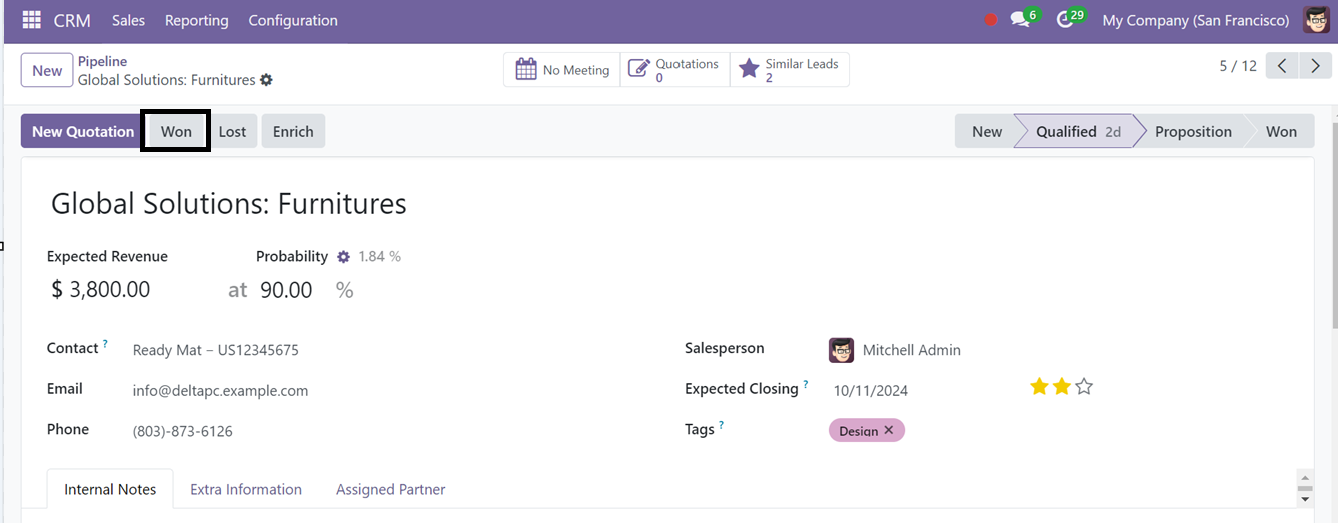
To make it a quotation, proceed by clicking on the New Quotation button, and a form view window will appear, as shown below.
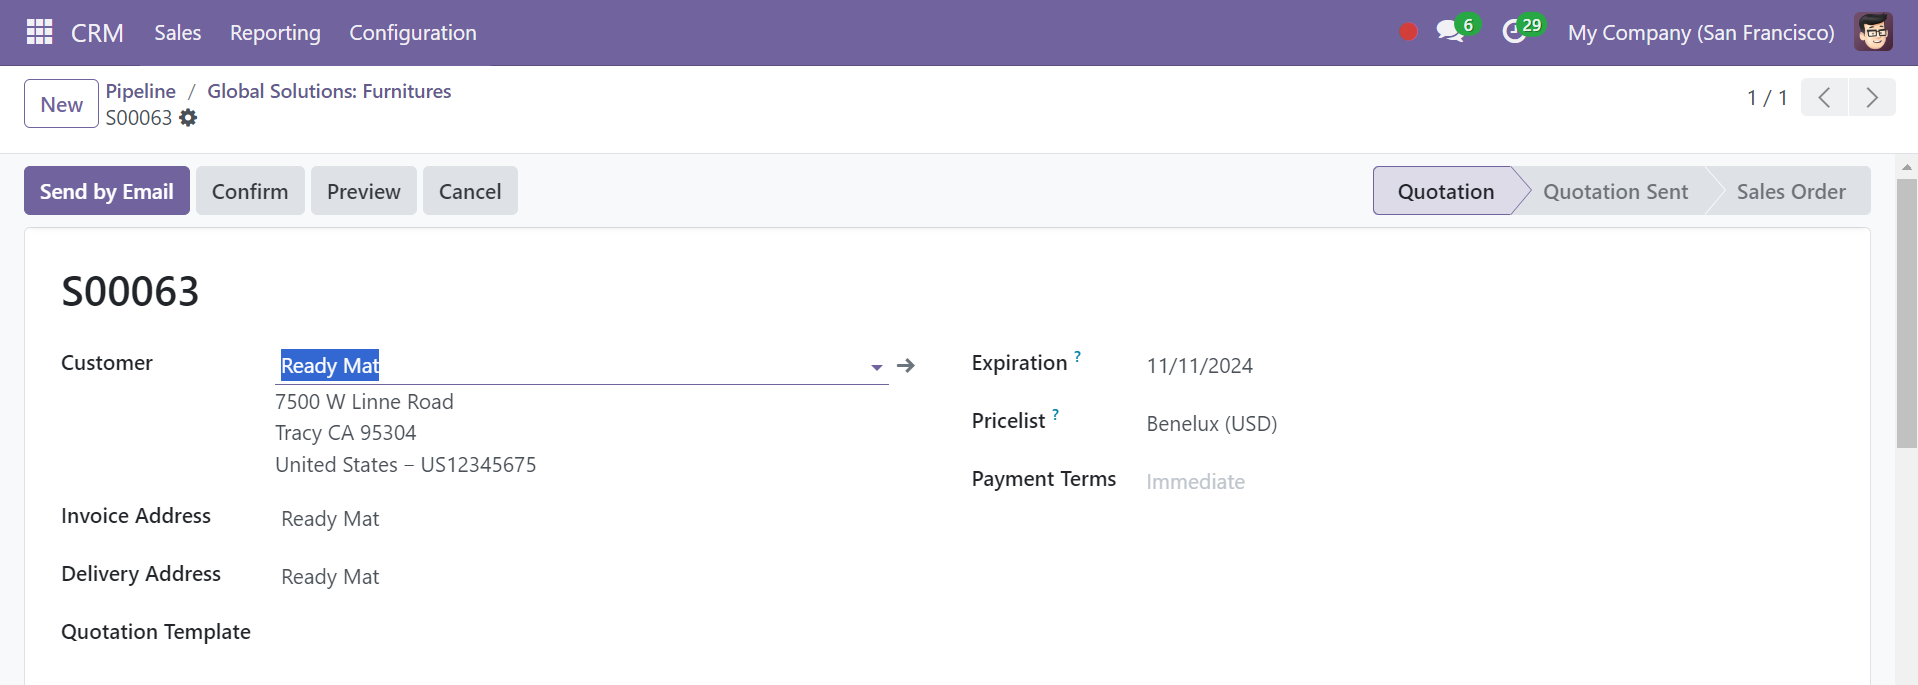

Here, you can edit the details for the new quotation, including the Customer, Quotation Templates, Payment Terms, etc. The Delivery Address, Payment Terms, and Pricelists can also be adjusted.
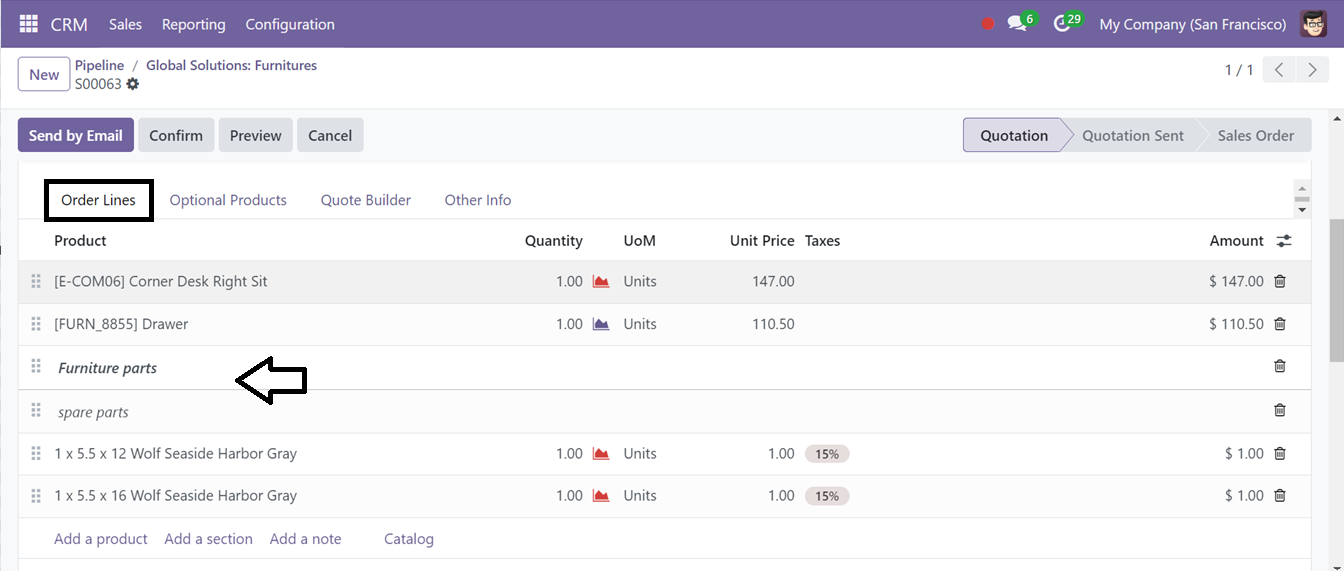
Order Lines Tab: you can select the quotation products from the Order Lines tab by clicking on the ‘Add a product ’ button. You can create more sections for the products and notes regarding them using the ‘Add a section’ and ‘Add a note’ buttons, respectively.
The Catalog button will help you to quickly navigate to the product catalog and choose the product according to your requirements.
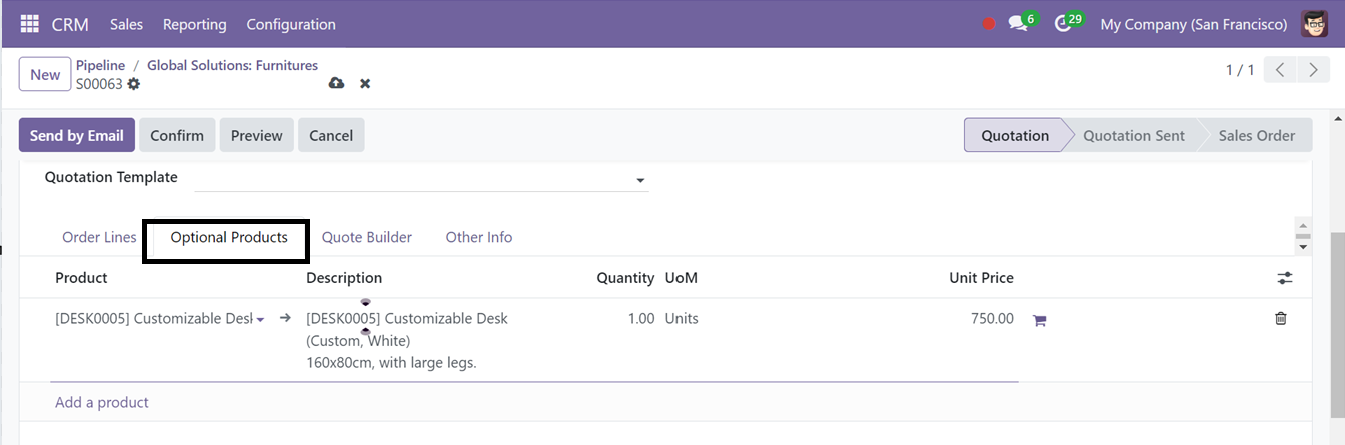
Optional Products Tab: After adding the products, you can utilize the Optional Products tab to add more products. These Optional products are extra goods or services that are recommended during a sale to increase the value of the transaction by recommending related or complementary goods.
You can add these products by using the ‘Add a product’ button as shown below.
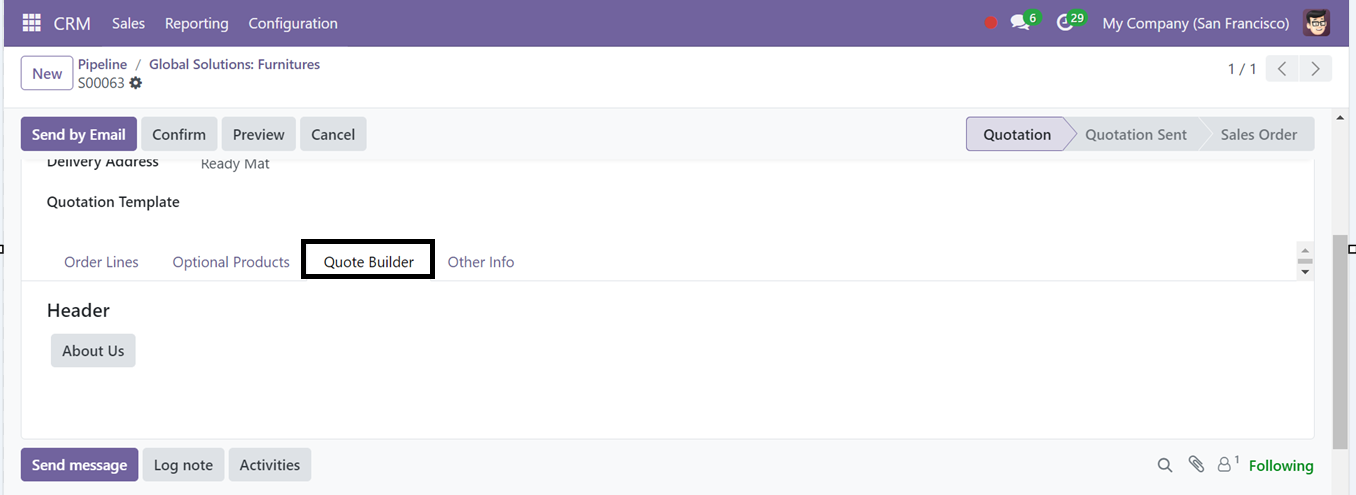
Quote Builder Tab: The Quote Builder tab in Odoo CRM streamlines sales teams' process of creating professional quotations, connecting the CRM pipeline with sales and invoicing workflow.
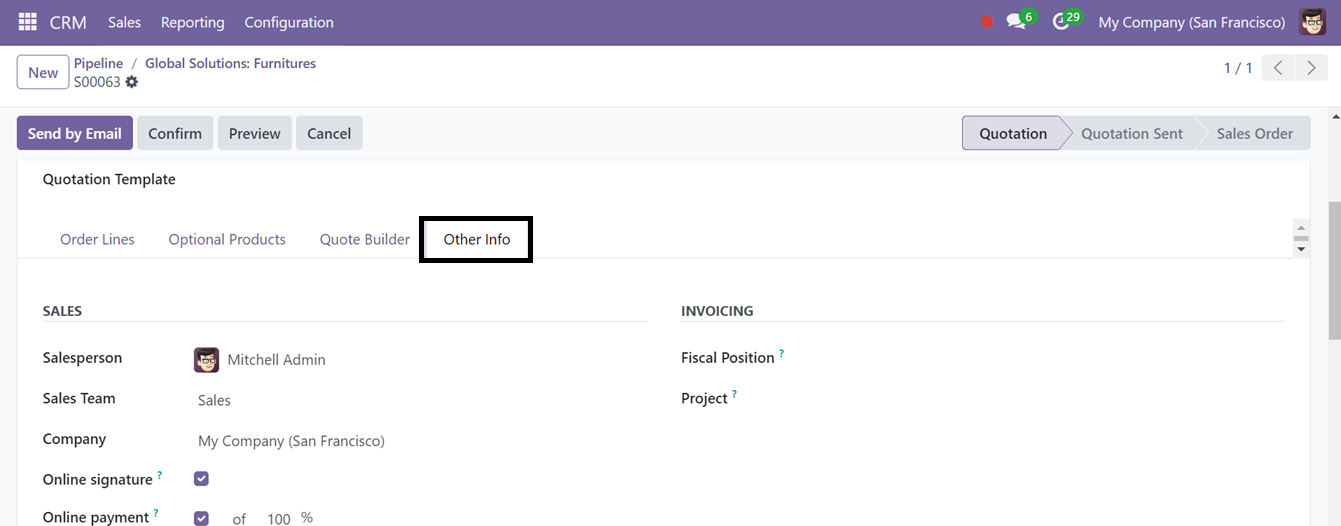
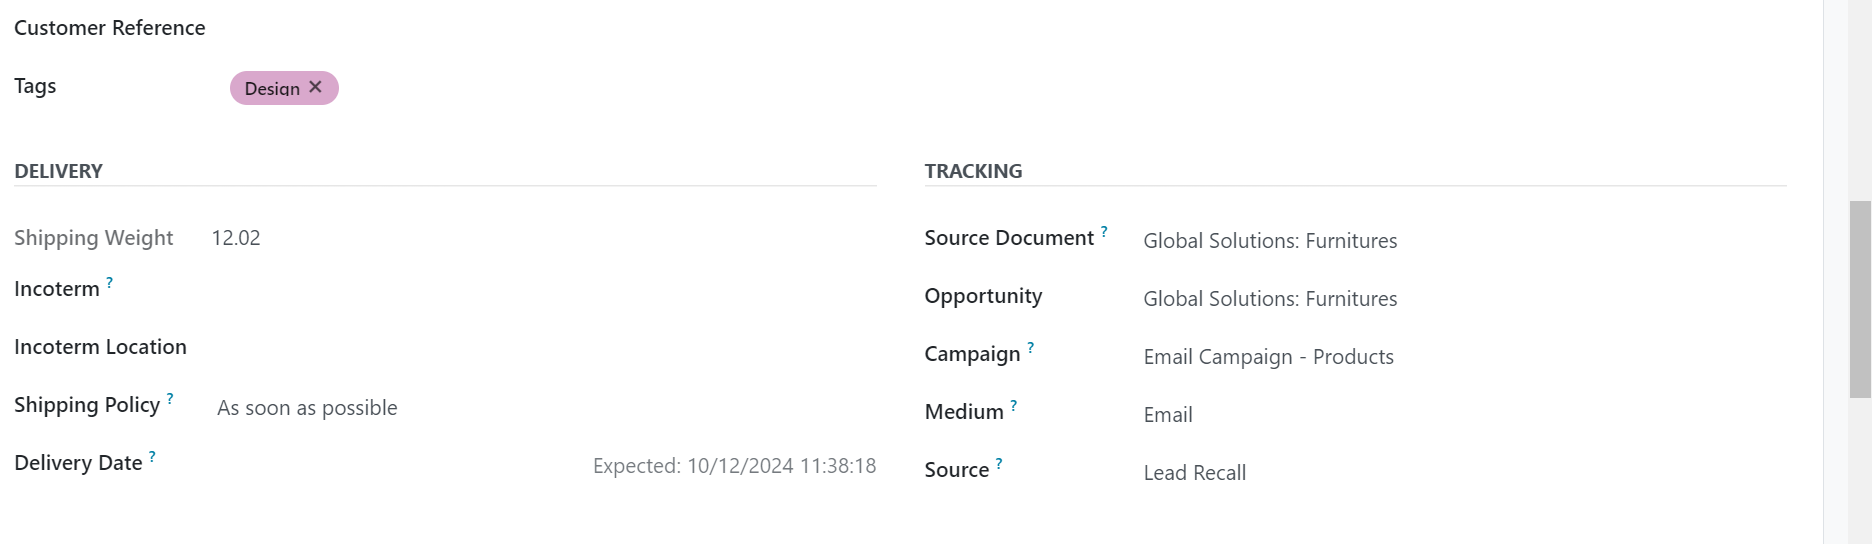
Other Info Tab: This tab can be used to configure the essential data about the SALES, INVOICING, DELIVERY, and TRACKING, as illustrated in the screenshot below.
After making your customization, click Confirm and enter the customer's details in the next window.

The form will generate some smart button options that can be used to track the project that this specific quotation is related to, the tasks that are included in the quotation, and the specifics of the products' delivery, using the Projects, Tasks, and Delivery smart buttons, respectively. You can also create invoices, send emails, and preview the invoice of the quotations using the Create Invoice, Send by Email, and Preview buttons.
My Activities Menu
The ‘My Activity” section under the Sales menu is a useful tool for tracking and analyzing sales-related activities. It provides a list view of client actions, including Opportunity names, Contact details, Email addresses, Phone numbers, Companies, Activities, Deadlines, Expected revenue, and Stages.
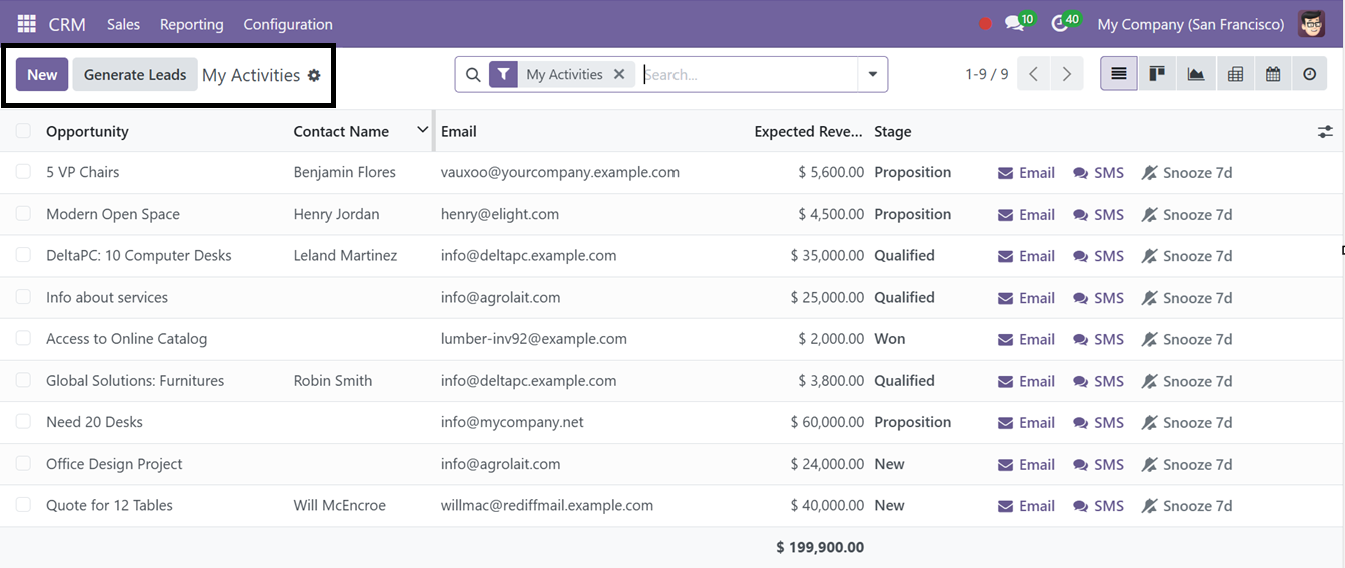
Select the desired activity column in the window and you can send emails and SMS using the Email and SMS buttons, snooze an activity for 7 days using the Snooze button, and click the ‘New’ button to generate a new opportunity. This will open a new Pipeline configuration window.
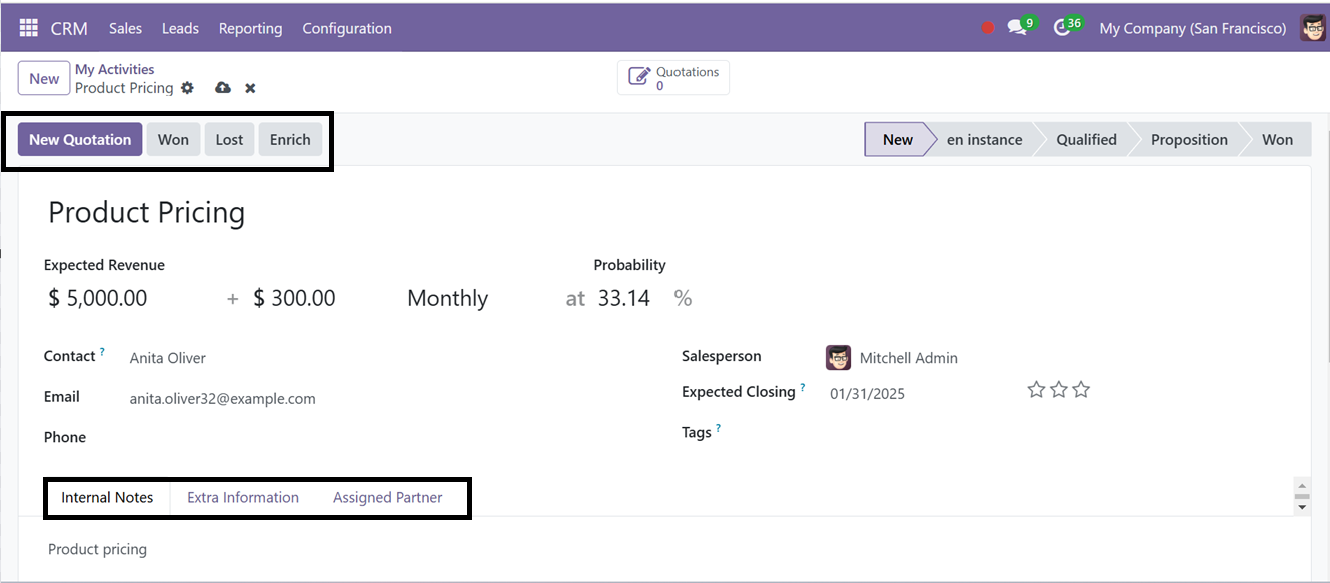
This form view is the same as the Pipeline creation form. So, you can create a new Pipeline activity and create it as a new quotation using the same procedure.
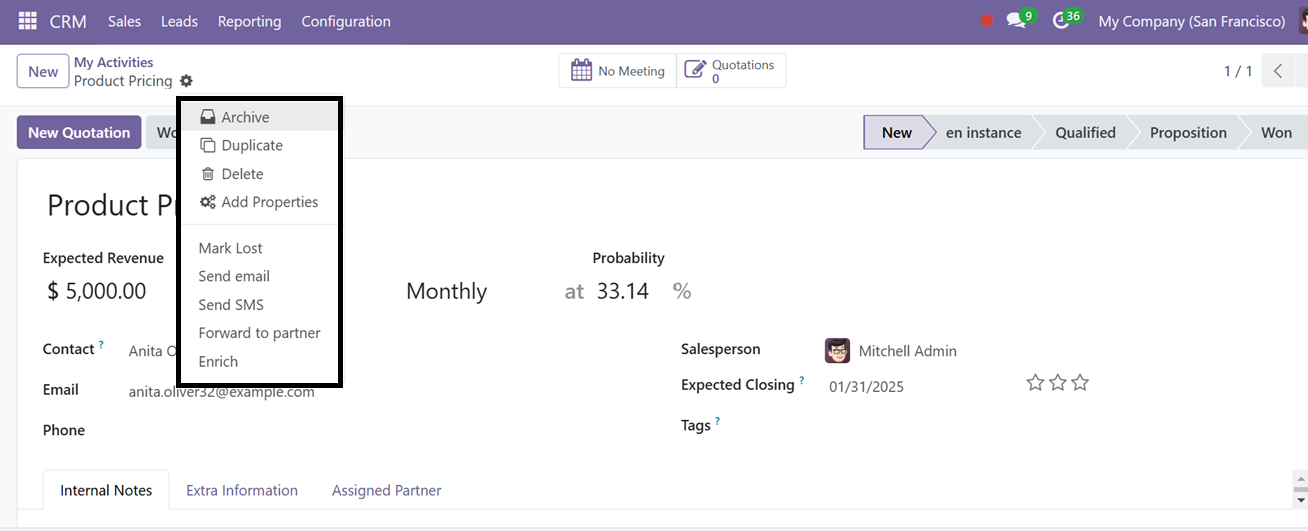
The ‘Action’ button placed on the upper left corner of the configuration form can be used to Archive, Duplicate, and Delete the form data. Then, you can mark the pipeline as a lost opportunity, Send an Email, or SMS, Forward it to the Partner, and Enrich the opportunity using the Mark Lost, Send Email, Send SMS, Forward to partner, and Enrich buttons respectively.
The ‘Add Properties’ button of the ‘Actions’ button can be used to create or add new form fields with various editing properties as per your requirements. Clicking this button will create a new field that can be customized according to the requirements of your job post. Enter the name of the field in the 'Label' section, then select the 'Field Type', such as Text, Tag, Line, Column, Checkbox, Date, Decimal Value, etc.
Next, specify whether the field should have a Default State and select the 'Display in Cards' option if applicable. Finally, save the newly created field.
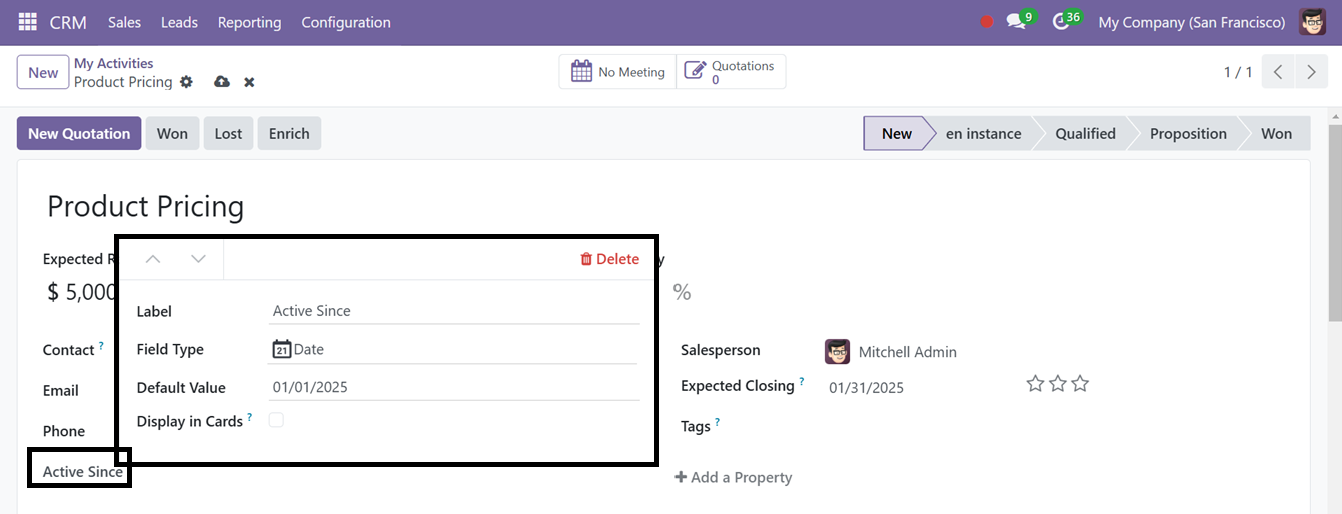
Using the ‘Add Properties’ feature, you can customize your Odoo CRM form fields as per your business needs.
Odoo Comprehensive Functional Course | Learn Odoo ERP
The Odoo functional training is necessary to give insight into the extensive functionalities of Odoo ERP modules to its users. Without having knowledge of the features and functionalities of the system, users will not be able to use Odoo correctly.
My Quotations Menu
You can access all your quotations by selecting My Quotations from the Sales tab. This window will show details such as Quotation Number, Creation Date, Customer, Website, Salesperson, Total, and Status.
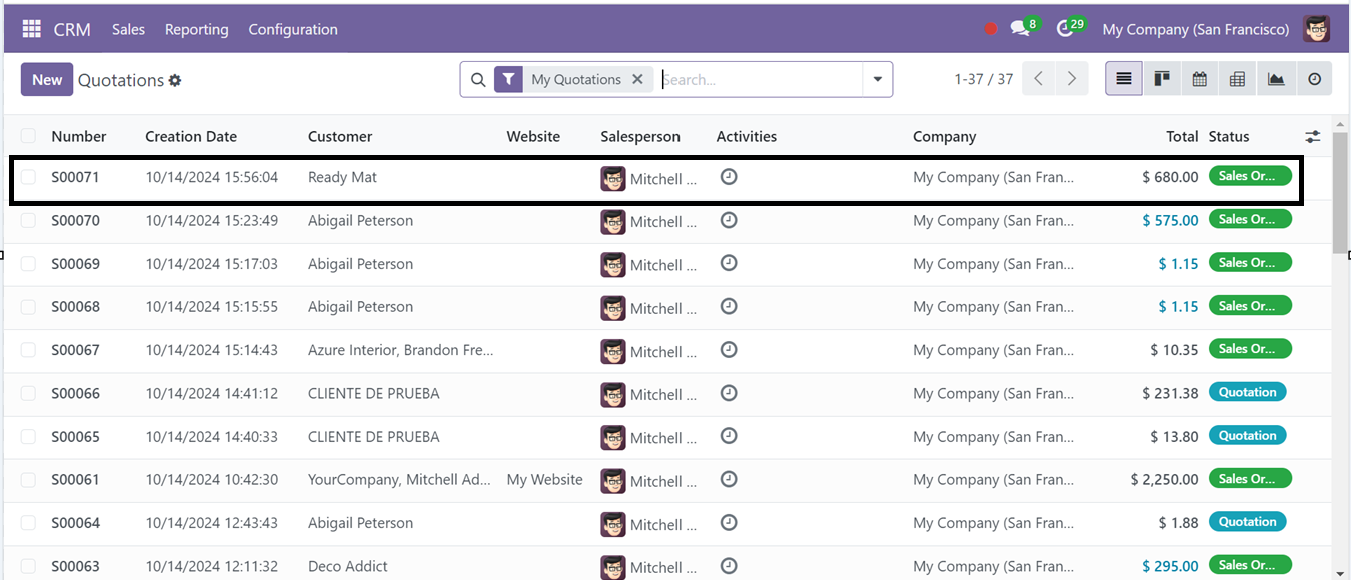
You can switch between List, Kanban, Calendar, Pivot, and Graph views for better organization. Use Filters and Group By options to find specific records, and save your preferred filters using Favorites for easier access in the future. To manage tasks related to the quotation, click the Activity button.
Using the Activity icon provided on each quotation column, you can schedule tasks by clicking on it. You can also create direct quotations from this tab using the ‘New’ button.
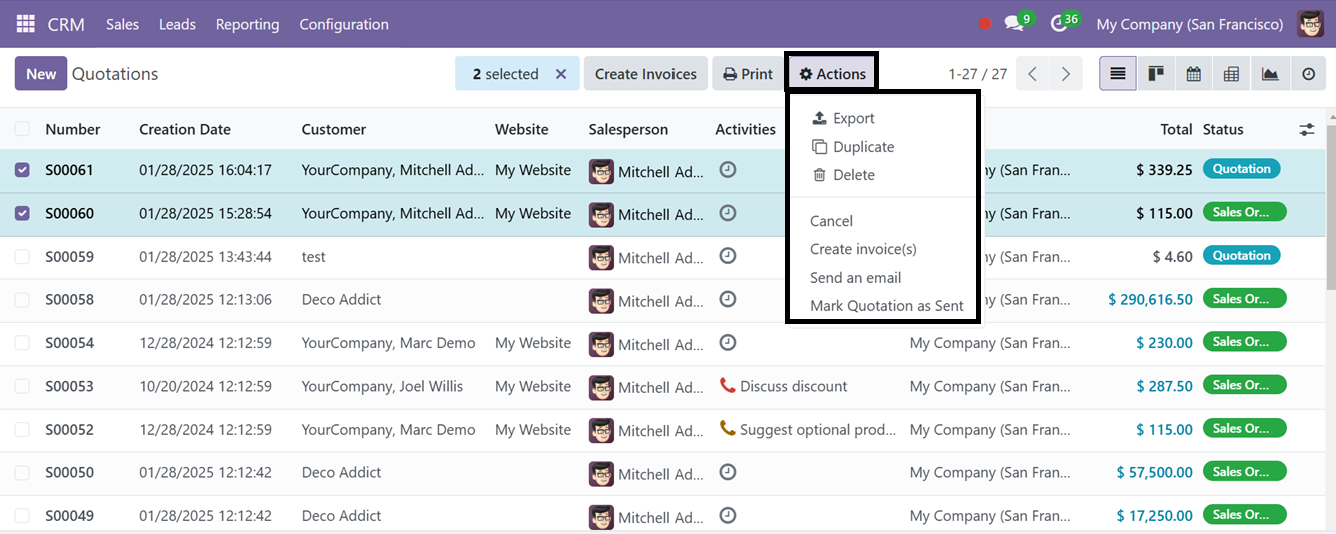
After selecting a quotation, you can use the 'Actions' button to perform various actions, such as Export, Duplicate, Delete, or Cancel the quotation directly from the dashboard without opening the configuration form view.
The 'Create Invoice(s)' button allows you to generate an invoice directly from the dashboard. Additionally, the 'Send an Email' and 'Mark Quotation as Sent' buttons enable you to email the quotation and mark it as sent, respectively.
Teams Menu
To access the sales team dashboard in Odoo 18 CRM, navigate to the 'Teams' option from the dropdown menu under the Sales Menu. This dashboard provides a comprehensive overview of the sales team's pipeline and activities, enabling you to monitor sales dynamics effectively.
To review or modify specific content, simply click on the corresponding title. Selecting 'Pipeline' will open the pipeline view for a particular team, allowing you to manage opportunities within that group. Interactive areas such as Sessions Running, Open Opportunities, Quotations, Orders to Invoice, and Abandoned Carts to Recover enable quick access to the relevant information.

The dashboard offers detailed sales analysis information about each Team, including the number of leads, quotations, opportunities, and orders awaiting invoicing. Each section features a clear graphical representation of new opportunities categorized by designated timeframes. For further analysis, click the three-dot menu located in the upper-right corner of each preview to explore more about the Sales Team regarding various categories such as View, New, and Reporting and Configuration.
You can manage Leads, Opportunities, Sales Orders, and Invoices quickly from this three-dotted menu of each Team card. Additionally, new opportunities or quotations can be created directly from these windows, and get the Reporting analysis of each of these sales specifics using the tools available within the Odoo 18 CRM module. Also, you can configure various settings options regarding the particular team using the ‘Configuration’ button. This streamlined approach simplifies managing the sales process and enhances team productivity.
To create a new Sales team, you can go to the ‘Sales Team’ section of the ‘Configuration’ Menu.
Customers Menu
The CRM module allows you to store and manage all customer information, including contact details. To access these stored contacts, navigate to the Sales menu and select Customers. Here, the customer details are displayed in this window using the Kanban view. To view or modify a specific record, simply click on it. Additionally, you can switch to the List view by selecting its respective icon located in the upper-right corner of the window.
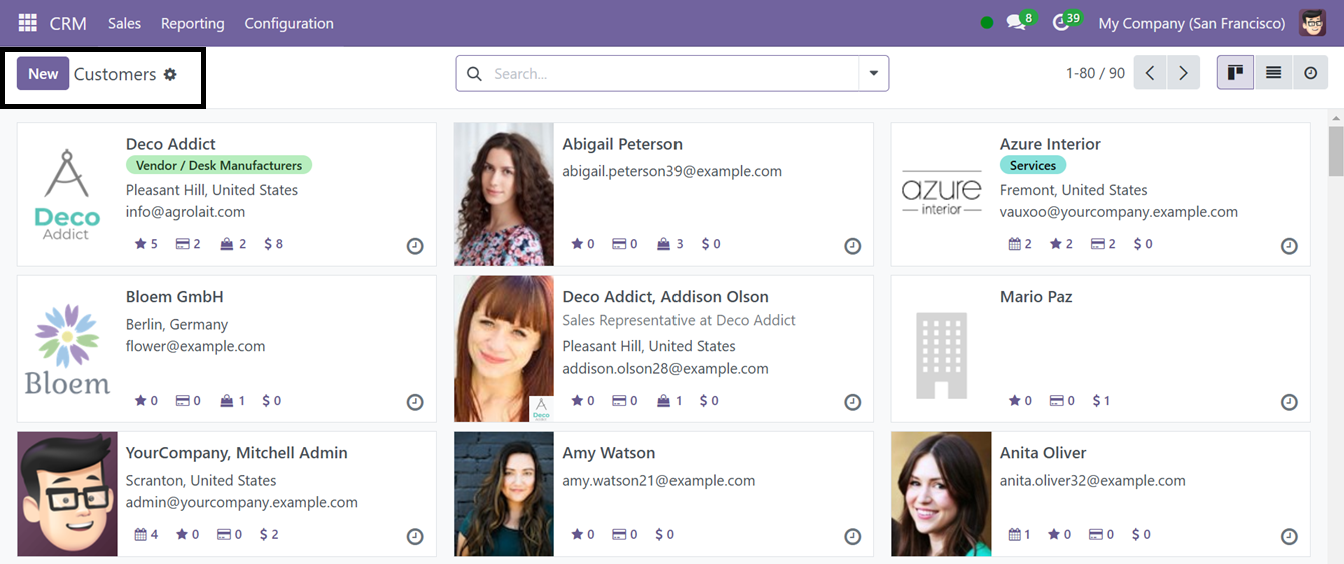
The Kanban view of each customer card shows a quick overview of their Name, Address, and Contact along with the total number of Opportunities, Purchases, Shopping carts, and Sales Orders related to the customer. Using the ‘Activity’ icon, you can schedule any activity with the customer.
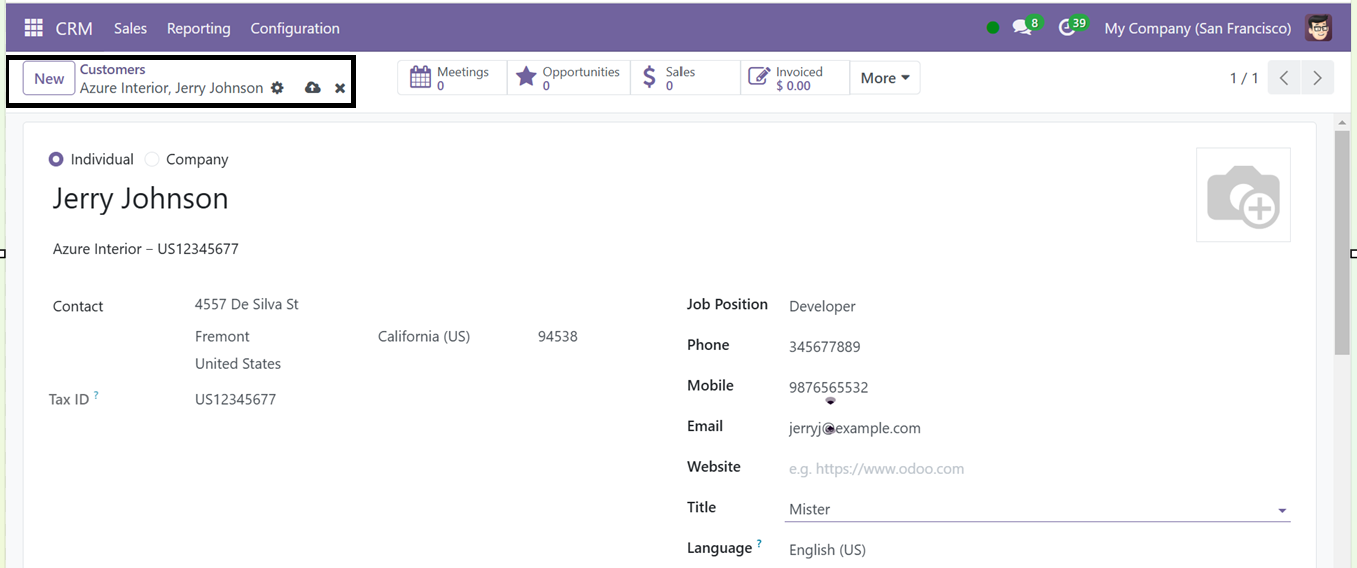
To create a new customer record, click on the ‘New’ button and mention whether it is an Individual or Company. Then, edit the basic customer details including the Name, Company, Contact Address, Job Position, Phone, Email, Title, Languag,e etc, as illustrated in the screenshot below.

In the 'Contacts & Addresses' tab, click the 'Add' button to enter the customer's contact details individually, particularly when multiple addresses are available. The 'Add’ button will open a new pop-up window, where you can choose the address type whether it is a Contact, Invoice Address, Delivery Address, or Other Address.
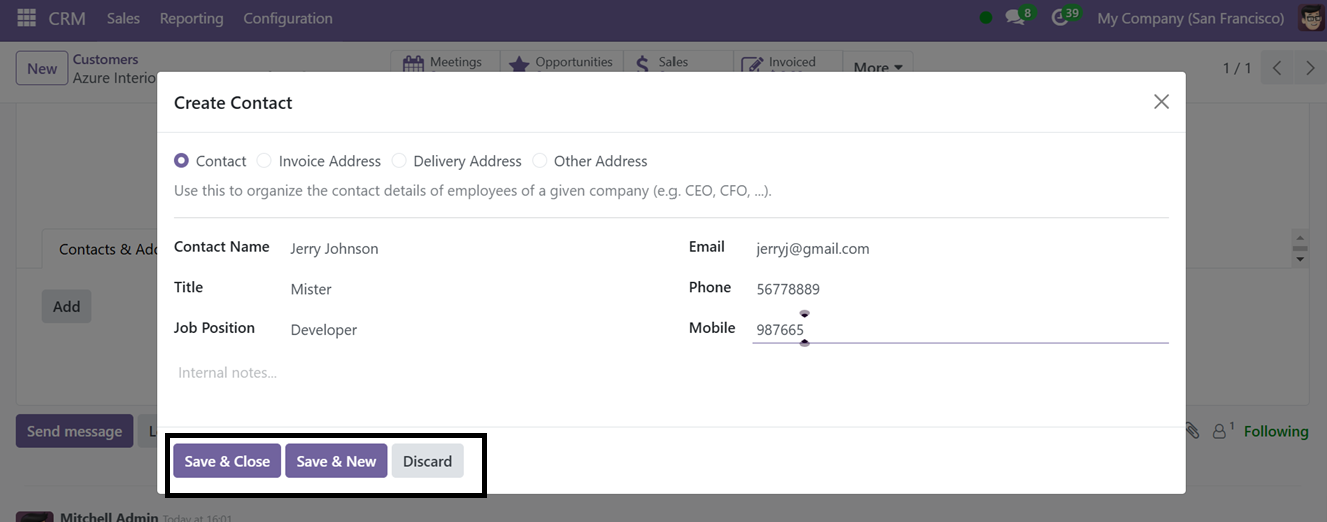
Then, edit the Contact Name, Title, Email, Phone, and other relevant information and save the address. Using this method, you can save multiple addresses of a particular customer.
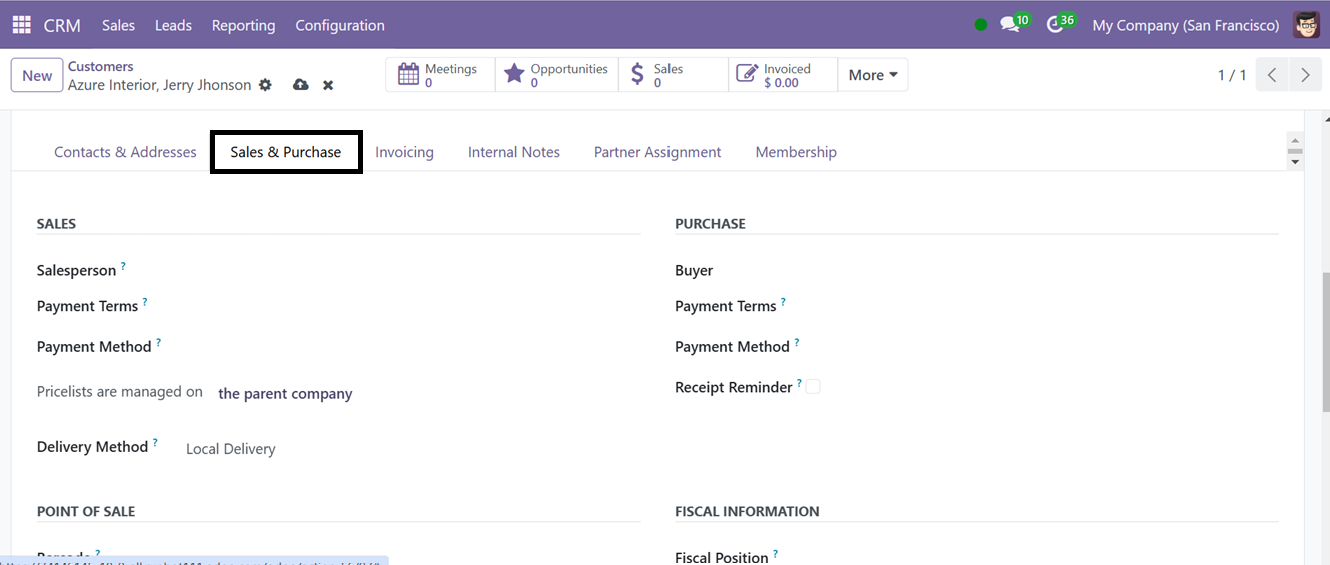
Under the ‘Sales & Purchases’ tab, you can configure the customer sales and purchase specifics including Salesperson, Payment Terms, Payment Methods, Buyer, FiscalPosition, Barcodes, etc in the SALES, PURCHASE, POINT OF SALE, FISCAL INFORMATION tab sections.
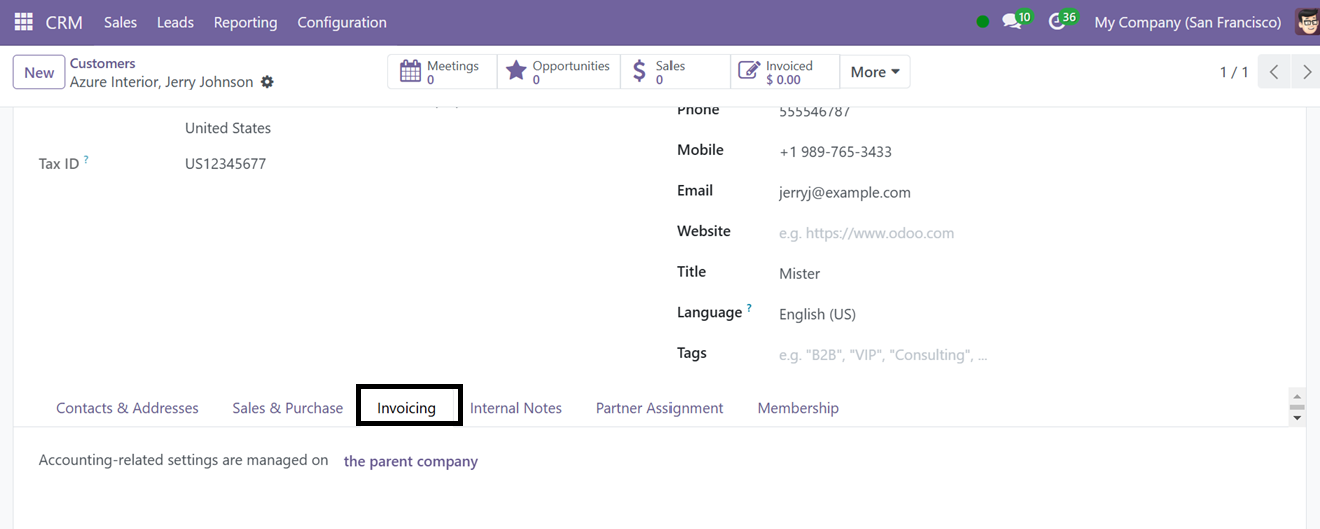
The ‘Invoicing’ tab can be used for invoice and accounting-related settings.
The ‘Internal Notes’ tab can be used to provide any information regarding the customer.

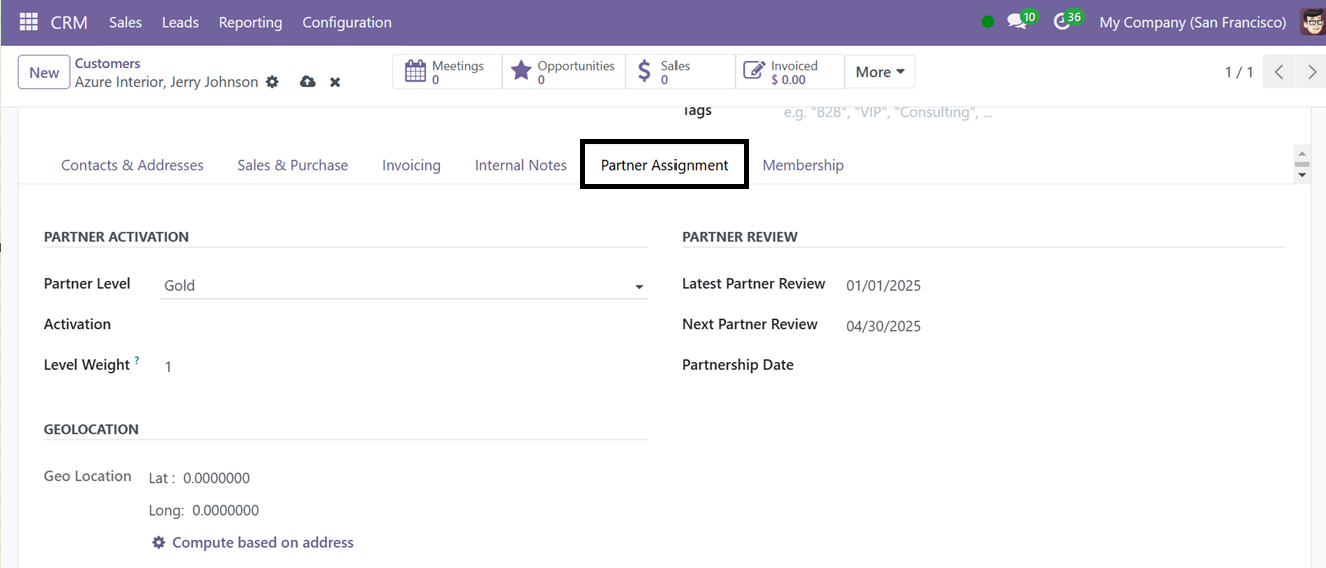
By utilizing the ‘Partner Assignment’ tab, you can configure the partnership details and Geolocation of the customer.
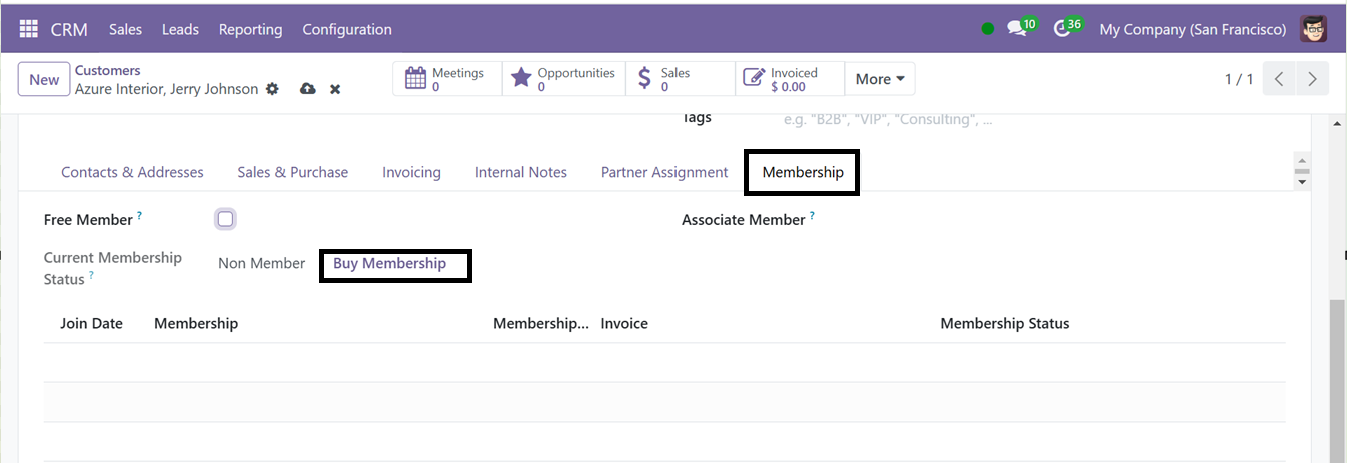
Finally, the ‘Membership’ tab can be used to manage the customer membership specifics including Free Membership, Associate Membership, Current Status, Joining Date etc. To add a new membership, click on the ‘Buy Membership’ button.
After saving all these details, the new customer data will be added to your CRM customer database and you can utilize the data for creating various Sales, Quotations, Leads, etc.

Odoo Comprehensive Functional Exam | Odoo 17 Certification
The Certificate Level of the Odoo 17 Certification qualification has six exams that will introduce you to the fundamentals of accountancy, finance and business. Each exam is directly relevant to the work that you do on a day-to-day basis.